background image

22 


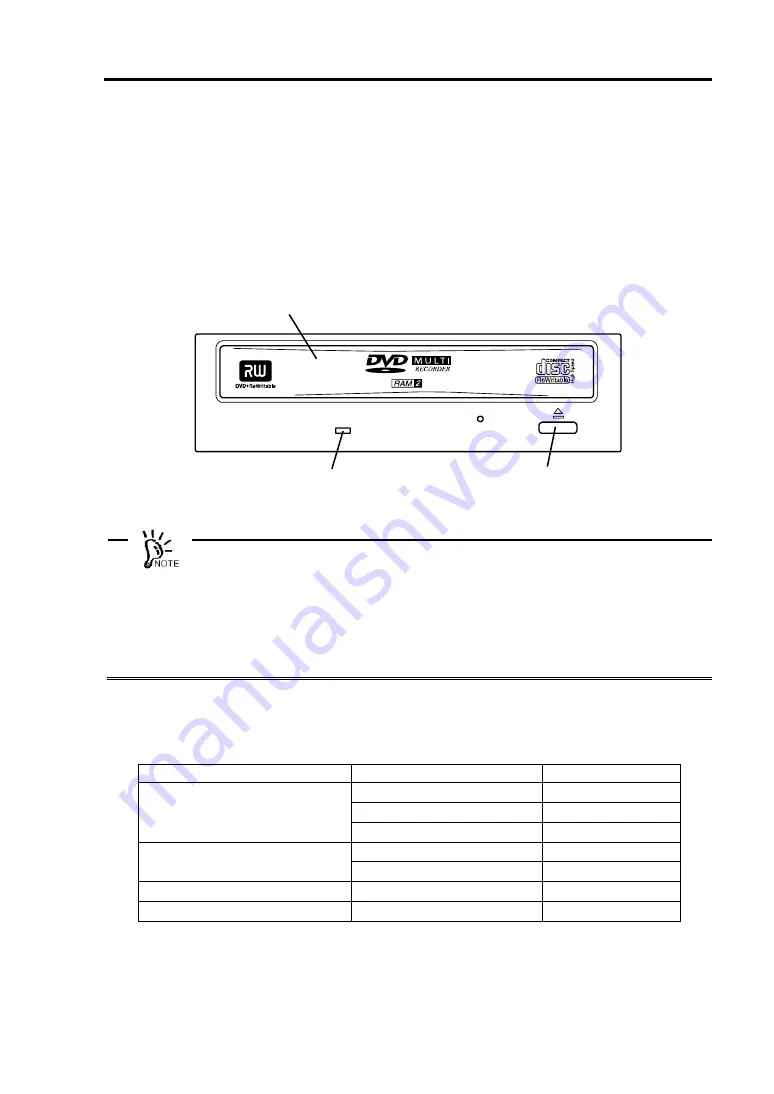
イジェクトボタンとビジーインジケータ 

本製品前面のフロントパネルには、トレーの開閉を行うためのイジェクトボタンと動作状
態を表示するビジーインジケータがあります。


イジェクトボタンは本製品にセットしたディスクをイジェクト(排出)するときに押しま
す。ただし、ソフトウェアによってイジェクトを禁止されているときは、このボタンを押
してもディスクはイジェクトされません。


お使いになる環境(本体装置やオペレーティングシステム、デバイスドライバ、フォー
マットソフトなど)によっては、ディスクを正しくイジェクトさせるために決められ
た手順を行う必要がある場合があります。また、イジェクトボタンを押さなくても本
体装置の画面上からイジェクトすることができる場合もあります。


ビジーインジケータが点灯している間はイジェクトボタンを押さないでください。ビ
ジーインジケータが点灯している間は、イジェクトボタンを押しても、ビジーインジ
ケータが消灯するまでイジェクトされません。


ビジーインジケータは、セットしたディスク内のデータのシーク中やフォーマット中、デー
タのリード中/ライト中に緑色に点灯します。


挿入メディア


動作状態


表示


書き込み中


グリーン点滅


読み取り中


グリーン点灯


DVD-RAM

ディスク


待機中


消灯


読み取り中


グリーン点灯


CD-ROM/CD-DA

などのディスク

待機中


消灯


ディスク未挿入


— 

消灯


ディスク挿入

/

排出時


— 

グリーン点滅


トレー


ビジーインジケータ


イジェクトボタン


Summary of Contents for N8151-74

Page 1: ...N8151 74 内蔵 DVD RAM Built In DVD RAM ユーザーズガイド User s Guide 製品をご使用になる前に必ず本書をお読みください 本書は熟読の上 大切に保管してください Make sure you read this manual before using the product After reading this manual carefully store it in a safe place ...

Page 2: ......

Page 3: ...ks of Microsoft Corporation in the United States and other countries The company and product names contained in this manual are trademarks or registered trademarks of the respective companies Windows Server 2003 is an abbreviation for Microsoft Windows ServerTM 2003 Standard Edition operating system and Microsoft Windows ServerTM 2003 Enterprise Edition operating system Windows XP is an abbreviati...

Page 4: ...out prior notice 3 Reprinting or changing of this document without prior approval of NEC is prohibited 4 All efforts have been made to ensure that the contents of this manual are correct however should any doubts arise or errors or missed entries be detected NEC would greatly appreciate it if our dealers are informed about it 5 Please note that in no event shall NEC be liable for any damages whate...

Page 5: ...a degree of danger These terms are defined as follows 人が死亡する または重傷を負うおそれがあることを示します WARNING Failure to heed this sign could result in serious injury or death 火傷やけがのおそれ および物的損害の発生のおそれがあることを示します CAUTION Failure to heed this sign could result in personal burn or injury and or damage to properties また 注意事項の説明の中では 絵表示を使用して注意の内容を表しています 絵表示の 意味は次のとおりです Precautions against hazards are presented with the fol...

Page 6: ...or any damages to property that may occur as a result of using the product in such facilities equipment or control systems 分解 修理 改造はしない Do not disassemble repair or alter the Built in DVD RAM drive 修理技術者以外の人は 本書および本体装置に添付の説明書に記載されていない分 解 修理 改造を絶対に行わないでください 感電したり 発火したり 異常動作 してけがをすることがあります Never attempt to disassemble repair or alter the Built in DVD RAM drive on any occasion other than described in...

Page 7: ...rtain current flows in the computer Having your body touch parts in the product in such condition may cause an electric shock 針金や金属片を差し込まない Keep needles or metal objects away from the product ディスク挿入口から金属片や針金などの異物を差し込まないでください 感電の危 険があります Do not insert needles or metal objects into the product from the disk insertion port Failure to follow this warning may cause an electric shock 本製品の内部をのぞかない Do not...

Page 8: ...duct Contact your service representative 指定以外のケーブルは使わない Use the authorized cables only 弊社が指定するケーブル以外のケーブルを使わないでください 指定以外のケーブ ルを使用したり誤接続した場合 ショートにより火災を起こすことがあります Use only the cables authorized by your service representative Use of an unauthorized cable or connection by unauthorized cabling may cause a fire 損傷したケーブルを使わない Do not use any damaged cable ケーブルを接続する前に ケーブルコネクタが破損していたり コネクタピンが曲 がっていたり 汚れていな...

Page 9: ...by radio wave トレーを引き出したまま放置しない Do not leave the tray ejected 引き出したトレーの間からほこりが入り誤作動を起こすおそれがあります また トレーにぶつかりけがをするおそれがあります Leaving the tray ejected may cause dust to enter into the product through the ejected tray This may then cause malfunction In addition people may hit on the tray to be injured 雷がなったら触らない Do not touch the unit when it thunders 雷が発生しそうなときは本体装置の電源コードをコンセントから抜いてください また電源コードを抜く前に雷が鳴りだ...

Page 10: ...ning label is put on a part having hidden potential of danger within the product or the area around such part It is intended to make you always conscious of possible danger when you operate the product Do not peel off any warning label Also do not make it dirty If a warning label is not put on peeling off or unreadable due to dirty contact your service representative The label put on the product d...

Page 11: ...録 A C から構成されています 本製品を購入されてから初めて取 り扱う場合は第 1 章から順に読んでください 本製品の取り扱い方法を知りたい場合は 第 2 章から読んでください また 本製品に異常が起きた場合は第 4 章を参照してくださ い 次にそれぞれの章で説明している内容について簡単に説明します 第 1 章 はじめてお使いになるとき 本製品の特長や各部の名称と機能 本体装置への取り付け方法を順を追って説明しま す 第 2 章 日常の使用方法 DVD RAM CD ROM 以下ディスクと呼びます ディスクを本製品にセットする方法 および取り出し方やデータの取り扱いについて説明します 第 3 章 クリーニング 本製品の輸送 本製品およびディスクのクリーニング方法について説明します また 本製品を輸送 するときの手順についても説明します 第 4 章 故障かな と思ったときは 本製品が思うよ...

Page 12: ... 11 レールの取り付け 12 5 25 インチデバイスベイへの取り付け 13 インタフェースケーブルの接続 17 電源ケーブルの接続 19 自己診断の実行 19 BIOS のチェック 20 デバイスドライバのインストール 20 第2章 日常の使用方法 21 電源の ON OFF 21 イジェクトボタンとビジーインジケータ 22 ディスクのセット 23 ディスクのイジェクト 25 ディスクの手動イジェクト 26 データの書き込み 読み取り 27 取り扱い上の注意 大切なデータを守るために 27 データのバックアップ 28 ディスクのライトプロテクト 28 日常の保守 クリーニング 29 第3章 クリーニング 本製品の輸送 30 本製品のクリーニング 30 本体のクリーニング 30 レンズのクリーニング 31 ディスクのクリーニング 32 本製品の移動 輸送について 32 第4章 故障かな ...

Page 13: ...3 付録B DVD RAM ディスクについて 37 DVD RAM ディスクの取り扱い上の注意 38 付録C 推奨品 39 ...

Page 14: ... にしないでください 本製品の故障の原因 となったり 書き込んだデータを失ったりすることがあります ディスクの挿入 取り出しは 本製品がディスクの挿入 取り出しを行える状態に なっていることを確認してから行ってください 無理やりディスクを挿入したり 取り出したりすると 本製品およびディスクが破損することがあります ディスクはシステムの起動後に挿入してください また 取り出しはシステムを 終了する前に行ってください ディスクを挿入したまま システムを起動したり 終了したりするとデータが壊れるおそれがあります ディスク以外のものを本製品に挿入しないでください 本製品の故障の原因とな ります 特にディスクをケースから取り出すときに ディスクの取扱説明書やラ ベルなどがくっついていることがありますので注意してください 本製品を移動する前にディスクを取り出し トレーを閉じてください ディスク を入れ...

Page 15: ... 3 章を参照してください 本体のお手入れについて 本体装置の電源を OFF にしてください よごれはやわらかい乾いた布で軽くふき取ってください よごれがひどいときは うすめた台所用洗剤 中性 に布をひたし よくしぼっ てからふいてください 化学ぞうきんをご使用の際は その注意書に従ってください ベンジンやシンナーなどの溶剤を使わないでください 本製品 消耗品の廃棄について 本製品の廃棄または使用できなくなったディスクの廃棄については各自治体の廃 棄方法に従ってください DVD RAM ディスクに保存されているデータは 第三者によって復元や再生 再 利用されないようお客様の責任において確実に処分してから廃棄してください 個人のプライバシーや企業の機密情報を保護するために十分な配慮が必要です ...

Page 16: ...置で ローエ ンドからハイエンドまでのコンピュータシステムで使用するために設計された 大容量の 高性能 DVD RAM 装置です 多様なメディアを書き込み 読み取り可能 書き込み 読み取り 大容量 DVD RAM 片面で 4 7GB 両面で 9 4GB DVD RAM 読み取り DVD ROM 多機能 CD ROM ダイレクトオーバーライト CD R 2MB のデータバッファ CD RW データの読み取り 書き込み 標準規格をサポート 業界標準の ATA インタフェースをサポート 高速データ転送 DVD RAM フォーラムの統一規格 Ver 2 1 Ver 2 2 に準拠 最大 16620KB 秒 高品質 信頼性の高いリード ライトヘッドを採用 最新の転送モードをサポート 高音質で再生 Ultra DMA モード 2 モード 4 に対応 高耐塵埃構造 マルチワード DMA モード 2 PI...

Page 17: ... い M3 ネジ ネジ部長さ 6mm 本製品を譲渡する場合には 本書を併せて譲渡してください 箱と緩衝材は本製品の移動時や保管時に使用しますので大切に保管しておいてくだ さい 本製品には データ用ディスクは含まれていません 販売店で別途購入してください 保証書 は 販売店で所定事項を記入してお渡しします 記載内容を確認の上 大 切に保管してください 保証期間中に故障した場合は 保証書 の記載内容に基づ き無料修理いたします 内蔵 DVD RAM 装置 レンズクリーナー IDE ケーブル デバイスドライバ セット ネジ 4 本 注意事項 1 枚 保証書 ユーザーズガイド 本書 ...

Page 18: ...タン ディスクをセットするときや取り出すときに押すボタン 電源が OFF のときおよびプログラ ムで禁止されているときは動作しません 3 強制イジェクトホール ピン まっすぐに伸ばしたクリップなど を押し込むと 手動でトレーをイジェクトできる イジェクトボタンやソフトウェアからイジェクトできないときに使ってください 4 ビジーインジケータ 電源が入っていると インジケータは次のように点灯する 挿入メディア 動作状態 表示 書き込み中 グリーン点滅 読み取り中 グリーン点灯 DVD RAM ディスク 待機中 消灯 読み取り中 グリーン点灯 CD ROM CD DA などのディスク 待機中 消灯 ディスク未挿入 消灯 ディスク挿入 排出時 グリーン点滅 1 4 3 2 ...

Page 19: ...9 背面 1 電源コネクタ 電源ケーブルを接続するコネクタ 2 IDE インタフェースコネクタ IDE バスに接続するコネクタ 3 デバイス設定ピン 内部設定をするピン 4 オーディオコネクタ オーディオケーブルを接続するコネクタ 5 未使用コネクタ 何も接続しないでください 5 4 3 2 1 ...

Page 20: ... 5 25 インチデバイスベイに取り付けることができます セットアッ プの順序は次のとおりです ステップ 1 デバイス設定ピンの確認 Ð ステップ 2 レールの取り付け Ð ステップ 3 5 25 インチデバイスベイへの取り付け Ð ステップ 4 インタフェースケーブルの接続 Ð ステップ 5 電源ケーブルの接続 Ð ステップ 6 自己診断の実行 Ð ステップ 7 BIOS のチェック Ð ステップ 8 デバイスドライバのインストール ...

Page 21: ...ス上に接続されるデバイ スは それぞれ異なる ID を設定しておかないと正しく動作しません ID には MASTER SLAVE CABLE SELECT の 3 つがありますが 本製品は標準 装備の光ディスク装置 以下 ODD と呼びます MASTER 設定と同一バス上に接続する ため SLAVE で使用してください ID は 本製品背面にあるデバイス設定ピンのピン 1 3 を使って設定できます 本製品は 工場出荷時 SLAVE に設定されています MASTER ピン 1 SLAVE ピン 2 CABLE SELECT ピン 3 設定する ID のピンにデバイス設定ピンを取り付ける ...

Page 22: ...5 25 インチデバイスベイにあったものを取り付けます 本体装置によってはレールを使用せず 直接本体装置の 5 25 インチデバイスベイのフレー ムに本製品を固定する場合もあります この場合はレールを取り付ける必要はありません 本製品をじょうぶで平らな場所に置いて レールを本製品に添付のネジを使って本製品の 左右に取り付けます 下図は一例です レール等の取り付けの詳細については 取り付ける本体装置の説明書を参照願いま す ネジは本製品に添付のネジ 4 本 を使用してください 添付のネジは M3 ネジ ネ ジ部長さが 6mm です ...

Page 23: ...れています このまま取り付けると内 部の部品に触れて 感電するおそれがあります 高温注意 本体装置の電源をOFFにした直後は 内蔵型のハードディスクなどをはじめ装置内 の部品が高温になっています 十分に冷めたことを確認してから取り付け 取り 外しを行ってください 本製品は標準実装の ODD と同一バス上に接続してください 本製品に添付の IDE インタフェースケーブルは MASTER SLAVE 間の線長が短いため ODD と隣接し たデバイスベイに取り付けてください 本体装置によっては 本製品を縦向きにして取り付けることができる場合もありま すが 縦向きに取り付けた場合は 8cmCD を使用できません 8cm の CD を使用す るときは横向きに取り付けてください 本製品は標準装備の ODD と隣接してデバイスベイに取り付けてください また マ ザーボード上のコネクタ 本製品 ODD の...

Page 24: ...14 ...

Page 25: ...15 本製品にレールを取り付けた場合 1 本体装置の電源を OFF にして 電源コードをコンセントから抜く 2 本体装置のカバー類を取り外す 詳しくは本体装置に添付の説明書を参照してく ださい 3 本製品を 5 25 インチデバイスベイに取り付ける ゆっくりとていねいに挿入してください ...

Page 26: ...を OFF にして 電源コードをコンセントから抜く 2 本体装置のカバー類を取り外す 詳しくは本体装置に添付の説明書を参照してく ださい 3 本製品を 5 25 インチデバイスベイに差し込む 4 添付のネジ 4 本 M3 ネジ ネジ部長さが 6mm で本製品を 5 25 インチデバイス ベイに固定する 左右の側面から各 2 本のネジで本製品を固定します 左側面 右側面 ODD 本体標準装備 ODD 本体標準装備 本製品 本製品 ネジ 2 本 ネジ 2 本 他の装置の前面と水平になるように位置を合わせる ...

Page 27: ...た場合 ショートにより火災を起こすことがあります 本体装置内部の IDE インタフェースケーブルが二股の場合にはそちらを使って接続 してください なお 接続する順序に注意してください 本体装置内部または本製品に添付の IDE インタフェースケーブルを本製品および標準で搭 載されている ODD に接続し マザーボード上の IDE コネクタに接続します また 不要 となったケーブルは大切に保管しておいてください インタフェースケーブルはマザーボード上のコネクタ 本製品 ODD の順に接続してくだ さい 本製品添付の IDE インタフェースケーブルは MASTER SLAVE 間の線長が短いため 標準装備の ODD と隣接して実装する必要があります マザーボード ODD 光ディスクドライブ 本製品 添付のケーブル IDE コネクタ MASTER SLAVE ...

Page 28: ...18 本体装置にオーディオケーブルがある場合は 本製品の背面にあるオーディオコネクタに 接続してください マザーボード上の オーディオコネクタへ ODD のコネクタおよびマザーボード上の IDE コネクタへ ...

Page 29: ...本製 品の背面にある電源コネクタに差し込みます 本製品に接続できる DC 電源ケーブルについては 本体装置の説明書を参照してくださ い 自己診断の実行 本体装置の電源を ON にすると 本製品は自己診断を自動的に実行します 自己診断の結果は本製品前面のビジーインジケータで表します 実行結果を確認してくだ さい 自己診断の結果 問題がなければビジーインジケータが消灯します インジケータが消灯しなかったり 故障かな と思ったりしたときは 第 4 章を参照し て障害の原因を確認してください DC 電源ケーブル ...

Page 30: ...ー の中などに本体装置に接続したデバイスのタイプなどが表示されています 表示の中に本製品 本製品を接続した IDE バスおよび本製品に割り当てた ID の欄に CD ROM と表示されます および ODD がない場合は 次のことが考えられます インタフェースケーブルおよび電源ケーブルが正しく接続されていない ケーブルを正しく接続してください デバイスの ID 設定が正しくない ID は 重複しないよう設定してください 表示例 デバイスドライバのインストール 本体装置にインストールされているオペレーティングシステムによっては デバイスドラ イバのインストールが必要な場合があります 本製品に添付の 内蔵 DVD RAM 装置ソフトウェアユーザーズガイド と デバイスドラ イバディスク を使って本体装置にドライバをインストールしてください インストールに必要な条件やインストール方法については 添...

Page 31: ...れば 自動的に本製品の電源も ON になります また 本体装置の電源を OFF にすれば 本製品の電源も OFF になります 電源の ON OFF の状態については 本体装置の POWER ランプで確認してください 本体装置の電源の ON OFF を必要以上に繰り返さないでください 本製品および本 体装置や接続している他の機器の誤動作や故障の原因となります 本製品前面にあるイジェクトボタンを押したまま 本体装置の電源を ON にしないで ください 本製品の内部設定が変更され 本製品および本体装置や接続している他の 機器の誤動作や故障の原因となります 本製品前面にあるビジーインジケータが点灯している間は電源を OFF にしないでく ださい ディスク上のデータの一部またはすべてが失われることがあります ...

Page 32: ...ー マットソフトなど によっては ディスクを正しくイジェクトさせるために決められ た手順を行う必要がある場合があります また イジェクトボタンを押さなくても本 体装置の画面上からイジェクトすることができる場合もあります ビジーインジケータが点灯している間はイジェクトボタンを押さないでください ビ ジーインジケータが点灯している間は イジェクトボタンを押しても ビジーインジ ケータが消灯するまでイジェクトされません ビジーインジケータは セットしたディスク内のデータのシーク中やフォーマット中 デー タのリード中 ライト中に緑色に点灯します 挿入メディア 動作状態 表示 書き込み中 グリーン点滅 読み取り中 グリーン点灯 DVD RAM ディスク 待機中 消灯 読み取り中 グリーン点灯 CD ROM CD DAなどのディスク 待機中 消灯 ディスク未挿入 消灯 ディスク挿入 排出時 グリーン点...

Page 33: ...扱ってください 乱暴に取り扱うと ディスクが破損して データの一部またはすべてを失うことがあります うまく本製品にセットできないときは 無理な力を加えてセットしようとせずに いったん本製品からディスクを取り出して セットする方向や向きを確認してくださ い 本製品で使用できないディスクをセットしないでください 本製品の故障の原因とな ります 本体装置によっては 本製品を縦向きにして取り付けることができる場合もあります が 縦向きに取り付けた場合は 8cmCD を使用できません 1 本体装置の電源が ON になっていることを確認する 2 イジェクトボタンを押す トレーが出てきます ...

Page 34: ...24 3 ディスクをトレーにのせる 4 イジェクトボタンを押してトレーを閉じる データ面をトレーに向け レーベルな どの印刷面を上に向ける ホルダーに引っかける ...

Page 35: ...た手順を行う必要がある場合があります また イジェクトボタンを押さなくても本 体装置の画面上からイジェクトすることができる場合もあります ディスクは本体装置の電源を OFF にする前に必ず取り出してください ディスクを セットしたまま本体装置の電源を OFF にするとディスクまたは本製品が損傷するお それがあります ビジーインジケータが点灯している間はイジェクトボタンを押さないでください ビ ジーインジケータが点灯している間は イジェクトボタンを押しても ビジーインジ ケータが消灯するまでイジェクトされません 1 本体装置の電源が ON になっていることを確認する 2 ビジーインジケータが消灯していることを確認する 3 イジェクトボタンを押す トレーが出てきます 4 ディスクの端を持って ゆっくりとていねいに本製品からまっすぐに取り出す ディスクは専用のケースに入れて 大切に保管してくださ...

Page 36: ...勧めします 分解 修理 改造はしない 修理技術者以外の人は 本書および本体装置に添付の説明書に記載されていない分 解 修理 改造を絶対に行わないでください 感電したり 発火したり 異常動作 してけがをすることがあります ディスクが通常の方法でイジェクトできなくなったときにのみ ここで示す方法を 行ってください 正常にイジェクトできるときに手動でイジェクトすると故障の原 因となります 本体装置の電源が OFF の状態で手動イジェクトを行ってください 本体装置の電 源が ON の状態で手動イジェクトを行うと ディスク内のデータの消失や本製品 および本体装置の故障の原因となります 折れやすいものは強制イジェクトホールに押し込まないでください ディスクの排出ができなかった原因が分からない場合は保守サービス会社にご連 絡ください そのままでご使用になると ディスクが挿入できなかったり 再び取 り出せ...

Page 37: ...スクの排出ができなかった原因を確認した後 異常がなけれ ば電源を ON にして イジェクトボタンを使って閉じてください その後も続いてイジェ クトできない場合は お買い求めの販売店または保守サービス会社に連絡してください データの書き込み 読み取り DVD RAM ディスクへの書き込みや本製品で使用できるディスクの読み取り方法は 使用 しているオペレーティングシステムおよびアプリケーションの説明書を参照してください 取り扱い上の注意 大切なデータを守るために DVD RAM ディスクも他の記録媒体と同じようにデータの保全性が 100 保証されている ものではありません DVD RAM ディスクに保存した大切なデータをメディアの欠陥や ハードウェア的な誤動作などによる消失や破壊などの問題を回避するためにも次のような 方法でデータを取り扱うことをお勧めします ...

Page 38: ...れたデータの 3 世代管理を お勧めします これは DVD RAM ディスクを 3 枚 A B C 使用して 1 日目はディスク A にデータを バックアップしたならば 2 日目にはディスク B にバックアップし 3 日目にはディスク C にバックアップし A B C と順番にデータをバックアップしていくものです こうしておけば ディスク C がリードエラーを起こしたとしてもディスク B のデータを使 用すればデータは復旧できます また ディスク B がリードエラーを起こしたとしてもディ スク A のデータを使用することで大切なデータは復旧できます ディスクのライトプロテクト 重要なファイルが保存されている DVD RAM ディスクをセットしているときは ライトプ ロテクトをしてください 災害や停電による突然の電源 OFF など万一のときにもディスク の中のファイルは保護されます また 誤...

Page 39: ...のレンズにほこりなどが付着して 正常に読み書きできなくな るおそれがあります 使用環境や使用回数によって異なりますが 添付のレンズクリーナーを用いて 2 ヶ月に 一度お手入れすることを推奨します クリーニングの詳細についてはこの次の章を参照し てください ディスクのお手入れについて ディスクを長時間使用していると 保管状態によりデータ面にほこりや汚れが付着して データを正しくリード ライトヘッドできなくなることがあります クリーニングの詳細に ついてはこの次の章を参照してください ...

Page 40: ...録 B でも説明しています ご覧ください 本製品のクリーニング 分解 修理 改造はしない 修理技術者以外の人は 本書および本体装置に添付の説明書に記載されていない分 解 修理 改造を絶対に行わないでください 感電したり 発火したり 異常動作 してけがをすることがあります 本体のクリーニング ディスクの挿入口などにほこりが溜まらないよう 定期的に本体のまわりをクリーニング してください 本体装置の電源を OFF にする よごれはやわらかい乾いた布で軽くふき取る よごれがひどいときは うすめた台所用洗剤 中性 に布をひたし よくしぼってか らふく 化学ぞうきんを使用する際は その注意書に従ってください ベンジンやシンナーなどの溶剤を使わない ...

Page 41: ...トレーから レンズクリーナーを取り出す 機種によっては 自動的にトレーが開きますが 異常ではありません 取り出したレンズクリーナーは ブラシ面を下にして専用の保管ケースに収納し てください お知らせ クリーニングの頻度は 使用環境や使用回数によって異なりますが 2ヶ月に一 度はクリーニングを行うことを推奨します また その場合でも正常なデータの 読み書きができないことがある場合には クリーニングの間隔を短く 1ヶ月 す ることをお勧めします レンズクリーニングしてもデータの読み書きに問題が生じる場合は 上記 使い 方 の手順でクリーニング液を使わず繰り返してください 5 6 回繰り返しても 解消されない場合は 他の原因が考えられます お買い上げの販売店にご相談く ださい お願い 添付のレンズクリーナーは 本製品専用です 他の機器には使用しないでくださ い 故障の原因になります ブラシが消耗...

Page 42: ...ィスク清掃をする場合 ディスクに傷がつかないよう注意してください ディスクに 傷がつくと大切なデータを読み取れなくなったり破壊されたりします 本製品の移動 輸送について 本製品を輸送するときは 必ず次の手順に従ってください 分解 修理 改造はしない 修理技術者以外の人は 本書および本体装置に添付の説明書に記載されていない分 解 修理 改造を絶対に行わないでください 感電したり 発火したり 異常動作 してけがをすることがあります 本体装置の電源コードを接続したまま取り付け 取り外しをしない 本製品の取り付け 取り外しを行う前に本体装置の電源をOFFにして 本体装置の 電源コードをコンセントから抜いてください 電源をOFFにしても コードを差し 込んだままだと電気が内部に流れています このまま取り付けると内部の部品に触 れて 感電するおそれがあります ...

Page 43: ... ディスクに過度の力が加わらないよう注意してください 2 本体装置の電源を OFF にして システムを終了した後 電源コードをコンセント から抜く 3 本体装置のカバー類を取り外す 4 本製品に接続している DC 電源ケーブルおよびインタフェースケーブルを取り外 す 5 本製品を本体装置から取り外す レールを取り付けている場合は 下図の手順で本体装置から取り出します 6 レールを本製品に取り付けている場合は レールを取り外す 7 本製品が入っていた箱に本製品を入れて 添付の緩衝材で本製品を固定する ...

Page 44: ...ださい 接続に使用する ケーブルは本体装置内蔵又は本製品に添付されてい るインタフェースケーブルを使用してください 動作しない デバイス設定ピンの 設定を間違えている 本製品にあるデバイス設定ピンを正しく設定してく ださい ID を設定するスイッチ以外は出荷時の設定 にしてください ディスクがトレーの 中に正しく入ってい ない ディスクを正しく入れてください ディスクの挿入方向 を間違っている ディスクを正しい向きにして差し込んでください ディスクをセット できない すでに別のディスク がセットされている セットしているディスクをイジェクトしてからセッ トしてください 本体装置からディ スク 本製品 を認 識できない インタフェースケー ブルが接続されてい ない 本製品 および標準装備の ODD をマザーボード上の IDE コネクタに接続してください 接続に使用する ケーブルは本体装置内蔵...

Page 45: ...の データは読みとることができません 本製品 お よび本体装置の仕様や環境にあったディスクを使 用してください 急激な温度変化を与えた 急激な温度変化のためにディスクや本製品 本体 装置が結露していることが考えられます 急激な 温度変化が合った場合は 1 時間以上待ってから 使用してください データのリード 読み取り がで きない ディスクが汚れている ディスクをクリーニングしてください ディスクがライトプロテク トされている ディスクのライトプロテクトを解除してくださ い データのライト 書き込み がで きない ディスクがフォーマットさ れていない または 本製 品や本体装置の環境に合っ ていない形式でフォーマッ トされている ディスクを本製品や本体装置の環境に合った形式 でフォーマットしてください 記録しているデー タが必要な場合は 別のディスクを使用してくだ さい 使用している環境温...

Page 46: ... 6MB s Random 平均回転待ち時間含む DVD RAM 260ms DVD ROM 140ms 平均アクセス時間 CD ROM 130ms バッファ容量 2MB 外形寸法 146mm 幅 190mm 奥行き 41 1mm 高さ 質量 約 0 925kg 電源 定格 DC 5V 1 4A DC 12V 1 5A 皮相電力 定格 25VA 環境条件 動作時 周囲温度 10 35 相対湿度 20 80 RH 最大湿球温度 29 結露しないこと 輸送時 周囲温度 ー30 60 相対湿度 5 90 RH 最大湿球温度 29 結露しないこと 振動 動作時 1 96m s 2 以下 輸送時 9 8m s 2 以下 ...

Page 47: ...M ディスクについて 本製品で使用できるディスクは 以下のとおりです 以下のメディアに書き込み 読み取りができます DVD RAM 4 7GB 片面 DVD RAM 9 4GB 両面 以下のメディアの読み取りができます DVD ROM CD ROM CD R RW 本製品で使用する DVD RAM ディスクは 弊社が提供する DVD RAM ディスクまたは 推奨品を使用することをお勧めします 詳しくは付録 C をご覧ください ...

Page 48: ...ど 電磁波による電波障害の発生源の近くには置かないでくださ い DVD RAM ディスクのデータが損なわれることがあります DVD RAM ディスクは直射日光を避け ヒータその他の熱源から遠ざけて保管し てください DVD RAM ディスクは 室内温度 10 50 相対湿度 3 85 のほこりの ない場所で保管してください DVD RAM ディスクを使用するときは 温度勾配 10 時間 1 時間に 10 以内の温度変化 で室温 温度が 5 35 湿度が 15 85 に戻してから使用してください DVD RAM ディスクは 常に添付の保護ケースに収納し ポリ袋に入れて密封し てください DVD RAM ディスクのデータ面を手やもので触れないでください 飲食や喫煙をしながらの取り扱いは避けてください DVD RAM ディスクは 専用のプラスチック保護ケースに入れて水平または垂直 な状態にして保...

Page 49: ...39 付録C 推奨品 DVD RAM ディスクについて DVD RAM ディスクは 松下電器産業製または日立マクセル製を推奨します クリーニングキットについて クリーニングキットは 松下電器産業製レンズクリーナー LF K123LCJ1 ディスククリー ナー LF K200DCJ1 を推奨します ...

Page 50: ... drive read Chapter 2 and following See Chapter 4 when an error occurs in the Built in DVD RAM drive The following describes the contents of each chapter or appendix simply Chapter 1 First Use of Built in DVD RAM Drive Describes the features of the Built in DVD RAM drive part names and functions and the installation of the Built in DVD RAM drive into a computer sequentially Chapter 2 Using Built i...

Page 51: ...le to the Built in DVD RAM Drive 58 Executing Self diagnosis 58 Checking by BIOS 59 Installing Device Driver 59 Chapter 2 Using Built in DVD RAM Drive 60 Power On Off 60 Eject Button and Busy Indicator 61 Loading Disk 62 Ejecting Disk 64 Ejecting Disk Manually 65 Data Read Write 66 Notes on Data Handling Security of Important Data 66 Data Backup 67 Disk Write Protect 67 Routine Maintenance Cleanin...

Page 52: ...42 Appendix A Specifications 75 Appendix B Disks 76 Notes on Handling of DVD RAM Disk 77 Appendix C Recommended Devices 78 ...

Page 53: ...r ejected Inserting or ejecting a disk forcibly may cause the Built in DVD RAM drive and or the disk to be damaged Insert a disk into the Built in DVD RAM drive after starting the system completely In addition eject the disk from the Built in DVD RAM drive before exiting the system Starting or exiting the system with a disk remaining inserted may cause some data in the disk to be broken Do not ins...

Page 54: ...uter Wipe out any dirt with soft and dry cloth lightly If heavy dirt is found immerse cloth in diluted kitchen detergent neutral wring out the cloth and wipe the dirt with the cloth Follow the notes on chemical cloth if used Do not use solvents including benzin and thinner Disposal of the Built in DVD RAM Drive and Consumables For the disposal of the Built in DVD RAM drive or disks become unavaila...

Page 55: ...erformance DVD RAM drive is designed to be used in a wide variety of computer systems ranging from low end to high end units Various media available for data read write Data read write Large capacity DVD RAM 4 7 GB for single sided disk 9 4GB for double sided disk DVD RAM Data read DVD ROM Versatility CD ROM Direct overwrite CD R 2MB data buffer CD RW Data read write Industry standard support Supp...

Page 56: ...screw screw length 6 mm When you transfer the Built in DVD RAM drive be sure to include the User s Guide Store the package and protectors securely because they are used in carriage or storage of the Built in DVD RAM drive The Built in DVD RAM drive does not include data disks Purchase them at your service representative Built in DVD RAM Drive Lens cleaner IDE cable Device drivers Screws 4 Caution ...

Page 57: ...rate if the power of the Built in DVD RAM drive is OFF or the relevant program prohibits it from operating 3 Manual emergency ejecting hole Insert a pin such as a clip extended straight into this hole to eject the tray manually The hole is provided to eject the tray manually when the eject button and the relevant software are not available for the ejection 4 Busy indicator The indicator operates a...

Page 58: ...face connector is used to connect the Built in DVD RAM drive to the IDE bus 3 Device ID jumper These pins are used to provide the internal settings for the Built in DVD RAM drive 4 Audio connectors The audio connectors are connected with audio cables 5 Unused connectors Do not connect any cables to these connectors 5 4 3 2 1 ...

Page 59: ...ter is explained below Step 1 Checking device ID jumper Ð Step 2 Attaching rails to the Built in DVD RAM drive Ð Step 3 Installing the Built in DVD RAM drive into 5 25 inch device bay Ð Step 4 Connecting interface cable to the Built in DVD RAM drive Ð Step 5 Connecting power cable Ð Step 6 Executing self diagnosis Ð Step 7 Checking by BIOS Ð Step 8 Installing device driver ...

Page 60: ...ces has a unique ID different from others There are three IDs or MASTER SLAVE and CABLE SELECT The optical disk drive that factory installed in your computer hereinafter referred to as ODD is defined as MASTER device Set the ID of the Built in DVD RAM drive to SLAVE The ID can be set by using jumper pins 1 to 3 on the rear of the Built in DVD RAM drive The Built in DVD RAM drive is defined as SLAV...

Page 61: ...he frame on the 5 25 inch device bay in the computer In this case the rails may not be installed on the Built in DVD RAM drive Put the Built in DVD RAM drive on a rugged and flat table Then install the rails on the right and left sides of the Built in DVD RAM drive by using the screws coming with the Built in DVD RAM drive The following figure shows an example for an installation Refer to the manu...

Page 62: ...our body touch parts in the Built in DVD RAM drive in such condition may cause an electric shock CAUTION Hot surface Immediately after the computer is powered off its internal components such as hard disk drives are very hot Leave the computer until its internal components fully cool down before installing removing any component Connect the Built in DVD RAM drive to the bus to which the factory in...

Page 63: ...53 ...

Page 64: ...he power of the computer and pull out the power cord from the AC inlet 2 Remove the proper covers on the computer Refer to the manual attached to the computer for details 3 Install the Built in DVD RAM drive into the 5 25 inch device bay Insert the Built in DVD RAM drive slowly and carefully ...

Page 65: ... the 5 25 inch device bay 4 Fix the Built in DVD RAM drive to the 5 25 inch device bay with the four screws coming with the Built in DVD RAM drive or M3 screws having screw length of 6 mm Fix the Built in DVD RAM drive to the 5 25 inch device bay with two screws on each of the left and right sides Left side Right side ODD factory installed in the computer Built in DVD RAM Drive Screws 2 Screws 2 L...

Page 66: ...ble included in the computer if the cable has a two way connector Note the connection order Connect the IDE interface cable to the Built in DVD RAM drive the factory installed CD ROM RW drive and the IDE connector on the motherboard Save any cables becoming unnecessary carefully Connect the interface cable coming from the mating connector on the motherboard to the Built in DVD RAM drive and the fa...

Page 67: ...ct the audio cable to the audio connector on the rear of the Built in DVD RAM drive if the computer includes the cable To audio connector on motherboard To connector on the ODD and IDE connector on motherboard ...

Page 68: ... manual of the computer Executing Self diagnosis At the power on of the computer the Built in DVD RAM drive automatically starts the self diagnosis The result of the self diagnosis is indicated by the busy indicator on the front face of the Built in DVD RAM drive Do not forget to check the result If the self diagnosis does not found any problem the busy indicator will go off If the indicator does ...

Page 69: ...ng problems is suspected For the Built in DVD RAM drive the screen display should indicate the IDE bus to which the Built in DVD RAM drive is connected and CD ROM in the ID field assigned to the Built in DVD RAM drive The interface and or power cables are connected incorrectly Connect the cables correctly One or more device IDs are set incorrectly Set any ID to be unique Sample display Installing ...

Page 70: ...r on off status see the POWER lamp on the computer Do not repeat the power on off of the computer needlessly Failure to follow it may cause the Built in DVD RAM drive the computer and or other connected devices to malfunction or be defected Do not turn on the power of the computer with the eject button on the front of the Built in DVD RAM drive remaining pressed Failure to follow it may cause the ...

Page 71: ...d procedure may be required to eject the disk from the Built in DVD RAM drive correctly or the disk may be ejected on the computer screen without the depression of the eject button Do not push the eject button while the busy indicator is illuminating If the eject button is pressed while the busy indicator is illuminating the disk will be ejected only after the busy indicator goes off The busy indi...

Page 72: ...in DVD RAM drive suitably do not add an excess force to load it Instead remove it from the Built in DVD RAM drive and check the direction and orientation in which the disk is placed Do not place any disk unavailable for the Built in DVD RAM drive Failure to follow it may cause the Built in DVD RAM drive to be defected Some computers can be equipped with the Built in DVD RAM drive vertically In the...

Page 73: ...63 3 Put a disk on the tray 4 Press the eject button to close the tray Have data side face on the tray and label printing side face upward Hang disk on holder ...

Page 74: ...e depression of the eject button Be sure to take off the disk before the power of the computer is turned off Turning off the power of the computer with the disk remaining inserted may cause the disk and or Built in DVD RAM drive to be damaged Do not push the eject button while the busy indicator is illuminating If the eject button is pressed while the busy indicator is illuminating the disk will b...

Page 75: ...is installed if you are not a maintenance engineer Failure to follow this instruction may cause an electric shock or a fire as well as malfunctions of the product Try the method described in this section only when the normal method cannot eject the disk The manual disk ejection in the status where the normal method is applicable may cause the Built in DVD RAM drive to be defected Eject the disk ma...

Page 76: ...found and press the eject button If the disk ejection is still disabled contact your service representative Data Read Write For how to write data into a DVD RAM disk and how to read data from a disk available for the Built in DVD RAM drive refer to the manuals of the used operating system and the relevant application Notes on Data Handling Security of Important Data As well as other recording medi...

Page 77: ...disks this method backs up the data in disk A on the first day the data in disk B on the second day and the data in disk C on the third day and then the data in disks A B and C in the order If disk C causes a read error to occur the correct data can be recovered by using the data in disk B If disk B causes a read error to occur the correct data can be recovered by using the data in disk A Disk Wri...

Page 78: ...eaning frequency varies depending on the usage environment and frequency of the Built in DVD RAM drive it is recommended to clean the lens once for two months by using the attached lens cleaner See the next chapter for details of the cleaning Cleaning of disk While a disk is used for a long time the data side may be covered with dust and or dirt This may cause data read write to be done incorrectl...

Page 79: ...scribed in this User s Guide or the manual of the computer in which the product is installed if you are not a maintenance engineer Failure to follow this instruction may cause an electric shock or a fire as well as malfunctions of the product Cleaning of Built in DVD RAM Drive Clean the surrounding area of the Built in DVD RAM drive routinely so that the disk insertion port and other portions may ...

Page 80: ...matically This does not indicate the occurrence of an error Put the removed lens cleaner into the exclusive storage case with the brush side facing downward Remarks The cleaning frequency is desired to be once per 2 months while it varies depending on the usage environment and frequency of the Built in DVD RAM drive If data read write error occurs it is recommended to clean the lens more frequentl...

Page 81: ... or alter the Built in DVD RAM drive Never attempt to disassemble repair or alter the Built in DVD RAM drive on any occasion other than described in this User s Guide or the manual of the computer in which the product is installed if you are not a maintenance engineer Failure to follow this instruction may cause an electric shock or a fire as well as malfunctions of the product Do not install or u...

Page 82: ...and interface cables connected to the Built in DVD RAM drive 5 Remove the Built in DVD RAM drive from the computer If the rails are attached to the Built in DVD RAM drive take off the Built in DVD RAM drive from the computer by the procedure shown in the figure below 6 Remove the rails from the Built in DVD RAM drive if they are attached to the Built in DVD RAM drive 7 Put the Built in DVD RAM dri...

Page 83: ...ection use the interface cable for your computer or that comes with the Built in DVD RAM drive The Built in DVD RAM drive does not operate The device ID jumper is set incorrectly Set the device ID jumper on the Built in DVD RAM drive correctly Leave the settings at the shipment for the switches other than that used to configure the ID The disk is not put on the tray correctly Put the disk on the t...

Page 84: ...disk the Built in DVD RAM drive and or the computer may be condensed due to a rapid temperature change If a rapid temperature change occurs wait for an hour or longer before using the system Data read is disabled The disk is dirty Clean the disk The disk is write protected Release the write protect of the disk Data write is disabled The disk is not formatted yet or formatted in a format which does...

Page 85: ...nsion 146 width 190 depth 41 1 height mm Weight About 0 925 kg Power supply rating 5 VDC 1 4A 12 VDC 1 5A Apparent power rating 25 VA Environmental requirement Operating Ambient temperature 10 ºC 35 ºC Temperature change rate 10 ºC h Relative humidity 20 80 RH Highest dry bulb temperature 29 ºC without condensation Carriage Ambient temperature 30 ºC 60 ºC Relative humidity 5 90 RH Highest dry bulb...

Page 86: ...d data to or from the following media DVD RAM 4 7 GB single sided DVD RAM 9 4 GB double sided The Built in DVD RAM drive can read data from the following media DVD ROM CD ROM CD R RW It is recommended to use DVD RAM disks provided by NEC or other recommended disks for the Built in DVD RAM drive See Appendix C for details ...

Page 87: ...ea not exposed to direct sunshine and far from heat sources such as a heater Store DVD RAM disks in an area at the room temperature ranging from 10 C to 50 C and the relative humidity ranging from 3 to 85 without dust To use the DVD RAM disks return to the operating environment room temperature 5 C 35 C humidity 15 85 at the temperature gradient of 10 C hour temperature change of 10 C or less for ...

Page 88: ...78 Appendix C Recommended Devices Ask your service representative for the recommended DVD RAM disks and cleaning kits ...

Page 89: ...006 Ver 1 日本電気株式会社 東京都港区芝五丁目 7 番 1 号 TEL 03 3454 1111 大代表 NEC Corporation 5 7 1 Shiba Minato ku Tokyo Japan TEL 03 3454 1111 main NEC Corporation 2006 日本電気株式会社の許可なく複製 改変などを行うこと はできません Reproduction of this document or portions thereof without prior written approval of NEC is prohibited ...

Page 90: ......

Page 91: ...N8151 74 内蔵 DVD RAM ユーザーズガイド N8151 74 Built in DVD RAM User s Guide 856 126486 001 A 本書は再生紙を使用しています This manual is printed on recycled paper ...

Page 92: ......

Reviews:

Related manuals for N8151-74