System Configuration 4-51
(2)
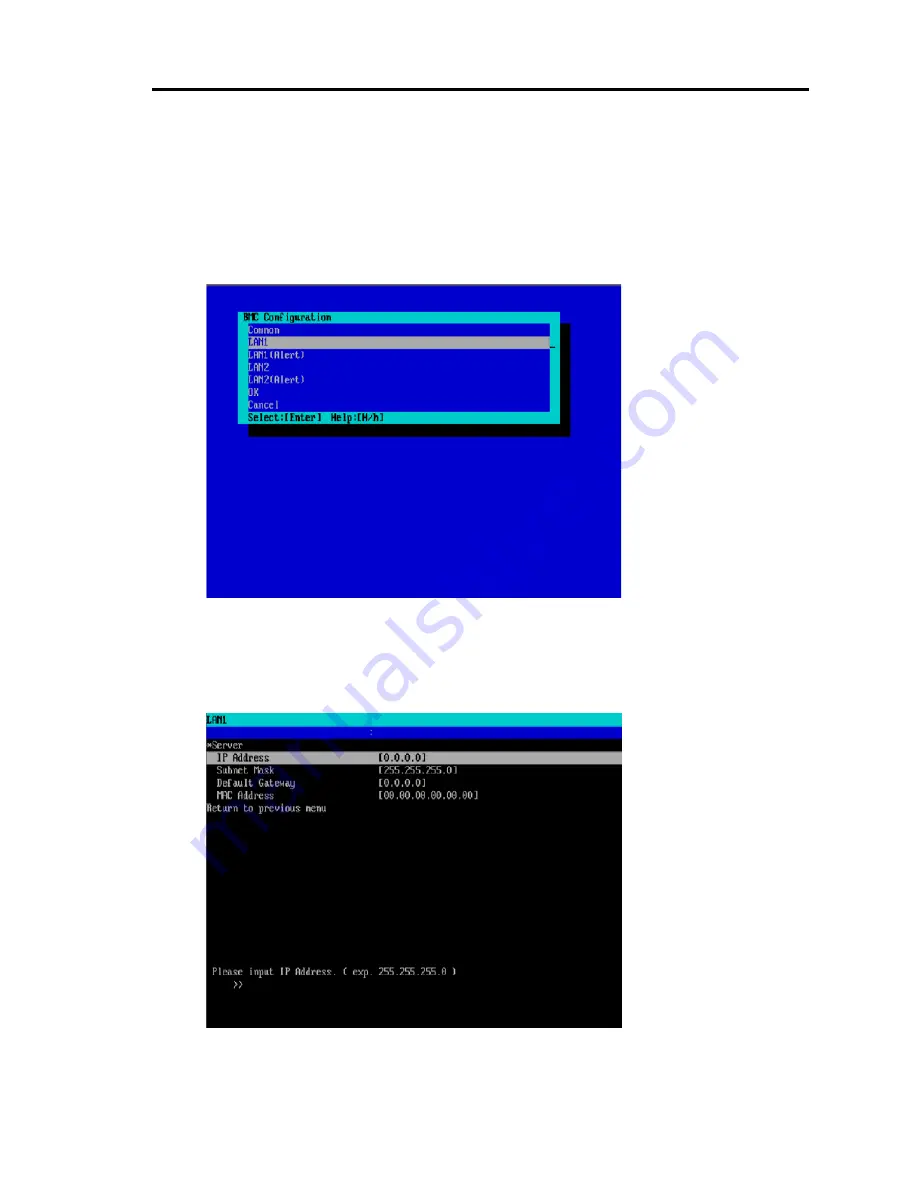
If you cannot use the default IP “192.168.1.1”, start up the “NEC EXPRESSBUILDER”
CD-ROM on the server and select [Tools]
ĺ
[System Management]
ĺ
[Set System
Management Parameters]
ĺ
[Configuration]. Select [New] to register new settings, or
[Change] to change the settings. Then, set IP addresses of the managed LAN ports on the
[BMC Configuration] menu.
LAN1: CPU/IO Module#0 management LAN port
LAN2: CPU/IO Module#1 management LAN port
The following is a configuration screen for LAN1 (CPU/IO module #0). Specify an IP
address to use. Make settings for LAN2 (CPU/IO module #1) in the same manner.
For the settings to take effect, you need to execute [OK] on the previous menu, “BMC
Configuration” window.
Summary of Contents for N8800-096F
Page 8: ...NEC Express5800 WARNING CAUTION CAUTION...
Page 9: ......
Page 15: ......
Page 22: ...Precautions for Use 1 3 Rack model Front Rear...
Page 24: ...Precautions for Use 1 5 Water Cooling kit...
Page 34: ...Precautions for Use 1 15 SAFETY INDICATIONS WARNING 32 5 CAUTION...
Page 35: ...1 16 Precautions for Use WARNING CAUTION P IW 9 6 7...
Page 36: ...Precautions for Use 1 17 CAUTION 1...
Page 37: ...1 18 Precautions for Use WARNING CAUTION...
Page 38: ...Precautions for Use 1 19 CAUTION CAUTION...
Page 39: ...1 20 Precautions for Use WARNING CAUTION...
Page 40: ...Precautions for Use 1 21 CAUTION...
Page 44: ...Precautions for Use 1 25 SAFETY INDICATIONS WARNING POWER CAUTION...
Page 45: ...1 26 Precautions for Use WARNING CAUTION AC 4 5m 14 76 ft V 10A 6 7...
Page 46: ...Precautions for Use 1 27 WARNING CAUTION...
Page 47: ...1 28 Precautions for Use CAUTION NEC...
Page 48: ...Precautions for Use 1 29 WARNING CAUTION...
Page 49: ...1 30 Precautions for Use CAUTION CAUTION...
Page 50: ...Precautions for Use 1 31 CAUTION EIA...
Page 51: ...1 32 Precautions for Use 1 9 836 56 3RZHU KXWH3OXV a e a 173 WR e WR 1 SUHVV IW e 1...
Page 52: ...Precautions for Use 1 33...
Page 53: ...1 34 Precautions for Use 5 5 WARNING...
Page 55: ...1 36 Precautions for Use...
Page 68: ...General Description 2 13 Rack model with the front door open...
Page 73: ...2 18 General Description Rear View Tower model Rack model...
Page 110: ...Windows Setup and Operation 3 15 7 Configure the mirror of the extended volume...
Page 128: ...Windows Setup and Operation 3 33 4 The confirmation dialog box appears Click Yes button...
Page 164: ...System Configuration 4 27 Exit Move the cursor onto Exit to display the Exit menu...
Page 225: ...4 88 System Configuration This page is intentionally left blank...
Page 286: ...Installing and Using Utilities 5 61 Sample screen of Server Maintenance Utility...
Page 327: ...6 14 Maintenance This page is intentionally left blank...
Page 381: ...7 54 Troubleshooting This page is intentionally left blank...
Page 424: ...Specifications A 3...
Page 425: ......


