background image

Safety Information

Summary of Contents for NEFAX655e

Page 1: ...Safety Information ...

Page 2: ...as determined that this machine meets the Energy Star Guidelines for Energy Efficiency What is an Energy Star Machine Energy Star Machines have a feature that allows them to automatically turn off or go to sleep after a period of inactivity ensuring night and weekend shut off ...

Page 3: ...al Do not dispose of batteries in a fire They may explode Check with local codes for possible special disposal instructions SAVE THESE INSTRUCTIONS Certaines mesures de sécurité doivent étre prises pendant l utilisation de matérial téléphonique afin de réduire les risques d incendie de choc électrique et de blessures En voici quelquesunes 1 Ne pas utiliser l appareil prés de l eau p ex prés d une ...

Page 4: ...t should not be opened under any circumstances For United States Users Laser Safety This FAX is certified as a Class 1 Laser product under the U S Department of Health Services DHHS Radiation Performance Standard according to the Food Drug and Cosmetic Act of 1990 This means that the FAX does not produce hazardous radiation CDRH Regulations The Center for Devices and Radiological Health CDRH of th...

Page 5: ...tion If this equipment does cause harmful interference to radio or television receiption which can be determined by one or more following measures Reorient or relocate the receiving antenna Increase the separation between the equipment and the receiver Connect the equipment into an outlet on a circuit different from that to which the receiver is connected Consult the dealer or an experienced radio...

Page 6: ...ment has been tested and found to comply with limits for a Class A digital device pursuant to Part 15 of the FCC Rules These limits are designed to provide reasonable protection against harmful interference when the equipment is operated in a commercial environment This equipment generate users and radiate radio frequency energy and if not installed and used in accordance with the instruction manu...

Page 7: ...or procedures that could affect the proper operation your equipment If they do you will be given advance notice so as to give you an opportunity to maintain uninterrupted service The telephone company may ask you to disconnect this equipment from network until problem has been corrected or you are sure that the equipment is not malfunctioning This equipment may not be used on coin service provided...

Page 8: ...s network protective operational and safety requirements IC does not guarantee the equipment will operate to the user s satisfaction Before installing this equipment users should ensure that it is permissible to be connected to the facilities of the local telecommunication company The equipment must also be installed using an acceptable method of connection In some cases the company s inside wirin...

Page 9: ...nals allowed to be connected to a telephone interface The termination on an interface may consist of devices subject only to the requirement that the sum of the Ringer Equivalence Numbers of all the devices does not exceed 5 HEARING AID COMPATIBILITY For U S A Canada Users This equipment complies with the FCC IC guide lines for hearing aid compatibility OZONE RELEASE For all Users During printer o...

Page 10: ...IX Safety Information LABELS ...

Page 11: ...ods 2 5 Receiving a Document 2 62 6 Making Copies 2 10 Chapter 3 Advanced Facsimile Using the Function Menu 3 1 Broadcast 3 2 Timer TX Delay Transmission 3 3 Mailbox TX 3 4 Print Mailbox RX 3 5 Print Memory RX 3 6 Polling TX 3 7 Polling RX 3 9 Continuous Polling RX 3 10 Relay Initiate 3 11 Using Combination Dial 3 12 JOURNAL Key 3 13 REPORT Key 3 14 Reports 3 15 SCHEDULE Key 3 16 PIN CODE Key 3 17...

Page 12: ...s 6 7 PCL4 Emulation 6 8 Printer Messages 6 10 GDI Printer Feature option 6 11 Scanning TWAIN Driver Option 6 15 Class 1 Fax Modem 6 17 Chapter 7 Maintenance Supplies Loading the Paper 7 1 Clearing Paper Jams 7 4 Changing Toner Cartridge 7 9 Maintenance 7 12 Chapter 8 Troubleshooting Troubleshooting 8 1 Chapter 9 Specifications Physical Specifications 9 1 Electrical Specifications 9 2 Operational ...

Page 13: ...Chapter 1 Introduction ...

Page 14: ... to cover After you have read the manual keep it near your Fax unit for handy reference It should be helpful in solving any operational questions you may have This manual is written to cover the base machine with all the options installed If your unit does not have these options installed just skip that section If you choose to upgrade your unit in the future you will already have the necessary in...

Page 15: ... Document Feed Tray Load your document face down on this tray for faxing or copying 4 Document Alignment Guides Adjust these Guides to fit the width of your original documents 5 Paper Tray You can load up to 250 sheets of Letter size A4 or Legal size paper into the standard Tray You can add another 500 sheets with the optional Paper Feed Unit 2nd cassette 6 Bypass Feed Tray You can feed single she...

Page 16: ...y 8 Program key Press the Program key to enter the set menu and program your desired function using either numeric keys or the arrow shown on the display 9 Yes key Press Yes key to accept the selections made under Program and Function menus 10 No key Press No key to reject the selections made under the Program and Function menus 11 Pin Code key This key is used to input a personal identification n...

Page 17: ... power cord only into a 3 conductor grounded outlet rated for at least 15 amperes Never ground the power cord to a gas pipe or a water pipe Keep the power cord away from hot surfaces Avoid using an extension cord if at all possible If you must use an extension cord use only a 3 conductor cord rated for at least 15 amperes Cords rated for less might overheat and become a fire hazard Do not operate ...

Page 18: ...t on a firm level surface 11 Do not place heavy objects on the ADF Automatic Document Feeder or the Exit Tray 12 Do not disassemble your unit or try to repair it yourself other than as instructed in this Operator Guide Call an authorized service representative for all necessary repairs Incorrect assembly can cause electrical hazards and possible damage to the machine ...

Page 19: ...b will be stored in memory then printed out when reception RX is complete Prints a document during reception Scans a document into memory for transmission Fax Transmission Copy GDI PCL4 Printing The available memory is shared by both jobs and their operations happen simultaneously The document will be printed from the PC during a Fax operation PC Fax Reception Copy Parallel Port Printing Fax Trans...

Page 20: ...set 12 Parallel Connector Provides connection between this unit and a host computer for GDI printing or PCL4 or 5e printing 13 Serial Connector RS232 Provides connection between this unit and a host computer for Class 1 PC faxing and Twain compliant scanning This interface can also be used for printing 14 Network Connector Optional NIC or I Fax Card Provides connection between the unit and the Net...

Page 21: ...um or to clean the interior of the unit 17 Toner Cartridge The Toner Cartridge contains the toner particles used in imaging 18 Drum Cartridge This Drum Cartridge transfers toner to the paper 19 Paper Feed Unit 2nd cassette Optional When installed it permits your unit to print up to 750 uninterrupted pages without reloading paper 750 pages of standard weight Letter A4 size paper including standard ...

Page 22: ...ut fax I Fax copying printing programming and operational functions 2 Resolution keys Press this key to select the desired resolution for scanning Standard Use for normal documents This is the default Fine Use for documents with fine lines or characters Ex Fine Use for very fine maps drawings or extremely detailed originals Half Tone Use for photographs or shaded drawings 3 Original Type key Press...

Page 23: ...sing a 2 5 second delay when dialing This is useful if you must dial a prefix such as 9 to pause briefly in order to access an outside telephone line A P after a series of numbers adds 10 seconds to the normal time the machine waits for a remote receiver to answer a call 22 Speaker key Press this key to switch the unit to the telephone line for direct manual dial from the machine keypad When press...

Page 24: ...s 25 key Press the key to access an internal line or a PSTN line when your unit is set for use over a PBX line 26 Copy key Press the Copy key to initiate copying documents that are loaded on the Document Feed Tray 27 Stop key Use this key to stop copying transmitting dialling waiting to dial or scanning You can also press Stop to return from any operation mode back to the standby status 28 Start k...

Page 25: ...nction is set into the destination fax number Example 0P412641267 Indicates the number of pages Example A single page Indicates when the Internal PBX function is set into the destinations fax number Shown while a document is being transmitted to the other party Indicates when the Sub Address is set into the destination fax number Example 4126412 8108 Shown while a document is being received from t...

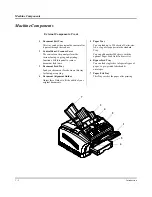
Page 26: ...Machine Components 1 13 Introduction ...

Page 27: ...Chapter 2 Basic Operations ...

Page 28: ...ss of transmitting data from memory receiving data or printing a file from the PC Note If the unit runs out of memory during scanning you can use manual transmission by pressing the Speaker key or by using the Direct Transmit ADF TX procedure 1 Place your document face down on the Document Feed Tray 2 Adjust the Document Side Guides to touch the edges of the document 3 Use the TYPE ORG key to sele...

Page 29: ... When your unit senses it will run out of memory of the next page of your document is scanned it will stop and ask if you wish to send what is already stored in memory When you answer YES it dials the number and sends those pages When sufficient memory has been freed up it begins scanning again It then places a second call automatically and sends the remainder of the pages On a report all of this ...

Page 30: ...ace your document face down on the Document Feed Tray 2 Adjust the Document Side Guides to touch the edges of the document 3 Use the TYPE ORG key to select the desired contrast 4 Use the Resolution key to select the desired resolution 5 Press the Speaker key 6 Enter the remote fax number using one of the entry methods 7 Listen until the remote fax unit answers then press the Start key 8 To stop a ...

Page 31: ...mit is 30 digits 1 Place your document face down on the Document Feed Tray 2 Adjust the Document Side Guides to touch the edges of the document 3 Use the TYPE ORG key to select the desired contrast 4 Use the Resolution key to select the desired resolution 5 Press a One Touch key The One Touch number should have a at the end indicating an additional key has been programmed to extend the length of t...

Page 32: ...be programmed for Group Dialing The Group Name is shown on the display The unit scans the document and dials the numbers automatically 5 Program Dial Several transmission functions can be programmed in any of the last eight One Touch keys To utilize these functions press the corresponding One Touch key For example if you want to set up an after hours broadcast which is performed regularly you can ...

Page 33: ...hen the transmission is complete this message is displayed The number at the end of the second line indicates the number of pages sent When the document starts to print the following message is displayed The return of the second line shows that other operations such as sending a Fax or making a copy are now available When the final page prints the display display the following message The number i...

Page 34: ...sending location is recognized the blank is filled in with the name or telephone number of the location When the transmission is complete this message is displayed The number at the end of the second line indicates the number of pages sent When the document starts to print the following message is displayed The return of the second line shows that other operations such as sending a Fax or making a...

Page 35: ...or telephone number of the location 4 When the transmission is complete this message is displayed The number at the end of the second line indicates the number of pages sent 5 The document prints into memory 6 When the final page prints the display shows the following message The display indicates the number of pages printed Note If you want to print documents from memory receive please refer to c...

Page 36: ...hen your unit rings the LCD shows this message If for any of the above reasons your unit cannot receive and print the message an error message is displayed 2 Take whatever actions are required to clear the error When the error is removed the unit returns to normal operation and starts printing the documents stored in memory When the final page prints the display shows the following message The dis...

Page 37: ...r documents Use LIGHT for documents with very fine or light characters Use DARK for documents that are dark 5 Use the Resolution key to select the desired resolution Use STD Standard for documents with standard size characters such as typed documents Use FINE for documents with smaller size characters like newsprint Use EX FINE for documents with very fine characters ENTER FAX NO or FUNCTION D FIN...

Page 38: ...s The unit scans the document into memory and then makes copies The unit automatically returns to standby mode This mode does this STACK Default Copies the original document according to the page number order Example If you are making two copies of pages 1 through 4 the copies are produced in this order 1 1 2 2 3 3 4 4 SORTER Copies the original document according to sort order Example If you are ...

Page 39: ...Chapter 3 Advanced Facsimile ...

Page 40: ...key 2 To select an option perform one of the following Press the number of the item you want Or Press FUNCTION a second time and use the arrow keys to go the menu item you want Or Press FUNCTION continually until you reach the menu item you want FUNCTION 1 BROADCAST 2 TIMER TX 3 MAILBOX TX 4 PRINT MAILBOX RX 5 PRINT MEMORY RX 6 POLLING TX 7 POLLING RX 8 RELAY INITIATE NOV 06 15 38 100 SET DOC FACE...

Page 41: ...cations Refer to Chapter 4 Facsimile Programming for more information Procedure 1 Select the Original Type Resolution if necessary and place your document in the Document Feeder face down 2 Press the Function key and enter 1 to select the Broadcast function 3 The following message appears briefly to confirm your selection 4 Enter the Broadcast location number This can be a One Touch key a Speed Di...

Page 42: ...e and Resolution if necessary and place your document in the Document Feeder face down 2 Press the Function key and press 2 to select the Timer TX menu 3 The following message appears briefly to confirm your selection 4 Enter the time you wish the Transmission to begin 5 Enter the destination fax number If you press FUNCTION the available types of Delay Transmissions are manually entered fax numbe...

Page 43: ...nter the correct Mailbox ID and Mailbox PW for successful transmission Procedure 1 Select the Original Type Resolution if necessary and place your document in the Document Feeder Tray face down 2 Press the Function key and press 3 to select the Mailbox TX menu 3 The following message appears briefly to confirm your selection 4 Enter the destination fax number 5 Enter the 20 digit Mailbox ID 6 Ente...

Page 44: ...ax unit can be programmed with up to 10 virtual mailboxes Each Mailbox is assigned a 20 digit Password This Password is required to access the documents setting in your Mailbox Procedure 1 Press the Function key and press 4 to select the Print Mailbox RX menu 2 The following message appears briefly to confirm your selection 3 Enter the 20 digit Mailbox PW to your Mailbox and press YES 4 If you ent...

Page 45: ...X menu 2 The following message appears briefly to confirm your selection 3 Enter your Memory RX password 20 digit and press YES 4 When the content of your Memory RX has printed you are prompted that printing is complete FUNCTION SEL 1 8 OR FUNCTION 5 PRINT MEMORY RX PASSWORD _ OK YES DEL NO PRINT MEMORY RX PRINT COMPLETE ...

Page 46: ...g TX or by Cancel Reservation Session Note You need to set a 4 digit security code to prevent unauthorized polling Procedure 1 Select the Original Type Resolution if necessary and place your document in the Document Feeder face down 2 Press the Function key and press 6 to select the Polling TX menu 3 The following message appears briefly to confirm your selection 4 Enter the 20 digit Polling ID 5 ...

Page 47: ...gle or Multi and press YES to start the Polling session 8 Your document is scanned into memory it is ready to be polled The P in the Message Display indicates the Polling Document is in memory SINGLE MULTI SELECT PUSH YES NOV 06 15 38 92 SET DOC FACE DOWN ...

Page 48: ...irm your selection 3 Enter the One Touch key of the remote fax unit or enter the telephone of the remote unit manually and press YES 4 Enter the 20 digit Polling ID 5 Enter the 20 digit Polling PW for the remote location If you do not have this PW you will have to contact the Key Operator for the remote fax unit for this information 6 You are given the opportunity to enter additional locations to ...

Page 49: ...up to ten groups Each group can contain up to ten locations This allows a central unit to poll remote units on a continuous basis Any time a document is placed in the remote unit for Polling TX your machine will automatically receive it Refer to the Program section for programming details Refer to page 4 37 ...

Page 50: ...d Dial locations Note If no One Touch or Speed Dial keys were set up no reports will be generated Procedure 1 Select the Original Type Resolution if necessary and place your document in the Document Feeder Tray face down 2 Press the Function key and press 8 to select the Relay Initiate menu 3 The following messages appear briefly to confirm your selection 4 Enter the destination fax number 5 Enter...

Page 51: ...ay face down 2 Press any of the One Touch or Speed Dial keys you have programmed and press YES 3 The following messages appear briefly to confirm your selection 4 If the displayed number has a as the last digit additional numbers must be used to dial this locaiton 5 At this point you have the option to enter the additional numbers using the Ten Key Pad selecting another One Touch key or entering a...

Page 52: ...essing the Start key then prints the report 1 With your unit at a ready condition press the Journal key 2 Using the Up and Down Arrows select the TX you wish to check the status on 3 Press the Start key to print the report NOV 06 15 38 100 SET DOC FACE DOWN 1 MAIL 2 AB 40 G H 08 TYPE ORG HALF TONE RESOLUTION SCHEDULE JOURNAL REPORT WA 1 MAR 01 14 00 TX NY OFFICE OK ...

Page 53: ... select the Report you wish to print The reports in the order they appear are TX RESULT REPORT RX RESULT REPORT ACTIVITY REPORT MEMORY DATA LIST MEMORY IMAGE PRINT ONE TOUCH LIST SPEED DIAL LIST KEY SETTING LIST MACHINE STATUS LIST CONTINU RX LIST RELAY BOX LIST 3 Press the Yes key to print the report NOV 06 15 38 100 SET DOC FACE DOWN MAIL ABC DE E EX FINE HALF TONE LIGHT NORM DARK SLEEP A TYPE O...

Page 54: ...te and time the receiver number the number of pages that were sent and other useful information If the document was scanned into memory the report prints a copy of the first page of the transmission on the report for your reference If the transmission was not completed the unit prints out an error report Manual TX Report This function can be used to save paper and bulk in your files by printing th...

Page 55: ...nd Down Arrow keys to select the desired message 4 Press the Right Arrow key to confirm the location this message is being set to 5 Use the Up and Down Arrows to select the locations you wish to check and press YES 6 If you selected Delete in Step 4 you are given the opportunity to delete that transmission NOV 06 15 38 100 SET DOC FACE DOWN MAIL F 38 06 39 40 G H 08 07 N CODE DELETE STD FINE EX FI...

Page 56: ...ar in the LCD or on any printout 1 With your unit at a ready condition press the Pin Code key 2 Enter your PIN Code make sure it is correct and press YES 3 Select the remote location using a One Touch key a Speed Dial key or manually entering the number from the 10 Key Pad Note The entry of your PIN is active only for this session and must be re entered for each new session NOV 06 15 38 100 SET DO...

Page 57: ...al key or manually entering it using the 10 Key Pad 3 Once the remote machine has answered press the Start key to begin the transmission 4 Press the Right Arrow key to confirm the location this message is being set to While the message is being sent you can hear the tones and this message appears While the message is being sent you can hear the tones and this message appears NOV 06 15 38 100 SET D...

Page 58: ...ardized by the Communications Industry Association of Japan and are based upon sub address communications These codes enable secure communication between devices of varying manufacturers This function is available for Mailbox TX RX Relay Broadcasting Polling TX RX ...

Page 59: ...Chapter 4 Facsimile Programming ...

Page 60: ... continue to press the Program key to step it to the next menu item The main menu items are DIAL REGISTRATION SCANNING PRINTING TX OPERATION RX OPERATION MACHINE OPERATION REPORT INITIAL USER DATA SET PRINTER LINE 2 SETTING INTERNET FAX Note A more complete menu appears on the next page Refer to Menu Structure 3 When on the Initial User Data option press YES 4 Use the Arrows to step through the av...

Page 61: ...n Off LETTER LEGAL A4 Standard Normal Step 4 Off A4 Letter TX OPERATION 1 DEFAULT TX 2 CLOSED NETWORK 3 FAX FORWARDING 4 HEADER MEM TX ADF TX On Off On Off On Off MEMORY TX Off On On RX OPERATION 1 MEMORY RX MODE 2 NO of RINGS 3 TWO PAGE PRINT 4 REDUCTION RX 5 MAILBOX RX 6 CLOSED NETWORK 7 RX MODE 8 FOOTER 9 CONTINUE POLL RX On Off 1 to 16 On On Sort Off On Off Cut Password On Off Auto Manual On O...

Page 62: ...ff When the 2nd Cassette is installed 1 to 99 IBM US 24 types of fonts 1 to 6 5 to 127 On Off On Off Off 1 IBM US 1 64 Not Required Off Off LINE 2 SETTING 1 LINE 2 FAX NO 2 TX LINE PRIORITY 3 LINE 2 TONE PULSE Line 2 Fax No Set Line 1 or Line 2 for TX Priority Tone Pulse Line 1 Priority Tone INTERNET FAX 1 E MAIL SETTING 2 SERVER SETTING 3 POP3 INTERVAL 4 TIME OUT SETTING 5 ERROR REPORT 6 TIME ZON...

Page 63: ...until you find the symbol you needed 5 To enter a European Symbol press One Touch key 29 repeatedly until you find the symbol you needed E 7 PQRS 1 L AL GHI 4 0 TUV 8 9 WXYZ START 3 2 JKL 5 MNO 6 ABC DEF STOP COPY R F N V 33 17 57 25 49 41 09 01 38 37 36 34 35 20 18 19 58 26 Y Z 50 Q R 59 27 60 28 51 S 52 42 I J 10 A B 43 K 44 11 C 12 22 21 61 29 T 53 62 30 U 54 L 45 D 13 M 46 E 14 02 03 04 05 06 ...

Page 64: ...ES Enter the Time and Date using the 10 Keypad 3 After entering this information check to make sure it is correct If correct press YES to enter it in memory If it is incorrect press NO and re enter the information Entering Your Telephone Number To have your telephone number display on the faxes you transmit 1 Use the Menu Navigation procedure on page 4 1 to access the USER FAX NO menu selection 2 ...

Page 65: ...to access the USER NAME menu selection 2 Press YES Enter your name 3 After entering your name check to make sure it is correct If correct press YES to enter it in memory If the name is incorrect press NO and re enter the correct name Setting Department PW Note This function is set by the Key Operator Please direct all questions to them 3 USER NAME OK YES NAME _ OK YES DEL NO ...

Page 66: ...u to appear 3 Use the Left Right Arrow keys to select the contrast level that you wish to use Setting the Correct Dialing Type Tone Pulse Select either TONE or PULSE according to the type of telephone system connection to the facsimile unit 1 Press the Program key and scroll through the menus until you reach the Machine Operations menu and press YES 2 Scroll through the menu options until the TONE...

Page 67: ...nd press YES 2 Press 3 or press the down arrow twice to reach the Buzzer Volume Menu Press YES 3 Use the Left Right Arrow keys to select either HIGH LOW or OFF and press YES Choices Available Description HIGH Buzzer Volume is set at the loudest setting available LOW Buzzer Volume is set at the lowest setting available OFF No sound will be heard MACHINE OPERATION YES or 1 9 3 BUZZER VOLUME OK YES H...

Page 68: ...ssible for the Service Representative to monitor and change machine settings This allows them to fix your unit over the telephone 1 Press the Program key and scroll through the menus until you reach the Machine Operations menu and press YES 2 Press 5 or press the down arrow four times to reach the Remote Monitor Menu Press YES 3 Use the Left Right Arrow keys to select either ON or OFF and press YE...

Page 69: ...stem you generally have to dial a prefix number e g 9 to access an outside line If you set the line type to PBX you can set the prefix number in advance Then the unit can dial the prefix number for you whenever you dial The following table shows you how to dial when using the PBX mode The prefix can be up to 4 digits in length When you are in the PBX mode pressing causes the machine to dial the pr...

Page 70: ... the time the unit will go into the Power Save Mode The OFF time is the time it will re enter a READY or STANDBY mode 4 Enter the time you wish the unit to enter the Power Save Mode and press YES 5 Enter the time you wish the unit to leave the Power Save Mode and return to normal operation Note There are three situations to leave the Power Save Mode and return to normal operation 1 Press Wakeup ke...

Page 71: ... 120 minutes Setting the Drum Counter This function allows service personnel to check how many sheets of paper has printed 1 Press the Program key and scroll through the menus until you reach the Machine Operations menu and press YES 2 Press 9 or press the down arrow eight times to reach the Remote Program Menu Press YES 3 The following message appears to check to how many sheets of paper have bee...

Page 72: ...lution Three scanning resolution options are available 1 Press the Program key and scroll through the menus until you reach the SCANNING PRINTING Menu Press YES to begin programming 2 Press 1 or scroll down to the Resolution menu and press YES 3 Using the Left and Right arrows select the resolution you wish to have as the default and press YES to enter this selection into memory Choices Available ...

Page 73: ... wish to have as the default and press YES to enter this selection into memory Print Density Set the print density according to your needs There are six printing density levels ranging from Light to Dark 1 Press the Program key and scroll through the menus until you reach the SCANNING PRINTING Menu Press YES to begin programming 2 Press 3 or scroll down to the Print Density menu and press YES 3 Us...

Page 74: ...on Copy menu and press YES 3 Using the Left and Right arrows select the option you wish to have as the default and press YES to enter this selection into memory Choices Available Description ON The facsimile machine will reduce the copy document as needed to fit on the paper The maximum reduction proportion is 70 If greater reduction is needed then the remainder of the document will be printed on ...

Page 75: ...as the default and press YES to enter this selection into memory Auto Cassette Sel Allows users to select the 2nd paper cassette to print out the document when the facsimile is equipped with the 2nd paper cassette Users can set the received FAX or printed PC document to be printed out from either the Upper or Lower Tray 1 Press the Program key and scroll through the menus until you reach the Set P...

Page 76: ...ress YES to enter this selection into memory When you select OFF you can set cassette for fax and printer 5 Select the function you wish to set the cassette and press YES 6 Select the Tray Cassette you wish to set for the function and press YES ON OFF SELECT PUSH YES PRINTER FAX SELECT PUSH YES LOW TRAY HIGH TRAY SELECT PUSH YES ...

Page 77: ...programming 2 Press YES since this is the first menu to appear and press YES to enter the One Touch Program 3 Press the One Touch key you wish to program 4 Press YES to accept the selection 5 Enter the telephone number you wish to transmit to and press YES 6 Enter the Name you wish associated with this number and press YES after checking to see if it is OK Edit Deleting 1 If you wish to change any...

Page 78: ...o program and press YES 4 Enter the Telephone number you wish to transmit to and press YES after checking to see if it is OK 5 Enter the Name you wish associated with this number and press YES after checking to see if it is OK 6 You are given the opportunity to program additional locations Continue to enter additional Speed Dial locations or press NO to exit Edit Deleting 1 If you wish to change a...

Page 79: ...r the Group Name and press YES to accept it 6 Enter the Key s you wish included in this group Remember you can include One Touch or Speed Dial already in memory 7 Continue to enter the locations you wish to include and then press YES You are given the opportunity to program additional locations Continue to enter additional Speed Dial locations or press NO to exit Edit Deleting 1 If you wish to cha...

Page 80: ...ugh the menus until you reach the DIAL REGISTRATION Menu Press YES to begin programming 2 Press 4 or scroll down to the Program Dial menu and press YES 3 Press the One Touch key you wish to use Remember it must be one of the last eight 4 Choose the function you wish to program 1 Broadcast 2 Timer TX 3 Mailbox TX 7 Polling RX and 8 Relay Initiate Note To continue with this process choose the group ...

Page 81: ...y pressing the One Touch key you have just programmed This is documented in Chapter 3 Advanced Facsimile For 3 Mailbox TX 5 A screen appears to confirm Mailbox TX was your selection 6 Enter the fax number you wish to send to or select Function If you select to enter a phone number once this function has been programmed you use it by simply pressing the One Touch key you have just programmed This i...

Page 82: ...nter the telephone number 7 Enter the 20 digit Relaybox ID 8 Enter the 20 digit Relaybox password Once this function has been programmed you use it by simply pressing the One Touch key you have just programmed This is documented in Chapter 3 Advanced Facsimile Edit Deleting 1 If you wish to change any entry a screen allows you to accept it or change it 2 If you wish to change a Key that was previo...

Page 83: ...hone call Entering 1 Press the Program key and scroll through the menus until you reach the DIAL REGISTRATION Menu Press YES to begin programming 2 Press 5 or scroll down to the Batch TX menu and press YES 3 Press the One Touch key you wish to use 4 Enter the time at which the batch should be transmitted and press YES to accept 5 This screen confirms your entry 6 Press the Start key to enter this ...

Page 84: ... previously programmed this message appears Press YES to keep this location as is or NO if you wish to edit it 3 If you choose NO use the arrow keys to select either EDIT or DELETE and then proceed with the needed changes REGISTERED KEEP OK YES EDIT DEL NO EDIT DELETE SELECT PUSH YES ...

Page 85: ...m key and scroll through the menus until you reach the DIAL REGISTRATION Menu Press YES to begin programming 2 Press 6 or scroll down to the Relay Box menu and press YES 3 Select the Relay Box number 1 to 5 that you wish to use 4 Enter 20 digit Relay Box ID 0 9 If the remote transmission side enter the SUB address to be the same as the Relay Box ID and the following PW is not set for Relay Box the...

Page 86: ...efault and press YES to enter this selection into memory Choices Available Description Memory TX When the unit is set in this mode documents are scanned into memory for transmission and dialing starts after the first page is scanned Quick TX ADF TX Direct Transmission When the unit is set in this mode documents are scanned for transmission after connection has been made to the receiving unit When ...

Page 87: ...f you specify a telephone number only those messages from that number will be forwarded If you do not specify a remote telephone number all the incoming message will be forward to the specified location 1 Press the Program key and scroll through the menus until you reach the TX Operation Menu Press YES to begin programming 2 Press 3 or scroll down to the Fax Forwarding menu and press YES 3 Select ...

Page 88: ...nt the message to print locally Select either ON or OFF and press YES 10 Enter the telephone number for the remote unit from which you will be receiving the message 11 Enter the remote fax number to which you wish to have the messages sent and press YES SEL STOP DAY WEN OK YES or 0 6 START TIME _0 00 OK YES DEL NO STOP TIME _0 00 OK YES DEL NO PRINT AT LOCAL OFF OK YES ENTER REMOTE FAX NO 77788855...

Page 89: ... first 5mm of the copy top It then starts the body below this Depending on the remote machine settings one of three things happen 1 because the copy is not a full page the copy fits below the header at 100 2 the copy is reduced to fit the page or 3 the copy is split into two pages at 100 1 Press the Program key and scroll through the menus until you reach the TX Operation Menu Press YES to begin p...

Page 90: ...immediately OFF If the unit is set in the Memory RX Mode OFF status then the received document will be printed out directly instead of being stored in memory Case 1 If there is no data stored in the memory and the unit is set to OFF status then the received documents print out directly Case 2 If there is a document stored in the memory and the unit is set to OFF status then the previously received...

Page 91: ...ived into memory 6 Enter the time you wish to stop receiving messages into memory 7 You must enter a password for this to work 8 If you have your unit programmed for Memory RX with the Timer turned ON and a Password required your screen displays the following message 9 The ready message for your unit now indicates that Memory RX is active ON OFF SELECT PUSH YES ON TIME _0 00 OK YES OFF TIME _0 00 ...

Page 92: ... document 1 Press the Program key and scroll through the menus until you reach the RX Operation Menu Press YES to begin programming 2 Press 3 or scroll down to the Two Page Print menu and press YES 3 Using the Left and Right arrows select the option you wish to have as the default and press YES to enter this selection into memory RX OPERATION YES or 1 9 2 NO of RINGS OK YES NO of RINGS _2 OK YES D...

Page 93: ...git password number 1 Press the Program key and scroll through the menus until you reach the RX Operation Menu Press YES to begin programming 2 Press 5 or scroll down to the Mailbox RX menu and press YES Choices Available Description ON The facsimile machine will reduce the documents as needed to fit on the paper The maximum reception proportion is 70 OFF The facsimile machine will not reduce the ...

Page 94: ... the menus until you reach the RX Operation Menu Press YES to begin programming 2 Press 6 or scroll down to the Closed Network menu and press YES 3 Using the Left and Right arrows select the option you wish to have as the default and press YES to enter this selection into memory MIALBOX NO SELECT 0 9 MIALBOX 1 ID OK YES MIALBOX 1 PW OK YES Choices Available Description ON Closed Network RX mode is...

Page 95: ...e reception control number and page number 1 Press the Program key and scroll through the menus until you reach the RX Operation Menu Press YES to begin programming 2 Press 8 or scroll down to the Closed Network menu and press YES 3 Using the Left and Right arrows select the option you wish to have as the default and press YES to enter this selection into memory Note Your Service Technician can se...

Page 96: ...ive Press YES to continue 5 Select a start day to begin polling Press YES to continue 6 Select a stop day to finish polling Press YES to continue 7 Enter a start time to begin polling Press YES to continue 8 Enter a stop time to finish polling Press YES to continue 9 Enter the number of minutes between each redail Press YES to continue 10 Enter the remote fax number to be polled 11 Press YES to co...

Page 97: ...ote location and you must match it when sending to them Note Polling Passwords must be set and must match for Polling to work 14 If you wish to poll more than one location enter that location When you are done entering the data press START to enter the data into memory POLLING ID _ OK YES DEL NO POLLING PW _ OK YES DEL NO NO 002 _ Fin START ...

Page 98: ...s data into memory TX Line Priority This allows the user to determine the priority of the second line 1 Press the Program key and scroll through the menus until you reach the Set Printer menu and press YES LINE 2 SETTING YES or 1 3 1 LINE 2 FAX NO OK YES _ OK YES Choices Available Description LINE 1 TX PRIORITY When both lines are read the transmission is sent on line 1 If line 1 is busy and line ...

Page 99: ...dialing mode of line 2 Its operation is the same as TONE PULSE setting for Line 1 1 Press the Program key and scroll through the menus until you reach the Set Printer menu and press YES 2 Press 3 or scroll down to the Line 2 Tone Pulse menu and press YES 3 Select either Tone or Pulse Press YES to accept this data into memory 2 TX LINE PRIORITY OK YES LINE 1 TX PRIORITY OK YES LINE 2 SETTING YES or...

Page 100: ...rrow keys to select either ON or OFF and press YES Reserv Reservation Report A Reservation Report prints a list of reservations for broadcast transmission When the function is turned ON a Reservation Report is printed before a broadcast transmission or multi polling reception is made allowing you to check the details of the reservation request 1 Press the Program key and scroll through the menus u...

Page 101: ...nd press YES RX Results Report A RX Results Report prints the results after receiving a Confidential or Multi Polling document or when errors occur during reception This report can be used to check whether a reception by Mailbox or Multi Polling has been successful 1 Press the Program key and scroll through the menus until you reach the Reports menu and press YES 2 Press 4 or scroll down to the RX...

Page 102: ...FF and press YES Toner Low Report A Toner Low Report will transmit to the service center when the toner is low 1 Press the Program key and scroll through the menus until you reach the Reports menu and press YES 2 Press 6 or scroll down to the Toner Low Report menu and press YES 3 Use the Left Right Arrow keys to select either ON or OFF and press YES 4 Enter the Telephone number per your Service Re...

Page 103: ...O Machine Status List Prints a list of current settings including Page counts X O TX Result Report Prints a list of the result of a transmission after it has been completed X O RX Result Report Prints a list of the results when receiving a confidential or multi polling document or when errors occur during reception X O Activity Report Prints a list of results of the last 60 communications X O Cont...

Page 104: ...g Auto printing is set using the PROGRAM Utilities When auto printing is set to ON the report is printed automatically When auto printing is set to OFF the report can only be printed when started manually from the machine control panel ...

Page 105: ...Chapter 5 Internet Fax Option ...

Page 106: ...ur LAN E mail server The LAN E mail server must be SMTP and POP3 compatible These settings are similar to those of popular mail clients such as Netscape Messenger and Outlook In order to properly setup your fax machine request your E mail administrator about the settings listed below which are required in order to make a connection to the mail server ACCOUNT NAME This is the E mail account name fo...

Page 107: ...message The TO FROM and Date information are automatically generated as part of the Internet fax process TIFF file The TIFF file attachments are the fax part of the Internet Fax The content of the attachment is determined by the end user The conversion to TIFF and file handling are part of the Internet Fax process Menu Item Description 1 EMAIL SETTING These settings make your fax unit to communica...

Page 108: ... address then press YES 5 Enter the account name for your unit This is the name of the mailbox at the E mail server Then press YES 6 Enter the password of the account name It allows your unit to log into the POP3 server to receive E mail 7 Enter the E mail address that a remote machine will reply to when they select Reply in their E mail program Press YES to enter this selection memory INTERNET FA...

Page 109: ... entering the IP address including the s then press YES 4 Enter the IP address for the POP3 mail server and press YES Note The SMTP server and POP3 server addresses may be entered up to 64 characters The address must include the divider e g 140 135 12 1 or use the host name e g mail network com Note You can select DHCP disable or enable The default value is Dynamic IP address but if you want to us...

Page 110: ... will look for new E mail messages based on this time setting Then press YES to finish this setting TIME OUT SETTING 1 Press the Program key and scroll through the menus until you reach the Internet Fax menu and press YES 2 Use the Up Down Arrow keys to the TIME OUT SETTING menu then press YES 3 Insert the number of minutes that the machine will try to contact the mail server and press YES INTERNE...

Page 111: ...whether Internet Fax has been successful TIME ZONE 1 Press the Program key and scroll through the menus until you reach the Internet Fax menu and press YES 2 Use the Up Down Arrow keys to the TIME ZONE menu then press YES 3 Use the e g Eastern Standard time is 05 00 or 5 hours behind GMT E mail server use this time to indicate when a message is sent Press YES after entering the correct time INTERN...

Page 112: ... Islamabad Karachi Tashkent GMT 07 00 Arizona Mountain Time US Canada GMT 06 00 Astana Almaty Dhaka Colombo GMT 06 00 Central Time US Canada Mexcio City Tegucigalpa Saskatchewan GMT 07 00 Bangkok Hanoi Jakarta GMT 05 00 Bogota Lima Quito Eastern Time US Canada Indiana East GMT 08 00 Beijing Chongqing Hong Kong Urumqi Perth Singapore Taipei GMT 04 00 Atlantic Time Canada Caracas Lapaz Santiago GMT ...

Page 113: ... the One Touch key you wish to program 4 Press YES to accept the selection 5 When this symbol appears then press MAIL 6 Enter the E mail address that you want to send to and press YES 7 Enter the E mail receiver name 8 You can select the image compression method using one of the standard formats used on faxes DIAL REGISTRATION YES or 1 6 1 ONE TOUCH DIAL OK YES SELECT REGIST KEY ONE TOUCH 01 or PR...

Page 114: ...he E mail address that you want to send to and press YES 6 Enter the E mail receiver name 7 You can select the image compression method using one of the standard formats used on faxes Group Dial This setting is the same as the Facsimile Programming Group Dial keys You can refer to chapter 4 but if Internet Fax is optioned the Group Dial can contain the One Touch or Speed Dial programmed by Fax NO ...

Page 115: ...nitiate When you want to use Internet Fax you just choose the function 1 Broadcast and 2 Timer TX Note To continue with this process choose the group of steps that match your needs for 1 Broadcast 5 A screen appears to confirm Broadcast was your selection 6 Press the Mail and enter the E mail address You can also include any One Touch or Speed Dial key in this group 7 You can select TO or C C for ...

Page 116: ... screen appears to confirm Timer TX was your selection 6 Enter the time you wish the transmission to occur and press YES 7 Press Mail key and enter address you wish to send or select a One Touch or Speed Dial key and press YES TIMER TX TIMER 00 00 OK YES TO TO YES CC PROG ...

Page 117: ...the E mail message press the Down Arrow key 2 Enter the E mail address you want to appear in the FROM and press START If you want to change the location for reply press the Down Arrow key 3 Enter the E mail address for replies and press START If you want to change the encoding method used for the TIFF attachment press the Down Arrow key 4 Use the Left Light Arrow key to change the coding selection...

Page 118: ... receive a fax message Use the following procedure to retrieve an E mail message manually 1 With the unit in Standby and no document in the ADF press the Mail key and Start key 2 If an E mail is at the POP3 server the E mail is received 3 The screen appears the message Then the received E mail is printed INTERNET FAX RX START E MAIL RX SET DOC FACE DOWN PRINT DOC ...

Page 119: ...ions but the group list is programmed in the machine The TX Broadcast Function is for one time only and the locations must be entered each time If you send a message to the same locations frequently you should consider using Group Dial 1 Place the documents in the Document Feeder 2 Press the Function key and enter 1 to select the Broadcast function 3 You can use One Touch or Speed Dial locations b...

Page 120: ...anually or use a One Touch key or Speed Dial key One Touch Speed Dial and Group Dial After you have programmed the E mail locations the procedure for transmitting using One Touch Speed Dial or Group Dial is the same as transmitting a fax message You can refer to chapter 4 Automatic Receive Your facsimile device will automatically poll the POP3 mail server for received message This automatic operat...

Page 121: ...a problem with the TIFF file format REPORT 2 The data received cannot be printed MIME Error This message indicates that the machine could not process the attachment due to an error in the E mail encoding REPORT 3 Machine memory full RX This message indicates that the machine memory was full when the E mail was received The E mail is first received into memory and then printed REPORT 4 Message Deli...

Page 122: ...RD ERROR This message indicates that the password entered is incorrect MAILBOX MEMORY FULL This message indicates that the mailbox for the e mail server is too full to receive mails CAN T CONNECT SMTP This message indicates that the machine could not connect to the SMTP server CAN T CONNECT POP3 This message indicates that the machine could not connect to the POP3 server SMTP COMM ERROR This messa...

Page 123: ...the TIFF file is not in the standard format for Internet Fax and cannot be printed MACHINE TIME OUT This message indicates that the machine could not communicate with the NIC NOT SETUP DATA This message indicates that the E mail setting or server setting did not finish programming ...

Page 124: ...Error Messages 5 19 Internet Fax Option ...

Page 125: ...Chapter 6 PC Printing Scanning ...

Page 126: ... Choose the number of copies you want to print You can override this through the computer software Symbol Set 23 kinds of symbols IBM US Choose the appropriate symbol set for your screen and for printing Font Number 01 06 01 Select the default font by number You can find the number on the font printout The default 01 is Courier Portrait Medium The font number also indicates whether it prints lands...

Page 127: ...users to choose the appropriate symbol set for printing Choose the appropriate symbol set for printing with PCL4 emulation If your application does not control this you may need to select a different symbol set to match the language characters math symbols and graphical characters 1 Press the Program key and scroll through the menus until you reach the Set Printer menu and press YES 2 Press 3 or s...

Page 128: ...ve as your default print font Press YES to accept this data into memory Font Definitions Font Number Font Pitch Point Orientation 1 Courier 10 12 Portrait 2 Courier Bold 10 12 Portrait 3 Line Printer 16 6 8 5 Portrait 4 Courier 10 12 Landscape 5 Courier Bold 10 12 Landscape 6 Line Printer 16 6 8 5 Landscape SET PRINTER YES or 1 8 4 FONT NUMBER OK YES FONT NUMBER 1 OK YES DEL NO Orientation Portrai...

Page 129: ...s YES 3 Enter the number of the lines per page you wish to have as your default Press YES to accept this data into memory Print Font Allows the user to print samples of the fonts resident in the machine for reference 1 Press the Program key and scroll through the menus until you reach the Set Printer menu and press YES 2 Press 6 or scroll down to the Print Font menu and press YES 3 The unit prints...

Page 130: ...re turning the unit back ON Note Be sure to print clear any documents from Fax memory before selecting PCL4 ENHANCE 1 Press the Program key and scroll through the menus until you reach the Set Printer menu and press YES 2 Press 7 or scroll down to the PCL4 Enhance menu and press YES 3 Select either ON or OFF depending on your needs Press YES to accept this data into memory 4 If you chose YES you m...

Page 131: ...te Since the fax unit must be turned OFF when switching to PCL4 emulation or GDI enhance make sure that any documents stored in memory are printed out first 1 Press the Program key and scroll through the menus until you reach the Set Printer menu and press YES 2 Press 7 or scroll down to the GDI Enhance menu and press YES 3 Select either ON or OFF depending on your needs Press YES to accept this d...

Page 132: ... Allocations Standard Memory Configuration Choices NEFAX655e memory configuration choices User Selection Fax Memory Memory PCL4 GDI Enhanced A4 Ltr Std Pages STD Off Off 192 Off On 96 On Off 60 Add Option 8MB Off Off 960 Off On 768 On Off 672 On On 681 ...

Page 133: ...structions to install the cables CAUTION Never connect or disconnect cables with the power to either unit ON 1 Close all the open programs on the PC 2 Be sure power to the computer and the fax unit are OFF 3 Connect the parallel cable to the parallel connector on your unit 4 Connect the other end of the cable to the parallel port on the PC 5 Turn power ON to both the computer and the fax machine C...

Page 134: ...tion explains standard printing with the NEFAX655e The display provides information about printer activities Using the Manual Feed Tray to Print Use the Manual Feed Bypass to print on paper that is a different size than the paper you have loaded in the paper cassettes or for printing on thick paper such as envelopes If paper is present in the Tray the unit automatically selects it 1 Place the pape...

Page 135: ... selecting a paper tray or letting the unit select the paper tray to print or fax Follow the instructions in Setting Auto Cassette Select on page 4 16 to set up this feature Message Description Recommendations PC Connection The printer is receiving data from the computer Allow unit to complete process before making any adjustments Printer Memory Full Memory 00 There is insufficient memory for the ...

Page 136: ...r Windows applications Either of a serial port on parallel port can be used to connect the unit to your PC for printing The parallel port is recommended because the speed is faster and the setup is easier PC Requirements These are the minimum PC requirements for using the GDI printer function with Windows 95 OS Windows 95 CPU Intel 80486 DX 33 MHz RAM 8 MB HDD 5 MB excluding swap area ...

Page 137: ...ck the Start button on the task bar 2 Choose Settings Printers 3 In the Printers window click the Add Printer icon 4 The Add Printer Wizard opens Click Next 5 Choose Local Printer Click Next 6 A list of printers appears Click the Have Disk button 7 When the dialog box appears insert the program disk Pin Signal Pin Signal Pin Signal Pin Signal 1 Strobe 10 Ack 19 GND 28 GND 2 Data 1 11 Busy 20 GND 2...

Page 138: ... Continue to follow the instructions in the Add Printer Wizard The Wizard copies all necessary files to the PC hard drive and loads the printer driver During the file copy process a Copying Files window might appear instructing you to insert the original Windows 95 installation disk Check to see if the requested files reside in your Windows system already To do this click Browse in the Copying Fil...

Page 139: ...r will be selected first For the 2nd Cassette the NEFAX655e will automatically select the correct paper size If both cassettes are the same size paper the Top Tray will be selected first If it runs out of paper the unit automatically selects the Bottom Tray and continues Printing with your GDI Print Function After you install the GDI print driver you can select and use it in your Windows applicati...

Page 140: ...nect the cable first Note This feature is an option on your unit PC Requirements for the TWAIN Option Installing the TWAIN Driver On Windows95 1 Insert the TWAIN driver disk in the disk drive 2 Select Window Explorer 3 Find the Setup exe in TWAIN Driver disk 4 Click Setup exe twice 5 The InstallShield wizard window appears Follow the instructions to load the program Cable RS 232 C Computer OS Wind...

Page 141: ...F Communication Error Check Setting Scanning Table The interface cable is not connected or the unit is OFF Connect the cable securely Make sure the power is on You may need to check and correct the communication settings in the Option menu Unable to scan image The unit is performing an operation and is not in the image scanning mode Wait for the unit to finish the operation Scanning error code XXX...

Page 142: ...terface The Class 1 interface provides these functions Fax transmission A file in the computer can be faxed directly to a remote location There is no need to print the file and scan it into the fax unit first The PC fax software directs the file to your fax unit and your fax unit sends it to the remote fax location Fax receiving Your PC can receive a fax from a remote location The PC fax software ...

Page 143: ...it communicates with the computer CLASS 1 MODE appears on the LCD No other fax activities can be performed while the unit communicates with the PC During a fax operation initiated by your unit a fax request initiated by the PC is not processed The maximum fax transmission speed is 14 400 bps in Class 1 mode Modem type Generic Class 1 or Class 1 Flow control Xon Xoff Dial type Use the type that mat...

Page 144: ...er Scanning in Class 1 Mode To scan a document from your unit into your PC fax application you must use your Class 1 ID number for the destination You must enter your ID number exactly as it is programmed Default 888 1 Make sure the computer is on 2 Make sure the PC fax software is running and set to auto answer mode 3 Load the document in the ADF 4 Select the highest available resolution to assur...

Page 145: ... to use your unit as a printer 1 In the PC fax software application enter the Class 1 ID number in the telephone number field 2 If the PC fax software application allows it you can enter a single hyphen for the telephone number instead of the Class 1 ID number 3 When your unit receives the destination telephone number the Class 1 ID number from the PC it recognizes the number as its own and prints...

Page 146: ...Class 1 Fax Modem 6 21 PC Printing Scanning ...

Page 147: ...Chapter 7 Maintenance Supplies ...

Page 148: ...Cover 2 Fan the paper stack thoroughly and align its edges 3 Load paper onto the Tray and adjust the Alignment Guides to touch the sides of the paper Note When paper remains in the Tray do not load more paper on top of it Always place the remaining paper on top the stack to assure it is used first ...

Page 149: ...ove it from the machine 2 Remove the Cassette Cover and press down on the Paper Lifting Plate 3 Fan the paper stack thoroughly and align its edges Load the paper stack on the tray Note Place the side of the paper you wish to print on UP This is particularly important when printing on pre printed stock such as letterhead ...

Page 150: ... paper above the Maximum Paper Level indicator Note When paper remains in the Cassette do not load more paper on top of it Always place the remaining paper on top the stack to assure it is used first 5 Replace the Cassette Cover and insert it into the machine ...

Page 151: ...lem in the Scanner section The message RECORDING PAPER JAM indicates a problem with the printer paper path Document Jams When a document jam occurs the message ORIGINAL DOC JAM appears on the LCD To remove the jam follow the procedure below 1 Open the Scanner Cover and remove the jammed documents 2 Open the ADF Cover and remove the jammed documents 3 Close the Scanner Cover ...

Page 152: ...ment Feed Tray is where the Fuser is located It can be hot and you should avoid touching it 2 Remove the used Toner Cartridge from the fax machine 3 Remove the Drum Cartridge from the fax machine Note Whenever the Drum Cartridge is removed from the fax machine be sure to cover it with a cloth to protect it from light 4 Check the paper feed area the paper exit area and the area under the Drum and T...

Page 153: ...per Feed Tray 1 Remove the Tray Cover and pull out the paper in the direction shown by the arrow Jam at Paper Exit Tray 1 If the paper is caught by the Fusing Unit remove the paper by pulling it toward you as shown by the arrow Note Under certain conditions after you remove a jam from the Fuser area you may experience toner smudges on the next page ...

Page 154: ...r from the Fuser Unit in the direction shown by the arrow 2 Pull out the paper from the Feed Roller in the direction shown by the arrow Jam at the PFU Cassette 1 Remove the PFU Cassette 2 Pull out the paper from the Feed Roller in the direction shown by the arrow 3 Re install the PFU Paper Cassette into the PFU ...

Page 155: ...er removing the jam follow these steps 1 Install the Drum Cartridge making sure the color tabs fit into the slots 2 Install the Toner Cartridge making sure the color tabs fit into the slots 3 Gently press down the Printer Cover and securely close it ...

Page 156: ...of the Printer Cover and swing open the Cover 2 Remove the used Toner Cartridge from the fax machine 3 Take the new Toner Cartridge out of its carton Before installing the Toner Cartridge it is necessary to evenly distribute the toner inside of the Cartridge Hold the Toner Cartridge with both hands and shake it in the direction of the arrows ...

Page 157: ...down the Scanner Cover and securely close it Note A new Cartridge sometimes makes a grinding noise when first installed This noise is caused by the initial meshing of the gears on the Cartridge It normally goes away after a few cycles Changing Drum Cartridge 1 Press the Cover Lock Release Buttons on the left and right side of the Printer Cover and swing open the Cover 2 Remove the used Toner Cartr...

Page 158: ...ts carton and install it Make sure to align the tabs with the slots and match blue and green color coding 5 Install the Toner Cartridge Make sure the four pins of the Toner Cartridge two each at the front and rear sides fit in the slots inside the fax machine 6 Gently press down the Scanner Cover and securely close it ...

Page 159: ...hine to keep it in optimum operating condition 1 Using a soft cloth dampened with mild detergent wipe the outside of the fax machine Cleaning the Scanner 1 Open the Scanner Cover 2 Gently wipe the glass of the image sensor Note To transmit your documents more clearly you can wipe with a dry cloth NEVER use detergent and water ...

Page 160: ...aintenance 7 13 Maintenance Supplies Cleaning the White Roller 1 Turn the power OFF 2 Open the Scanner Cover 3 Wipe the roller clean of dirt and paper dust with a soft cloth 4 Close the Scanner Cover I O ...

Page 161: ...Maintenance Maintenance Supplies 7 14 Notes ...

Page 162: ...Maintenance 7 15 Maintenance Supplies ...

Page 163: ...Chapter 8 Troubleshooting ...

Page 164: ...er the meaning of the LED ERROR and messages together with action you can take to correct the problem LED Indication Description Action LED ON Machine Trouble A minor malfunction has occurred Follow the instructions on the display LED Blinking Machine trouble A malfunction has occurred Call your Service Representative Alarm Beeps Description Action Three short intermittent beeps An incorrect key h...

Page 165: ...n memory When memory is available request the other party to retry the transmission While your fax was scanning a document for Memory TX the Memory became full and the fax was unable to send the entire document using Memory TX To transmit the portion of the document that has been scanned into memory press the Start key To increase the memory capacity of the fax machine print out any documents that...

Page 166: ...ILBOX ID The Mailbox ID specified by the other party does not match the Mailbox ID programmed in your fax Advise the other party of the correct Mailbox ID and ask them to retry the transmission or ask the party to cancel Mailbox TX and retry transmission WRONG PAGE COUNT The number of pages of the document transmitted does not equal the number of pages set with page count TX Check the number of pa...

Page 167: ...ON GDI ENHANCE NOT SET GDI ENHANCE printing mode is not set or memory is not available Select GDI ENHANCE printing refer to set printer session Call your Service Representative for possible memory upgrade required Message Cause Symptom Action ...

Page 168: ...s black stripes contact service personnel 6 No sound can be heard from the telephone set Check if the Telephone Cord is correctly connected to the terminal of the fax Check if the Line Cord is connected correctly 7 Communication error Most errors are caused by bad line connections so retry Test with another fax machine If this problem still exists contact your service representative 8 The image re...

Page 169: ...nt transmitted to check for image quality If the copy is not clear clean the contact image sensor of the Scanner of your fax If still not clear your fax may need service If the copy is clear the telephone line or the fax machine of the other party is probably faulty Re transmit the document to check the image quality Symptom Action ...

Page 170: ...Troubleshooting 8 7 Troubleshooting ...

Page 171: ...Chapter 9 Specifications ...

Page 172: ...mage Sensor CIS Photo Conductor Organic Photo Conductor Drum OPC Fusing Hot roll fusing Dimensions Standard Unit Basic Unit With Trays extended With 2nd cassette Width 424 mm 16 69 inches Depth 708 mm 27 89 inches Height 540 mm 21 25 inches Weight Standard Unit w o 2nd cassette 14 kg 30 87 pounds Master Carton Contents Fax machine AC Power Cord Drum Toner Cartridge Document Entrance Tray Document ...

Page 173: ...d cassette Manual Feed Tray Exit Tray Capacity 250 sheets A4 Letter Legal 500 sheets A4 Letter Single Sheet A4 Letter Legal Transparency Executive Envelope 200 sheets face down Recommended Paper Weights Cassette recommended acceptable Manual Feed 20 lb 75 g m2 A4 Letter Legal 16 24 lb 60 105 g m2 A4 LT LG 16 24 lb 60 105 g m2 A4 LT LG Print Effective Width Effective Length A4 202 mm 7 8 inches Let...

Page 174: ...aximum 11 inches 280mm Resolution Horizontal x Vertical Standard 203 pixels inch x 98 lines inch 8 pixels mm x 3 851 lines mm Fine 203 pixels inch x 196 lines inch 8 pixels mm x 7 7 lines mm Super Fine 203 pixels inch x 392 lines inch 8 pixels mm x 15 4 lines mm Memory Transmit Super Fine 300 pixels inch x 300 lines inch 11 8 pixels mm x 11 8 lines mm ADF or manual Transmit with 300x300dpi capibil...

Page 175: ...ons 180 Locations Group Dial 64 Groups One Touch or Group Dial Max 50 locations per Group Protocol Group 3 ITU T with ECM Class 1 Optional Compression MH MR MMR JBIG Modulation V 34 V 17 V 29 V 27 Modem 33 600 bps Maximum Transmission Speed Standard Resolution Less than 3 sec ITU T NO 1 chart Memory Capacity Standard 2 MB Option 8 MB Memory Backup Time 10 hours Min Minimum 48 hours charge Hardware...

Page 176: ...rallel One Direction Parallel Port Serial RS232 C Din type NIC Interface Recommended Software Driver Class 1 1 WinFax Pro V10 0 2 LaserFax generic Class 1 Driver 3 Unimessage Pro Twain 1 PhotoShop 2 ImagePAL PCL4 HP LaserJet Series II Protocols NetWare TCP IP SMB Service Message Block NetBEUI Network Support 10BaseT 10Base2 and 10Base T 10BaseT and 100BaseTX Web based Interface TCP IP SNMP Support...

Page 177: ...ntent type inage TIFF 3 content type application octet_stream name _tif name _txt I Fax TX Resolution 204 x 98 dpi 204 x 196 dpi 204 x 391 dpi I Fax RX Resolution 204 x 98 dpi 204 x 196 dpi 204 x 391 dpi 200 x 100 dpi 200 x 200 dpi Print by 204 x 98dpi Print by 204 x 196dpi I Fax Coding method TIFF S MH TIFF F MR MMR TIFF J JBIG Default MH I Fax Transmission Mixed transmission for E mail and Fax Y...

Page 178: ...Operational Specifications 9 7 Specifications Auto Reception periodically Yes Manual RX immediately Yes Report RX Error replay to E Mail address Yes TX error report Yes RX error report Yes ...

Page 179: ...rect Dial Keypad Numeric Keypad One Touch Dial 64 One Touch keys Speed Dial 100 Locations Broadcasting locations 180 Locations Group Dial 64 Groups One Touch or Group Dial Max 50 locations per Group Protocol Group 3 ITU T with ECM Class 1 Optional Compression MH MR MMR JBIG Modulation V 34 V 17 V 29 V 27 Modem 33 600 bps Maximum Transmission Speed Standard Resolution Less than 3 sec ITU T NO 1 cha...

Page 180: ...um Battery Statement Lithium batteries have a danger of explosion Do not attempt to replace If needed contact your service representative Temperature 10 33o C 50 95o F Relative Humidity RH Minimum 15 Maximum 85 non condensing Operating Altitude Maximum 2500 meters 8020 feet or below ...

Page 181: ...Appendix A Unpacking Installation ...

Page 182: ...nd that you skip to that procedure and install it first since the Facsimile unit set on top of the 2nd Paper Cassette Main Carton Contents Unpack the carton and verify that the following items are included and undamaged 1 Toner Cartridge 2 Accessories Box 3 Packing Material 4 Facsimile Unit 5 Protective Bag 6 Packing Material 7 Shipping Carton 8 Packing Material 9 Drum Cartridge 9 3 1 4 5 8 6 2 7 ...

Page 183: ...g Unpacking Installation A 2 Accessories Box Contents 1 Accessory Carton 2 Document Feed Tray 3 Paper Exit Tray 4 Document Exit Tray 5 Operator Guide 6 Telephone Cord 7 AC Power Cord 8 Core x 2 1 4 2 3 5 6 7 8 ...

Page 184: ... the left and right sides of the Printer Cover and swing open the cover Installing the Drum Cartridge 1 Unpack the Drum Cartridge CAUTION Do not expose the Drum to bright light for extended periods of time Bright light can damage the Drum 2 Install the Drum Cartridge The ends of the Cartridge and the slots of the unit are color coded Match the Green to Green and the Blue to Blue when inserting the...

Page 185: ...both hands and shake the Cartridge in all directions to assure the toner inside the cartridge is even 3 Install the Toner Cartridge The ends of the Cartridge and the slots of the unit are color coded Match the Green to Green and the Blue to Blue when inserting the Cartridge 4 Close the Printer Cover and press down to lock it into position ...

Page 186: ...1 Insert the two tabs into the corresponding slots inside the unit Installing the Document Exit Tray 1 Insert the two tabs into corresponding slots located just below the front of the Control Panel Note The tabs must snap into place Lifting the front of the tray slightly may help ...

Page 187: ...l 2 Press down firmly but evenly until they snap into place Attaching the Power Cord and Telephone Cords 1 Make sure the Main ON OFF Switch is in the OFF position 2 Connect one end of the Power Cord to the Power Cord Receptacle on the Fax unit 3 Plug the other end into the wall receptacle Note Make sure the wall power meets the specification for this unit ...

Page 188: ...ack of the Fax unit 5 Connect another external telephone to the TEL jack upper of the two on the back of the Fax unit 6 If Dual Line Kit is optioned connect the Telephone line 2 cable to the Dual Line Jack Note Two turns the line cord with Core about 1 cm from line jack Before installing to the machine LINE TEL DUAL LINE 1cm ...

Page 189: ...Setting Up Fax Unit Unpacking Installation A 8 Attaching the PC Cables 1 Insert the end of the Printer Cable and or RS 232 Cable into the appropriate connectors on the back of the Fax unit ...

Page 190: ...ull it out to the second stop 6 Place a piece of paper in the tray and test to see the Side Guides are in the correct position for your paper 7 To change the positions of the Guides to a new size paper snap them out and re locate them 8 Place paper in the Tray and push the Tray Extension in against the end of the paper Note Refer to the Specifications Chapter for information on what type and size ...

Page 191: ...ee seconds after turning the Main ON OFF Switch ON or OFF before pressing it again 2 After the power is turned ON the fax goes through an initialization cycle until it is Ready 3 If a problem occurs during a transmission causing the lose of system data or memory this unit generates a Power Fail Report and emits short intermittent beeps I O ...

Page 192: ...User Data Set Date Time 2 User Fax Number You Fax unit can print out a transmission report at a remote unit with your fax number for identification Refer to Program User Data Set User FAX Number 3 User Name You Fax unit can print out a transmission report at a remote unit with your company name for identification Refer to Program User Data Set User Name 4 Correct Dialling Type Tone or Pulse Select...

Page 193: ... Thin or transparent paper Film copies of document Thicker than a postcard Originals of cloth 2 Adjust the document Side Guides to fit your original 3 Enter the telephone number for another fax unit 4 Press the Start key 5 Check to make sure the transmission was successful 6 If the transmission was successful you are now ready to do the remainder of the programming 7 If the transmission was not su...

Page 194: ...der the Fax unit and serves as a base for it We recommend that you un pack this unit first After you complete this procedure go back to the installation procedure for the Fax unit and install the Fax on top of the 2nd Paper Cassette Unpacking the 2nd Paper Cassette Unpacking the accessory boxes and verify that the following items are included in the kit 1 2nd Paper Cassette Carton 2 Packing Materi...

Page 195: ...ag and peel off the shipping tape 3 Remove the shipping tape and cardboard from the gear area 4 Remove any shipping material and tape from the Cassette cavity CAUTION Before proceeding make sure the Main ON OFF Switch on the Fax unit is in the OFF position 5 Place the Fax unit on top the 2nd Paper Cassette making sure the three Aligning Posts and the Power Connectors are carefully aligned ...

Page 196: ...ace a sheet of paper on the baseplate and check to see that the Cassette is set for that paper size Note Refer to the Specifications for appropriate paper sizes 5 To change the Cassette Paper size remove the necessary screws and re position the guides for the new size Note Do not overtighten the screws They can strip out if care is not taken 6 Fan the paper stack thoroughly and align its edges 7 L...

Page 197: ...n A 16 8 Do not load paper above the Maximum Level Indicator 9 If you add paper prior to the tray being completely empty make sure you place the old paper on top the stack 10 Put the Cassette Cover on the Cassette 11 Install the Cassette into the 2nd Paper Cassette ...

Page 198: ...Setting Up the Optional 2nd Paper Cassette A 17 Unpacking Installation ...

Page 199: ...u selection 2 Press YES 3 Use the Left Right Arrow keys to select REGISTER and press YES 4 Enter the department number 0 9 5 Enter the Department Password number using the Numeric Keypad CAUTION Once the password is entered you cannot edit it without having the old password If the old password is not available choose another mailbox to use Call your Service Representative for help in locating your...

Page 200: ... place The Department Name is not entered in machine memory It is listed here only for your convenience 7 Once the Department PW has been entered for a given Department ID a message appears informing you it has been used If you wish to edit this information follow the instructions given in the display Dept ID Dept PW Name Dept ID Dept PW Name 0 5 1 6 2 7 3 8 4 9 ...

Page 201: ... the number 0 9 for your mailbox ID 4 At the next screen enter the 4 digit password for this mailbox location CAUTION Once the password is entered you cannot edit without having the old password If the old password is not available choose another mailbox to use Call your Service Representative for help in locating your Password from within machine memory 5 Use a pencil to note the assignments This...

Page 202: ...ame is not entered in machine memory It is listed here only for your convenience 6 Once the Department No and PW have been entered a message appears informing you it has been used If you wish to edit this information follow the instructions given in the display ...

Reviews: