19
LAN
Connecting to a Network
The NP2000/NP1000 comes standard with a LAN port (RJ-45) which provides a LAN connection using a LAN cable.
Placing the optional wireless LAN card (NWL-100*) in the PC card slot of the projector also provides a wireless LAN
connection. To use a LAN connection, you are required to assign an IP address to the projector. For setting the LAN
mode, see page
89
(From the menu, select [Setup]
→
[Installation]
→
[LAN Mode])
With the LAN connection, two features are available: Projector control and Picture transmission.
Projector control feature
With the wired or wireless LAN connection, you can control (power on/off, input select, etc.) and receive information
from the projector over the network using a computer. The following two methods are available:
* Using the HTTP Server feature on the projector. (
→
page
51
)
* Using PC Control Utility 3.0 from the supplied User Supportware 3 CD-ROM.
Picture transmission feature
With the wired or wireless LAN connection, you can send images and slides from a personal computer to the projector
which then can be projected on the screen. The following two methods are available:
* Using Image Express Utility 2.0 from the supplied User Supportware 3 CD-ROM.
* Using Ulead Photo Explorer 8.0 from the supplied User Supportware 3 CD-ROM.
With the USB mouse connected to the projector, you can also operate the desktop screen on your Windows PC
connected to the LAN or the wireless LAN.
* Using Desktop Control Utility 1.0 from the supplied User Supportware 3 CD-ROM.
NOTE: Use a wireless LAN card conforming to the Wi-Fi standard for your personal computer.
TIP:
Five Windows software programs (Image Express Utility 2.0, Desktop Control Utility 1.0, Ulead Photo Explorer 8.0, Viewer PPT
Converter and PC Control Utility 3.0) and a Macintosh software program (Image Express Utility 2 for Mac OS X) are contained on the
supplied Projector User Supportware 3 CD-ROM. For their functions and operations, see the user's guides (PDF) contained on the
same CD-ROM.
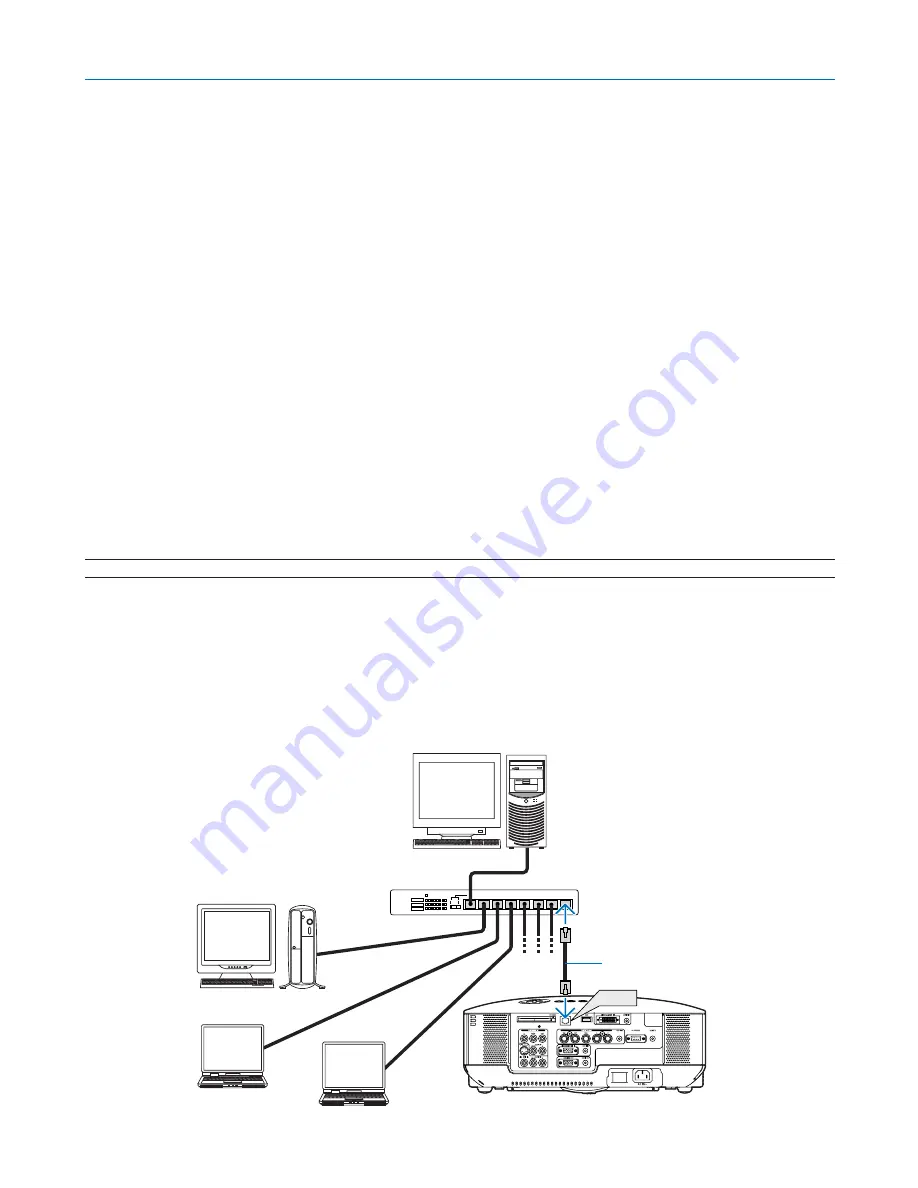
Example of LAN connection
(A) Example of wired LAN connection
Server
Hub
LAN cable (not supplied)
2. Installation and Connections
Summary of Contents for NP1000
Page 1: ...LCD Projector NP2000 NP1000 User s Manual ...
Page 145: ...LCD Projektor NP2000 NP1000 Bedienungshandbuch ...
Page 289: ...Projecteur LCD NP2000 NP1000 Mode d emploi ...
Page 433: ...Proiettore LCD NP2000 NP1000 Manuale dell utente ...
Page 577: ...Proyector LCD NP2000 NP1000 Manual del usuario ...
Page 721: ...LCD projektor NP2000 NP1000 Bruksanvisning ...
Page 939: ......
Page 942: ......
Page 943: ......
Page 981: ...35 MEMO ...
Page 982: ...36 MEMO ...
Page 988: ...LCD 液晶 NP2000 NP1000 用户手册 ...
Page 1002: ...6 1 产品说明 锁定提手 1 小心地将投影机的底部朝上放置 2 按下卡口拉起提手 3 按下左右锁将提手设置在适当位置 若要将提手位置还原 将左右锁往上推然后将提手往下推 ...
Page 1042: ...46 4 便利的功能 4 按四次 SELECT 键打亮 安全 5 按 ENTER 键显示安全画面 6 按一次 SELECT 键打亮密码输入框并按 ENTER 键 显示软键盘 ...
Page 1100: ...104 6 使用屏幕菜单 信号源页 1 输入端口 信号类型 视频类型 信号源名 项目号码 信号源页 2 水平频率 垂直频率 同步类型 同步极性 扫描类型 ...
Page 1112: ...116 8 使用可选的镜头 使用防盗螺丝防止镜头被盗 拧紧正面底部随机附带的防盗螺丝 镜头装置的防盗螺丝孔 ...
Page 1127: ...Printed in China 7N8P6621 NEC Viewtechnology Ltd 2006 ...
Page 1164: ...35 备忘录 ...
Page 1165: ...36 备忘录 ...


