Disassembly and Reassembly 3-21
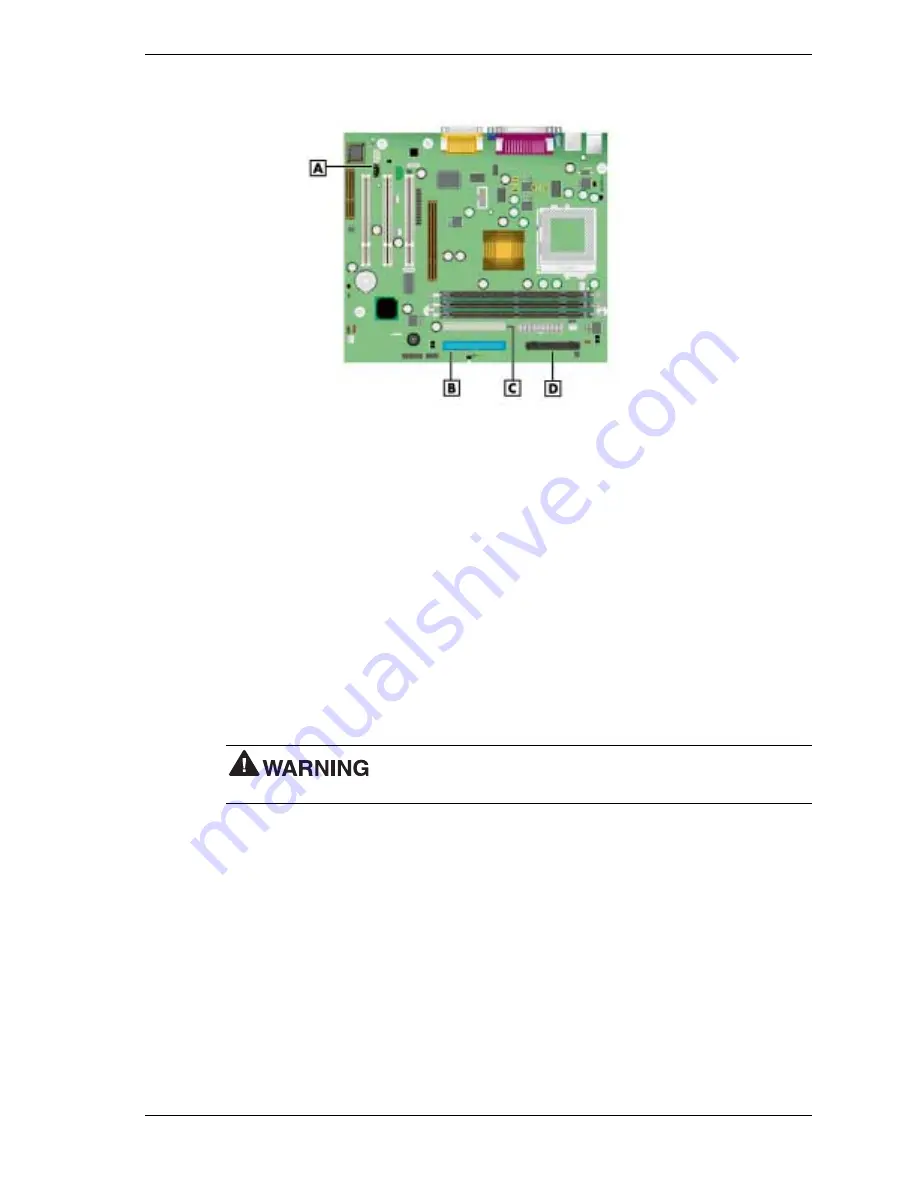
Locating System Board Cable Connectors
A
– CD Audio In
C
– Secondary IDE Connector (IDE2)
B
– Primary IDE Connector (IDE1)
D
– Diskette Drive Connector
3 1/2-Inch Accessible Device
The following sections describe how to remove a 3 1/2-inch accessible device (such as a diskette
drive or a Zip drive) from a 3 1/2-inch accessible device bay. Also included are procedures for
installing an accessible device in the device bay.
If removing a 3 1/2-inch device, use the following procedure. If installing a 3 1/2-inch device,
see “Installing a 3 1/2-Inch Device” later in this section.
Removing a 3 1/2-Inch Accessible Device
Remove a 3 1/2-inch accessible device as follows.
1.
Remove the system cover and front panel (see “Removing the Cover” and “Removing the
Front Panel”).
Before removing the cover, turn off system power and unplug the
system power cable. Power is removed only when the power cable is unplugged.
2.
Tag and unplug the signal and power cables from the back of any devices in the two-device
bracket (see the following figure “Removing the Two-Device Bracket” for bracket
location).
3.
Press in on the tab on each side of the bracket and pull the bracket out of the bay (see the
following figure “Removing the Two-Device Bracket” for tab locations).
4.
Remove the cover from the bracket by pressing in on the cover’s two tabs (see the figure
“Removing the Bracket Cover” later in this section for tab locations).
Summary of Contents for POWERMATE CT 815 - RELEASE NOTES
Page 13: ...1 System Overview Configurations Features Components Software...
Page 106: ...6 Preventive Maintenance System Cleaning Keyboard Cleaning Mouse Cleaning...
Page 109: ...7 Troubleshooting Checklist Diagnostics...
Page 118: ...8 NECC Information Services Service and Support Functions Technical Support...


![Lenovo 90B6 [H50-50 ES] User Manual preview](http://thumbs.mh-extra.com/thumbs/lenovo/90b6-h50-50-es/90b6-h50-50-es_user-manual_201023-01.webp)


