background image

English−10

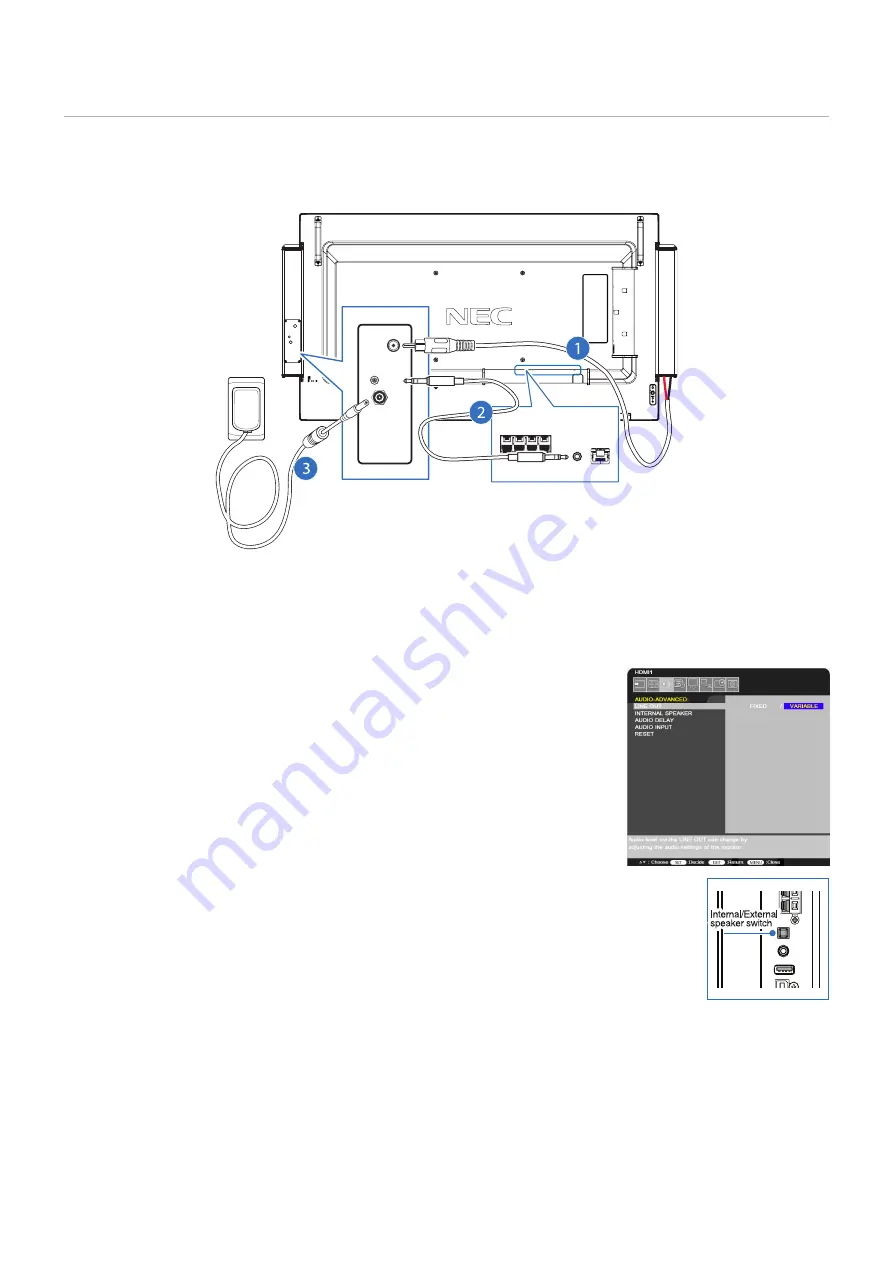
Connect the speakers to the monitor

1.  Connect the RCA cable to AUDIO OUT on the active speaker and the input on the passive speaker's base. 
2.  Connect the 3.5mm audio cable to the AUDIO OUT port on the monitor's terminal and the AUDIO IN on the 

active speaker.

3. 

Connect the power supply to the active speaker and then to the wall outlet.

LAN 

EXTERNAL SPEAKER

AUDIO OUT

AUDIO OUT

AUDIO IN

24VDC/2A

4. 

Turn the monitor's power on.

Activate the external speakers

This step depends on the monitor model; please check your product's user manual for the specific instructions 

on enabling external speakers. 
Depending on the model, activating the external speakers may require one of 

the following steps:

•  The monitor automatically detects the external speaker; you do not need to 

change any settings.

•  Enable the variable out setting in the OSD menu. Press the MENU button on 

the IR remote, then go to [AUDIO] > [ADVANCED] > [LINE OUT] and select 

[VARIABLE]. 

• 

Turn off the internal speaker in the OSD menu. Press the MENU button on 

the IR remote, then go to [AUDIO] > [ADVANCED] > [INTERNAL SPEAKER] 

and select [OFF] or [DISABLE].

• 

Push the "Internal/External speaker switch" below the speaker terminals on 

the monitor's terminal panel.

Summary of Contents for SP-RM3

Page 1: ...sion 1 0 Sharp NEC Display Solutions Contents Important monitor information on page 2 Box contents on page 4 Mounting the speakers on page 5 Connecting the cables on page 7 Safety precautions maintenance and troubleshooting on page 11 Manufacturer s Recycling on page 14 ...

Page 2: ...tlet and has been approved by and complies with the safety standards in the country of purchase This equipment is designed to be used in the condition of the power cord connected to the earth If the power cord is not connected to the earth it may cause electric shock Please make sure the power cord is earthed properly This symbol warns user that uninsulated voltage within the unit may have suffici...

Page 3: ... Incorporated in the United States and or other countries All other brands and product names are trademarks or registered trademarks of their respective owners NOTE 1 The contents of this user s manual may not be reprinted in part or whole without permission 2 The contents of this user s manual are subject to change without notice 3 Great care has been taken in the preparation of this user s manua...

Page 4: ...nterchangeable power plug adapters EU US UK and AU Parts list Part Quantity Description Quantity Description A 2 Speakers SP RM3 or SP RM3a 2 Speaker cables 2m SP RM3 B 4 M4 Screw 1 3 5mm TRS audio cable SP RM3a C 4 M4 Washer 1 RCA speaker cable SP RM3a D 4 Mounting bracket pre installed 1 Power supply base SP RM3a E 4 U S ADA mounting brackets 1 International plug adapter set SP RM3a Parts identi...

Page 5: ...er s mounting bracket to the monitor 3 Repeat step 2 for the right speaker NOTE If needed remove any handles from the monitor to be able to move the speakers behind the monitor Important The mounting position described leaves the speakers visible from the front of the monitor This is the recommended mounting position for the best sound quality For a concealed installation the speaker can be flippe...

Page 6: ...es in the United States have been provided for alternative mounting options To use the ADA mounting brackets first attach them to the speaker before mounting the speaker to the monitor See U S ADA mounting bracket installation options below for the usage orientations with monitor Mounting bracket orientation 1 Mounting bracket orientation 2 NOTE These brackets are optional they are not required to...

Page 7: ...al equipment s power as this may result in a loss of image or sound Fully complete the cable connections before powering on the monitor or external devices Do not use an attenuating built in resistor audio cable Using an audio cable with a built in resistor will lower the sound level Use an audio cable without a built in resistor The illustrations in this section are for example purposes only Plea...

Page 8: ...rs This step depends on the monitor model please check your product s user manual for the specific instructions on enabling external speakers Depending on the model activating the external speakers may require one of the following steps The monitor automatically detects the external speaker you do not need to change any settings Enable the variable out setting in the OSD menu Press the MENU button...

Page 9: ...Your display may differ from the illustrations Actual connections depend on the display model used Before you begin 1 Select the plug adapter for the plug style that matches the power socket where the speaker is located 2 Connect the plug adapter to the power supply base NOTE The following illustration is for example purposes only your power supply and power adapters may look slightly different CA...

Page 10: ...tor model please check your product s user manual for the specific instructions on enabling external speakers Depending on the model activating the external speakers may require one of the following steps The monitor automatically detects the external speaker you do not need to change any settings Enable the variable out setting in the OSD menu Press the MENU button on the IR remote then go to AUD...

Page 11: ...h the speakers SP RM3a Make sure the 3 5mm audio cable is fully inserted in the AUDIO OUT port on the monitor and the AUDIO IN port on the active speaker Do not use an attenuating built in resistor audio cable Using an audio cable with a built in resistor will lower the sound level Use an audio cable without a built in resistor Make sure the RCA cable is fully inserted into the AUDIO OUT port on t...

Page 12: ... on page 13 SP RM3 speakers Frequency range 80 20000 Hz Sensitivity 72 dB Rated Impedance 8 Ohm Long term max power 20 W Net Dimensions 1pcs 370x60x60 mm Net Weight 1pcs 1 kg Packing gross dimension 420x220x130 mm Packing gross weight 2 4 kg Fundamental Harmonic distortion components Outlines ...

Page 13: ...ower 40W Input 90 264VAC 47 63Hz Interchangeable plugs EU US UK and AU Loudspeaker driver 50mm full range driver Connections Audio IN 3 5mm TRS Net Dimensions 1pcs 370x60x60 mm Net Weight 1pcs 1 2 kg Packing gross dimension 420x220x130 mm Packing gross weight 2 6 kg Fundamental Harmonic distortion components Outlines ...

Page 14: ...s life All required information concerning the disposal of the product and country specific information on recycling facilities can be found on our following websites https www sharpnecdisplays eu in Europe https www sharp nec displays com in Japan or https www sharpnecdisplays us in USA WEEE Mark European Directive 2012 19 EU and amendments Disposing of your used product In the European Union EU ...

Reviews: