UNIVERGE SV8100
Issue 4.1
System Hardware Manual
5 - 37
3.
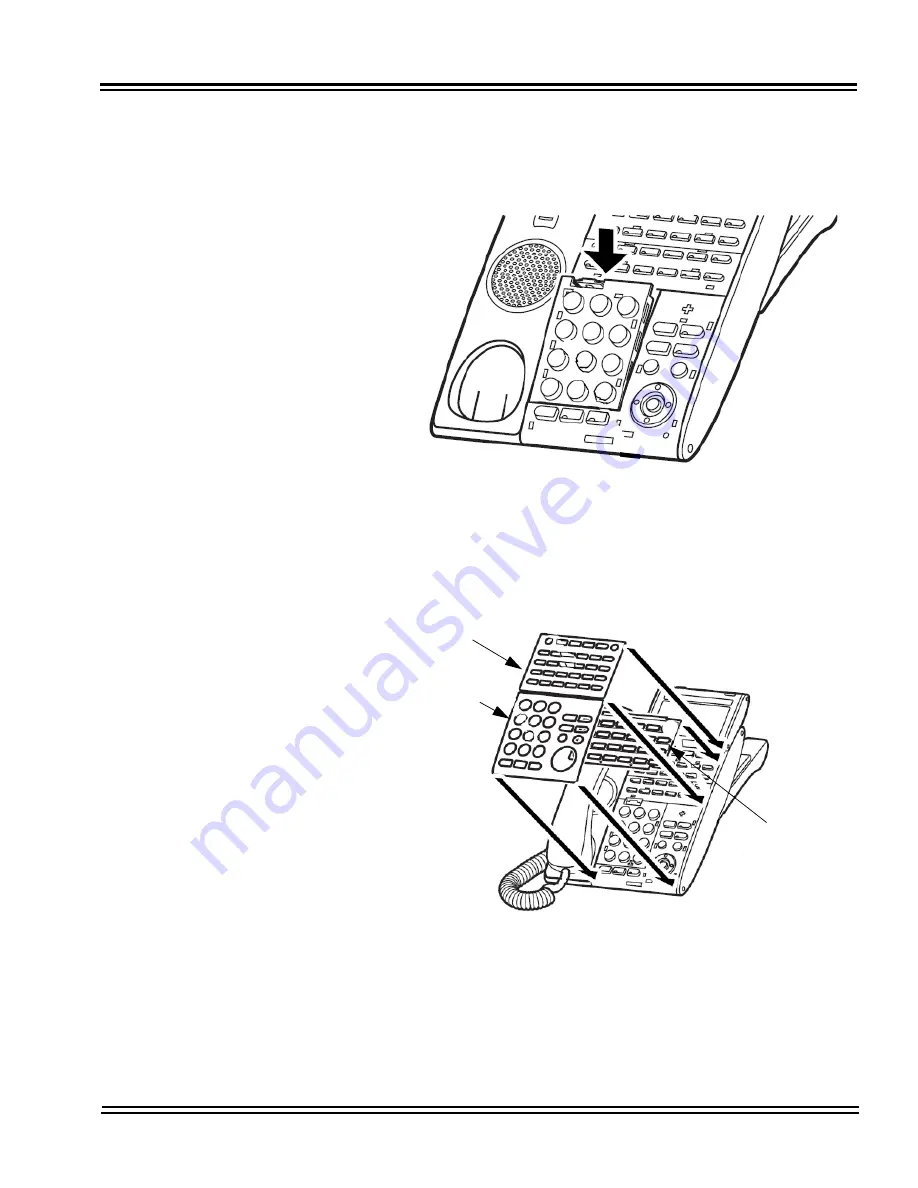
Slide the replacement numbered keypad into the grooves
located on the inside of the telephone, then press down on the
keypad to snap it into place. See
Figure 5-35 Install New
Numbered Keypad into DT300/DT700 Series Terminal
.
4.
Insert the DESI printer sheet and plastic panels on the multiline
terminal. Refer to
Figure 5-36 Install Plastic Panels
.
Figure 5-35
Install New Numbered Keypad into DT300/
DT700 Series Terminal
Figure 5-36 Install Plastic Panels
Desi Printer
Sheet
Line Key
Panel
Numbered
Keypad
Panel
Summary of Contents for Univerge SV8100
Page 1: ...System Hardware Manual Issue 4 1 February 2011...
Page 2: ...THIS PAGE INTENTIONALLY LEFT BLANK...
Page 36: ...Issue 4 1 UNIVERGE SV8100 1 14 Introduction to SV8100...
Page 68: ...Issue 4 1 UNIVERGE SV8100 2 32 SV8100 System Specifications...
Page 99: ...UNIVERGE SV8100 Issue 4 1 System Hardware Manual 3 31 Figure 3 34 Install Screws Option 2...
Page 148: ...Issue 4 1 UNIVERGE SV8100 3 80 Installing the SV8100 Chassis...
Page 247: ...UNIVERGE SV8100 Issue 4 1 System Hardware Manual 4 99 Figure 4 34 Control Signal Connection...
Page 258: ...Issue 4 1 UNIVERGE SV8100 4 110 Installing the SV8100 Blades NOTES...
Page 418: ...Issue 4 1 UNIVERGE SV8100 6 64 Installing SV8100 Optional Equipment...


