Creating a Logical Disk
The following procedure describes how to create a logical disk (LD).
Your disk array unit contains three factory-installed disk drives that are bound
(RAID-configured) through RAID-5 (2+P). You can use this logical disk as is or after
rebinding in accordance with the operating environment of your system.
Perform the procedure below to rebind a logical disk:
1.
Unbind the logical disk that is already bound.
2.
Bind the new logical disk.
3.
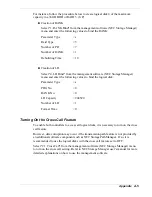
Set the Cross Call feature to ON (if necessary).
Unbinding the Existing Logical Disk
To create a new logical disk, first unbind the existing LD, and then unbind the RANK
using NEC Storage Manager. Refer to NEC Storage Manager user’s manual for detailed
explanations on how to use the management software.
For instance, follow the procedure below to unbind logical disk 0 that is already bound:
Unbinding of LD
Select "5. LD Unbind" from the management software (NEC Storage Manager)
menu and specify LUN=0.
Unbinding of RANK
Select "2. RANK Unbind" from the management software (NEC Storage
Manager) menu and specify PDG=0 and RANK=0.
Binding the New Logical Disk
To create the logical disk, first bind the RANK, and then bind the LD.
To bind the RANK, you must specify a RAID level. Select the RAID level carefully
because it has consequences on system performance and capacity. See Chapter 1 for
details.
To bind the LD, you must specify a capacity. The specified capacity defines the number
of logical disks in a single RANK. Select the capacity carefully because the unused area
remaining may affect its performance. See Chapter 1 for details.
Refer to NEC Storage Manager user’s manual for detailed explanations on how to use
the management software.
A-4
Appendix
Summary of Contents for VERSA S1300 Series
Page 1: ... U s e r s G u i d e NEC Storage S1300 ...
Page 2: ......
Page 4: ......
Page 8: ...vi Contents ...
Page 18: ...xvi Using This Guide ...
Page 19: ...1 System Overview Overview System Chassis System Features ...
Page 54: ...A B Figure 2 3 Installing the Rack Mounting Kit 2 6 Setting Up the System ...
Page 73: ...3 Upgrading the System Overview Adding Hard Disk Drives Adding Disk Enclosures ...
Page 86: ...3 14 Upgrading the System ...
Page 114: ...A 8 Appendix ...
Page 117: ...xx ...
Page 118: ... ...

