7-2 Troubleshooting
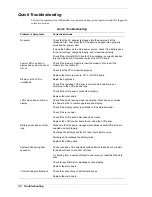
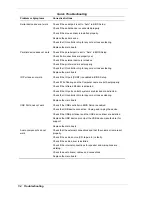
Quick Troubleshooting
This section summarizes problems that may develop during system operation and lists suggested
corrective actions.
Quick Troubleshooting
Problem or Symptoms
Corrective Actions
No power
Check that the AC adapter is plugged into the power port of the
notebook. Also, check that the AC adapter is plugged into a properly
grounded AC power outlet.
If using the battery as the main power source, check if the battery pack
is the correct type, charged properly, and is inserted correctly.
Check if the internal DC/DC board of the notebook is correctly inserted
into the main board. Otherwise, replace the DC/DC board.
Power LED is on but no
display and system does not
turn on
Check if the memory module is inserted properly. Also insert the
module into the other slot.
Check that the CPU is inserted properly.
Replace the memory module, CPU, or DC/DC board.
Display on the LCD is
unreadable
Adjust the brightness.
Check if the installed VGA driver is correct and resolution is set
according to the LCD size and type.
Check if the LCD panel is connected properly.
Replace the main board.
LCD screen does not show
display
Check if the power saving mode is activated. Press any key or press
the Power button to resume operation and display.
Check if the display output is switched to the external monitor.
Check if there is power.
Check if the LCD panel is disconnected or loose.
Replace the LCD inverter board found inside the LCD panel.
Battery power does not last
long
Make sure that the power management options under BIOS Setup are
enabled and set properly.
Recharge the battery pack for at 3 least hours before using.
Discharge and recharge the battery twice.
Replace the battery pack.
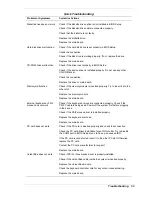
System halts during boot
sequence
Check condition of the selected bootload device (diskette or hard disk)
for bad boot track or incorrect O/S files.
Try booting from a new boot diskette and recopy or repartition the hard
disk.
Check for any BIOS error messages on the display.
Replace the main board.
I/O processing malfunctions
Check the connections of all internal devices.
Replace the main board.
Summary of Contents for VXI Series
Page 43: ...3 Disassembly and Reassembly Required Tools and Equipment Disassembly Reassembly...
Page 67: ...4 System Board Layout Audio Board DC DC Board I O Board Main Board...
Page 70: ...5 Illustrated Parts Breakdown Illustrated Parts Breakdown Parts List...
Page 71: ...5 2 Illustrated Parts Breakdown Illustrated Parts Breakdown...
Page 77: ...7 Troubleshooting Quick Troubleshooting Helpful Questions...
Page 86: ...9 Specifications System Components Connector Locations Memory Map Interrupt Controllers...

