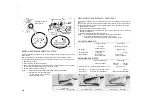
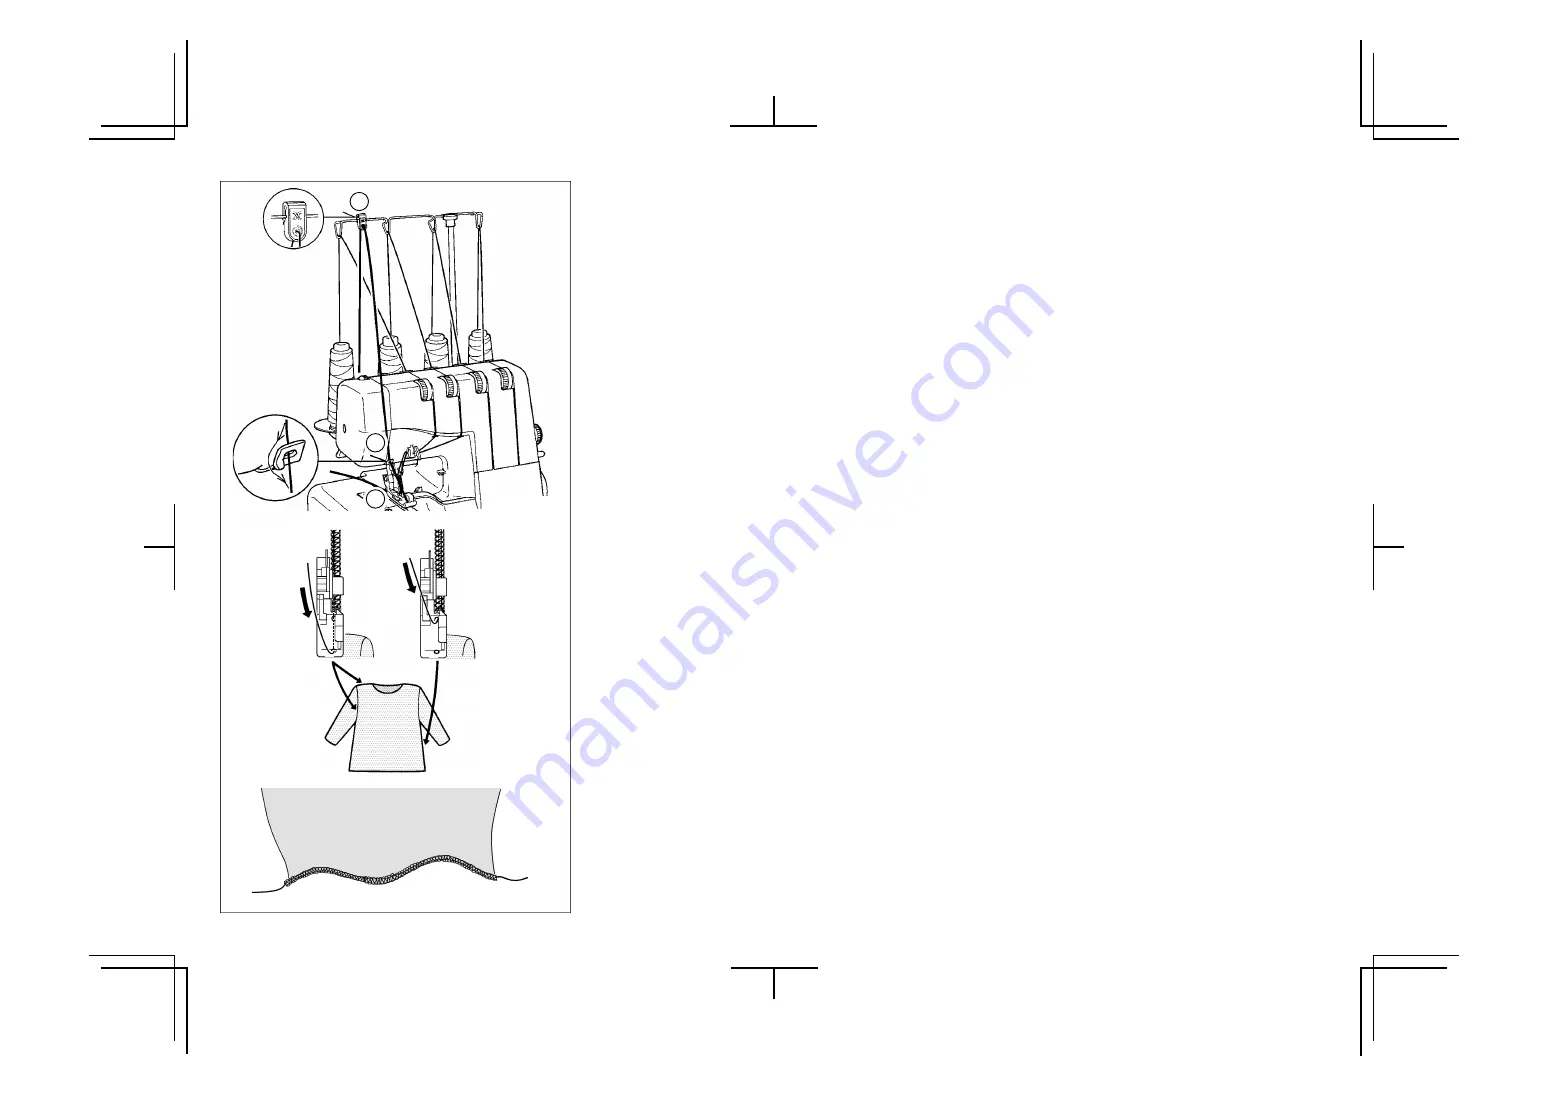
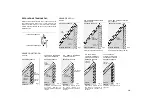
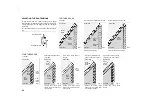
background image

Fig. 3

Fig. 2

Fig. 4

SOPRAGGITTO CORDONATO

Il   sopragitto   cordonato   può   essere   usato   per   rinforzare 
spalle, maniche o cuciture laterali quando si cuciono o si 
fabbricano indumenti di maglia. Come elemento decorativo 
si   può   usare   filo   per   maglieria   di   colori   contrastanti.   La 
vostra macchina è equipaggiata   con un piedino pressore 
che è stato disegnato per alimentare la corda ed il filo alla 
sinistra o alla destra del punto di sicurezza.
Seguire le istruzioni seguenti :

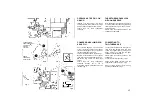
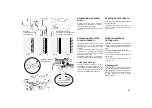
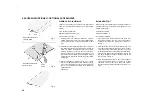
1. Porre la guida del cordone sul sostegno guida filo. (Fig. 

1).

2. Porre un cordone quale cotone da crochet, lana, filo di 

maglia o filo elastico, dietro il perno della spola di filo.
Far   passare   il   cordone   attraverso   il   guida   filo   ago   di 
sinistra (3) vedere Fig. 1

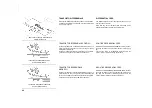
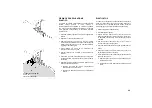
3. Inserire il cordone attraverso l'un o l'altro foro anteriore o 

posteriore (in accordo all'operazione vedere diagramma 
di   fig. 2 e 3) nel piedino   pressore e passarlo sotto   e 
dietro il piedino.

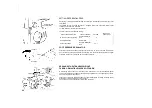
4. Porre il materiale da cucire normalmente. Partire a bassa 

velocità osservando se il cordone è alimentato in modo 
corretto e aumentare la velocità come è necessario.

PER   UNIRE   SPALLE   O   MANICHE   passare   il   cordone 
attraverso il foro frontale, assicurandosi che esso sia fissato 
tra i fili dell'ago destro e sinistro mentre è guidato attraverso 
il foro frontale. (Fig. 2).

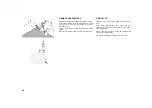
PER   UNIRE   CUCITURE   LATERALI   passare   il   cordone 
attraverso   il   foro   posteriore   assicurandosi   che   esso   sia 
posizionato vicino al filo dell'ago destro.

PER   EFFETTI   DECORATIVI   potete   passare   colori 
contrastanti o se lo disiderate passare il cordone o il filo 
attraverso ciascun foro.

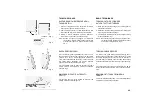
PER PRODURRE UN ORLO ONDULATO CON IL CORDONE

 (Fig. 4) passare   il   cordone   attraverso   il   foro   posteriore   e 

cominciare.

ORLATURA A RULLO (vedere pag. 18) questo si usa per 
l'orlo di gonne.

CORDED OVERLOCK

Corded overlock can be used to strengthen shoulder, sleeve

 or side seams when joining or making up knitted garments. 

As   a   decorative   feature   you   can   use   knitting   yarn   of 
contrasting colours to further enhance your garment. Your 
machine is equipped with a presser foot which has been 
designed to feed your cord or yarn to the left of the safety 
stitch or to the right. Follow instructions as follows:

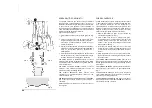
1. Snap the detachable cord guide, in your accessory set 

onto the thread guide pole (Fig. 1).

2. Place   a   " filler "   cord,   such   as   a   crochet   cotton,   gimp, 

wool, knitting yarn, or shirring elastic at the rear of the 
machine   spool   pin.   Pass   the   cord   through   the   cord 
guides   (1)   and   (2)   and   then   through   the   left   needle 
thread guide (3). See Fig. 1.

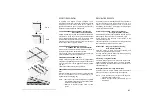
3. Insert   the   cord   through   either   the   front   or   rear   hole 

(according to the operation, see diagrams Figures 2 and 
3), in the presser foot and pass it under and to the rear of

 the foot.

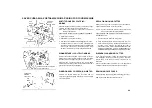
4. Place the material to be sewn as normal. Start at slow 

speed observing if cord is feeding correctly and increase

 speed as needed.

FOR JOINING SHOULDERS OR SLEEVES, pass the cord 
through the front hole, ensuring that it is fixed between the 
left and right needle threads as it is guided through the front 
hole. (Fig. 2).

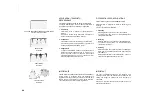
FOR JOINING SIDE SEAMS, pass the cord through the rear 
hole, ensuring   it is positioned   to   the right needle   thread. 
(Fig. 3).

FOR   DECORATIVE   EFFECTS,   you may pass contrasting 
colours either through the front or rear hole or if you desire, 
pass cord or yarn through each hole.

FOR MAKING WAVED HEM WITH GUT (Fig. 4), pass the gut

 through the rear hole and start ROLLED HEM (See page 18).

This is used for the hem of skirt, etc.

26

3

2

1

Fig. 1

Summary of Contents for Lock 181

Page 1: ......

Page 2: ...spina 27 Interruttore luce e potenza 28 Coperchio frontale 29 Coltello mobile 30 Gancio superiore 31 Gancio inferiore 32 Guida cavo 1 Foot pressure regulator 2 Sewing light 3 Presser foot lever 4 Thr...

Page 3: ...isuratore opzione 7 Coperchio macchina 8 Cacciavite grande 9 Coltello mobile 10 Chiave 11 Rete filo 12 Pinzette 13 Piastre di estensione 14 Porta spola 15 Coperchio spola 16 Borsa accessori 1 Two thre...

Page 4: ...destra e alzate la parte frontale del piedino pressore con la mano sinistra SETTING UP YOUR MACHINE 1 Wipe off excess oil in the needle plate and bed areas 2 FOOT CONTROL Push foot control plug into...

Page 5: ...tenere i fili all altezza della spola spingendo gi il sostegno come illustrato PREPARATION FOR THREADING THREAD GUIDE POLE Pull up thread guide pole to the highest point until you hear it click Place...

Page 6: ...ESTIC TYPE SPOOLS SPOOL DISC AND SPOOL HOLDERS FOR CONE SPOOLS For large cone spools use the rubber spool holders with the wide end at the top and for small ones use the same rubber spool holders but...

Page 7: ...e il suo perno sia sotto la scanalatura del supporto piedino 3 Abbassare il supporto piedino e spingere la leva per bloccare il piedino LINT TRAY With the lint tray located in this position it will co...

Page 8: ...to Cammello Astrakhan Peso leggero Crepe Georgette Velo Raso Peso consistente Taffeta Twills Denim Tricot Jersey Lana Cotone Lana Fibra Sintetica Tessuti maglia 90 per cuciture generiche 75 per tessut...

Page 9: ...0 50 Bulk Nylon COTTON LINEN WOOL SYNTHETIC FIBRE KNIT 90 14 for general sewing 75 11 for light weight fabrics THREAD NEEDLE FABRIC Synthetic threads are recommended for ordinary overlocking Polyester...

Page 10: ...sare il filo attraverso la cruna del gancio inferiore ed agganciarlo intorno alla parte A come indicato dalla freccia Lasciare circa 10 cm di filo THREADING YOUR MACHINE Wrong threading may cause skip...

Page 11: ...il filo attraverso il guidafilo metallico e l occhiello del gancio lasciando una lunghezza in eccesso di 10 cm THREADING UPPER LOOPER 1 Feed the thread through the thread guide as illustrated 2 Pull t...

Page 12: ...cesso di 10 cm circa INFILA AGO OPZIONE L ago viene infilato facilmente per mezzo dell infila ago vedere pagina 36 THREADING NEEDLES 1 Feed the thread through the thread guide as illustrated 2 Draw th...

Page 13: ...Tirare il filo vicino al taglia filo sulla placca ago e spingere la leva taglia filo HELPFUL HINTS REPLACING THREAD SPOOLS When replacing thread spools the following steps may be helpful for quick cha...

Page 14: ...rodurre una catenella di 10 cm circa tirando leggermente la catenella da dietro Tagliare i fili con il tagliafilo spingendo la leva tagliaflio lasciando 5 o 6 cm di catenella TESTING STITCH OVERLOCK S...

Page 15: ...a manopola ampiezza taglio sovra orlo sono di norma generale Una piccola rotazione migliorer la vostra cucitura in molti casi I seguenti suggerimenti vi aiuteranno 1 Ruotate la manopola ampiezza tagli...

Page 16: ...1 2 4 4 0 0 4 4 4 4 4 4 4 4 4 4 2 5 3 5 4 6 4 5 4 Note The above settings of tension and overedge cutting width dial are for general guidance Tension settings may vary with different threads and fabr...

Page 17: ...nvertitore inserirlo profondamente come illustrato in fig 4 THREE THREAD OVERLOCK WITH ONE NEEDLE By threading the LEFT needle only a width of 6 mm will be produced and by threading the RIGHT needle o...

Page 18: ...plate by screw driver and keep it in the front cover as illustrated Model 087 only or in the accessory bag 4 Set the machine according to page 15 NOTE 1 Please use following recommended thread for ma...

Page 19: ...SCIO FILO D AGO TIRATO SUL DIRITTO DEL TESSUTO Aumentare la tensione del filo ago ROVESCIO TESSUTO Fig 4 FILO GANCIO INFERIORE FILO GANCIO SUPERIORE FILO AGO SINISTRO FILO AGO DESTRO FILO GANCIO INFER...

Page 20: ...fabric Increase left needle thread tension and or decrease either or both looper threads Increase right needle thread tension Decrease needle tension Just right Lower looper thread pulled to under sid...

Page 21: ...re una perfetta chiusura del punto ADJUSTING STITCH LENGTH Turn the stitch length dial until the required length is reguired The higher the number the longer the stitch This dial can adjust the stitch...

Page 22: ...l arricciamento sulla stoffa DIFFERENTIAL FEED The differential feed has two independent feed dogs one front A and one rear B Each feed dog has an individual feed mechanism which enables the feeding...

Page 23: ...essione del piedino pressore stata predisposta in un modo corretto dalla fabbrica cosi non occorre regolarla per la maggior parte delle cuciture ordinarie Se necessaria la regolazione ruotare il regol...

Page 24: ...pressure has been correctly set at the factory so you do not need to adjust it for most of ordinary sewing If adjustment is necessary turn the foot pressure regulator to higher number to increase or...

Page 25: ...e nell opposta direzione Fig 4 RIMUOVERE I PUNTI DAL TESSUTO CUCITO Per rimuovere punti gi cuciti tagliare ad intervalli il filo dell ago e tirare fuori il filo del gancio BASIC TECHNIQUES TURNING OUT...

Page 26: ...Fig 4 passare il cordone attraverso il foro posteriore e cominciare ORLATURA A RULLO vedere pag 18 questo si usa per l orlo di gonne CORDED OVERLOCK Corded overlock can be used to strengthen shoulder...

Page 27: ...NOTA Se cucirete i sopra menzionati punti con il piedino orlo invisibile opzionale pag 32 potrete ottenere facilmente un cucitura ottimale Riducete le tensioni quando usate un filato grosso DECORATIV...

Page 28: ...lasticit del tessuto Anche la lunghezza punto pu influenzare la regolazione Pi lunghi i punti pi il tessuto contratto Fare sempre una prova di cucitura su scarto di pezze di tessuto che volete cucire...

Page 29: ...a dalla presa di corrente prima di rimuovere il coperchio sinistro Rimuovere la vite ed estrarre il coperchio sinistro REPLACING MOVING CUTTER Replace a moving cutter if it becomes blunt as follows A...

Page 30: ...e polvere e filaccia con la spazzola all interno della macchina CLEANING AND OILING To keep the machine running smoothly keep it clean and lubricated at all times FIRST DISCONNECT MACHINE FROM POWER S...

Page 31: ...liata Tensioni troppo tese Infilare correttamente 4 CONTROLLO PROBLEMI DI FUNZIONAMENTO CHECKING PERFORMANCE PROBLEMS Differential feed is set incorrectly Incorrect Thread Tension s Bent or blunt Need...

Page 32: ...ire e pressare di nuovo I punti dovrebbero risultare quasi invisibili sul diritto del tessuto Vedere fig 3 BLIND HEM FOOT Blind hem feet are obtainable as an optional extra and are available in two si...

Page 33: ...risultato a Tensione pi stretta del rullo da pi elasticit al tessuto dopo che stato cucito b Tensione pi debole del rullo da meno elasticit del tessuto ELASTICATOR An elastic foot is available as an...

Page 34: ...sere usati sia treccia piatta o piegata Usare per decorazione di bordi di colli polsini tasche ecc PIPING FOOT Prepare a piece of ready made piping corded bias fold tape Place folded piping between se...

Page 35: ...il tessuto Tenere presente che lo strato inferiore del tessuto si muover pi in fretta mentre viene pieghettato GATHERING SHIRRING FOOT 1 Tension settings for gathering Left needle 4 Differential feed...

Page 36: ...ciare la mano che sta tirando il filo 6 Togliere l infila ago dal morsetto ago 7 Tirare il filo via da voi NEEDLE HOLE THREADER 1 Feed the thread through the thread guide of needle clamp as illustrate...

Page 37: ...macchina conforme alla direttiva CEE 89 336 EEC relativa alla compatibilit elettromagnetica This appliance complies with EEC Directive 89 336 EEC covering the electromagnetic compatibility Part No 772...

Page 38: ...ma di maneggiare vicino all ago per infilare cambiare l ago o cambiare il piedino premi stoffa ecc Disinserire la macchina dalla presa murale prima di iniziare la manutenzione descritta nel manuale Ut...

Reviews: