L-PAK 150, L-PAK 250
EN
acoustic enclosure over the motor/fan and the top
cover over the dust extractor.
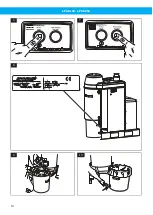
• Switch off the unit at the end of the shift by press-
ing the white push button shown in
on the
control panel (even when the unit has automatic
start/stop) and turning the switch-disconnector to
0.
6 Maintenance
Read
be-
fore carrying out any maintenance work.
Maintenance work means that the equipment will
have to be opened and possibly dismantled. This may
constitute a risk and the maintenance personnel need
to know about the risks that may occur when acting
incorrectly.
Always replace damaged, worn or defective electrical
components or other parts with new original parts.
WARNING! Risk of personal injury
An approved protective mask should be used
when emptying the collector bin and when
replacing filters in the dust collector and mi-
cro-filter.
6.1 Checks one month after installation
and every year
One month after installation, and then every year,
perform the following checks:
• Check all power and protective conductors and
ground wire connections. Tighten, if required, to en-
sure good contact.
• Inspect valves, hoses and seals for leakage.
• Clean the area around the unit and all areas where
the collected material is stored to ensure that there
are no dust deposits.
• Check that all signs/markings regarding safe opera-
tion are in place and that the personnel knows about
them.
• Verify the function of all emergency stop buttons,
alarms and signalling devices.
6.2 Collector bin
WARNING! Risk of personal injury
Always use an approved breathing mask when
replacing the dust sack.
Empty the collector bin regularly and before it be-
comes 2/3 full, see
. If the bin is too full it in-
creases the load on the filters. Replace the plastic sack
with a new one (no holes) and re-connect the connec-
tion hose, see
.
NOTE!
Check that the connection hose is intact and
not blocked.
The plastic sack is held in position in the bin by feeding
negative pressure to the outside of the sack via the
hose that runs from the bottom of the bin to the dust
collector.
6.3 Changing the filter
WARNING! Risk of personal injury
Always use an approved breathing mask when
changing the filter.
6.3.1 Filter package
The following filter packages are available for L-PAK
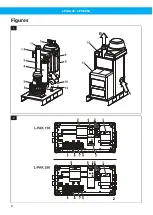
150, L-PAK 250, see
position A - D:
(A) Filter package, PP. Replacing the entire filter pack-
age is recommended. When only changing the socks,
the filter ring should also be replaced.
(B) Filter package, cartridge
(C) Filter package, CF
(D) Filter package, sack
Change the whole filter package after about 5,000
hours of operation or a maximum of 3 years. If welding
fumes are filtered these figures should be reduced to
3000 hours and 2 years.
NOTE!
The changing interval of the filter is dependant
of the material the unit handle. If uncertainties
arise of changing intervals, contact the distrib-
utor or Nederman.
1
Remove the top cover and the dust extractor’s
cover.
2
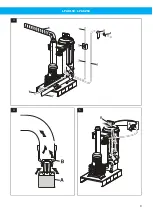
shows how the filter package with filter
socks are removed.
3
Place the old filter package in a large plastic sack,
see
, or wrap in plastic foil. Avoid dust
spreading.
6.3.2 Micro-filter (accessory)
Replace the micro-filter, see
, every 12
months or more frequently if the suction capacity de-
preciates. For placement see
position 4. Care-
fully lift out the filter, place it in a plastic sack and seal
the bag with care.
6.4 Filter cleaning
1
Check the automatic cleaning equipment.
2
Remove the top cover from the collector and in-
spect the valve disc.
3
Startup the unit and press the Manual Filter Clean-
ing button, see
The compressed air cylinder should lift the valve disc
and loud noise can be heard as air rushes into the col-
lector to blow off the dust from the outside of the fil-
ter package.
22
Summary of Contents for 40051800
Page 8: ...L PAK 150 L PAK 250 Figures 1 2 8 ...
Page 9: ...L PAK 150 L PAK 250 3 4 5 9 ...
Page 10: ...L PAK 150 L PAK 250 6 7 8 9 10 10 ...
Page 11: ...L PAK 150 L PAK 250 11 12 13 14 11 ...
Page 178: ...www nederman com ...

