background image

Hose Reel 876

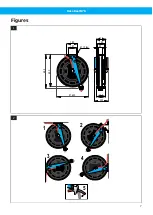
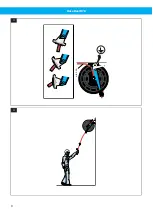
5.4 Ratchet mechanism

See 

Figure 4

. The Hose Reel 876 is delivered with a

ratchet mechanism which retains the hose in the re-
quired outdrawn position. The ratchet will disengage
if the hose is drawn out a little further and the hose
then recoils to the drum.

NOTE! 
The hose should be held by the hand as long
as possible during the recoiling. The ratchet
function can be disengaged by removing the
ratchet. In that case the hose must first be
completely recoiled.

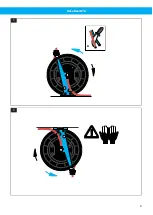
5.5 Hose fitting

See 

Figure 5

. When selecting hose, note bore size and

working pressure on the reels identification label.
1

Place the Hose Reel 876 on a suitable working
bench.

NOTE! 
Ensure that there is no tension in the
spring.

2

Fit the hose to the fitting on the drum shaft, see
also item A.

3

Loosen the spring hub fixing screws, see item *.

4

Wind all the hose on, by turning the drum in the
direction of the blue arrow.

5

Fasten the spring hub with 3 fixing screws.

6

Tension the spring by turning the drum, with all
hose in place, 1–3 revolutions in the direction of
the black arrow.

7

Push the hose through the reels outlet and fit the
hose-stop.

8

Fit the inlet hose, min. length 0.5 m.

9

Fit the reel, see 

Section 5.1 Mounting instruction

.

10 Check that the required length of hose can be un-

reeled without stretching the spring to its limit.

11 Turn on the supply and check that the hose con-

nections don’t leak.

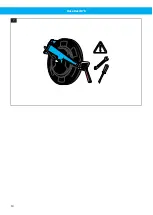
5.6 Adjustment of spring tension

WARNING! Risk of personal injury
Use protection gloves.

See 

Figure 6

.

• Recoil the hose until the hose stop stops against

the outlet. Pull the hose out, to a position where the
ratchet is engaged. Unscrew hose stop and tool con-
nected to the hose.

• Turn the drum, with all hose wound on: one revolu-

tion in the direction of the black arrow when in-
creasing the spring tension, one revolution in the
direction of the blue arrow when decreasing the
spring tension.

• Refit hose stop and tool.

• Check that the required length of hose can be pulled

out without stretching the spring to its limit.

6 Maintenance

NOTE! 
• Installation, repair and maintenance work is

to be carried out by qualified personnel using
only original Nederman spare parts. Contact
your nearest authorized distributor or Neder-
man for advice on technical service.

• The service intervals in this chapter are

based on the unit being professionally main-
tained.

The following maintenance is recommended to be ac-
complished regularly or at least once a year:
• Check the spring function by testing if the hose re-

coils properly.

WARNING! Risk of fire
• Check that swivel and hose couplings don’t

leak. Use leak detection spray. Change the
seal if required. Clean the swivel and coup-
lings.

• Check that the hose is intact. Clean the hose if oily or

dirty.

• Check the ratchet mechanism.
• Check the fixing points of the reel on wall or ceiling.

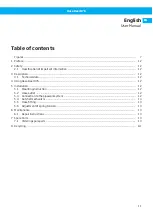
6.1 Repair instructions

See 

Figure 7

.

WARNING! Risk of personal injury
Before starting any operation in the Hose Reel
876:
• Turn off the supply of gas (air etc.).
• Neutralize the spring power by removing the

hose stop and let the hose recoil.

Instructions for hose fitting, see 

Section 5.5 Hose fit-

ting

. Instructions for changing the spring cassette,

swivel or seal comes with each spare part.

7 Spare Parts

CAUTION! Risk of equipment damage
Use only N

$

e

$

d

$

e

$

r

$

m

$

a

$

n

$

 original spare parts and ac-

cessories.

Contact your nearest authorized distributor or
N

$

e

$

d

$

e

$

r

$

m

$

a

$

n

$

 for advice on technical service or

if you require help with spare parts. See also
w

$

w

$

w

$

.

$

n

$

e

$

d

$

e

$

r

$

m

$

a

$

n

$

.

$

c

$

o

$

m

$

.

7.1 Ordering spare parts

When ordering spare parts always state the following:
• The part number and control number (see the

product identification plate).

EN

13

Summary of Contents for 876

Page 1: ...MANUAL Translation of original user manual DE BEDIENUNGSANLEITUNG ES MANUAL DE USUARIO FI K YTT OHJE FR MANUEL DE L UTILISATEUR IT MANUALE DELL UTENTE NL GEBRUIKERSHANDLEIDING PL INSTRUKCJA OBS UGI S...

Page 2: ...Hose Reel 876 Trace back information Workspace Main version a68 Checked in 2022 10 28 Skribenta version 5 5 022...

Page 3: ...Hose Reel 876 Declaration of Conformity 4 Figures 7 English 11 Deutch 15 Espa ol 19 Suomi 23 Fran ais 27 Italiano 31 Nederlands 35 Polski 39 Svenska 43 3...

Page 4: ...7 2019 El nombre y firma que figuran al final de este documento corresponden a la persona responsable tanto de la declaraci n como de la ficha t cni ca FI Suomi Vaatimustenmukaisuusvakuutus Me AB Ph N...

Page 5: ...e odpowiednie wymaga nia wymienionych ni ej dyrektyw i norm Dyrektywy 2006 42 EC Normy EN ISO 12100 2010 EN ISO 20607 2019 Na ko cu niniejszego dokumentu znajduj si imi i nazwisko oraz pod pis osoby o...

Page 6: ...2008 Standards EN ISO 12100 2010 EN ISO 20607 2019 The name and signature at the end of this document is the person responsible for the declaration of conformity The UK importer is authorised and resp...

Page 7: ...Hose Reel 876 Figures 180 157 13 4x 150 125 65 135 220 620 690 650 1 1 5 3 4 2 2 7...

Page 8: ...Hose Reel 876 min 0 5 m 3 4 8...

Page 9: ...Hose Reel 876 A 5 6 9...

Page 10: ...Hose Reel 876 7 10...

Page 11: ...12 3 1 Technical data 12 4 Using Hose Reel 876 12 5 Installation 12 5 1 Mounting instruction 12 5 2 Hose outlet 12 5 3 Connection to the pipework system 12 5 4 Ratchet mechanism 13 5 5 Hose fitting 1...

Page 12: ...potential hazard to the health and safety of personnel and how that hazard may be avoided CAUTION Risk of equipment damage Cautions indicate a potential hazard to the product but not to personnel and...

Page 13: ...ion in the direction of the black arrow when in creasing the spring tension one revolution in the direction of the blue arrow when decreasing the spring tension Refit hose stop and tool Check that the...

Page 14: ...a r c h Quantity of the parts required 8 Recycling The product has been designed for component mater ials to be recycled Different material types must be handled according to relevant local regulation...

Page 15: ...ibung 16 3 1 Technische Daten 16 4 Gebrauch der Hose Reel 876 16 5 Installation 16 5 1 Montageanleitung 16 5 2 Schlauchausgang 16 5 3 Anschluss an das Leitungssystem 16 5 4 Rastmechanismus 17 5 5 Schl...

Page 16: ...r die Gesundheit und die Sicherheit der Be nutzer sowie auf die Gefahrenvermeidung hin VORSICHT Gefahr der Anlagenbesch di gung Vorsichtshinweise kennzeichnen eine m gli che Gefahr f r das Produkt jed...

Page 17: ...Medienzufuhr einschalten und berpr fen ob die Schlauchanschl sse dicht sind 5 6 Federkrafteinstellung WARNUNG Verletzungsgefahr Schutzhandschuhe tragen Siehe Abbildung 6 Schlauch komplett aufrollen wi...

Page 18: ...i der Bestellung von Ersatzteilen ist immer Folgen des anzugeben Teile und Kontrollnummer siehe Typenschild am Produkt Ersatzteilnummer mit Beschreibung siehe w w w n e d e r m a n c o m e n s e r v i...

Page 19: ...20 4 Uso de Hose Reel 876 20 5 Instalaci n 20 5 1 Instrucciones de montaje 20 5 2 Salida de manguera 20 5 3 Conexi n al sistema de tuber as 20 5 4 Mecanismo de trinquete 21 5 5 Montaje de la manguera...

Page 20: ...n un peligro potencial para la salud y la seguridad del personal y la forma en que el peligro puede ser evitado PRECAUCI N Riesgo de da o del equipo Las precauciones indican un peligro potencial para...

Page 21: ...n personal Utilice guantes protectores Consulte Ilustraci n 6 Enrollar la manguera hasta que el tope se de tenga contra la boca de salida Sacar la manguera hasta la posici n de retenci n Desatornillar...

Page 22: ...n c o m 7 1 Solicitud de piezas de repuesto Cuando haga pedidos de piezas de repuesto indique siempre lo siguiente N mero de la pieza y de control v ase la placa de identificaci n del producto Indiqu...

Page 23: ...3 Kuvaus 24 3 1 Tekniset tiedot 24 4 Hose Reel 876 yksik n k ytt 24 5 Asennus 24 5 1 Asennusohjeet 24 5 2 Letkunohjain 24 5 3 Liitt minen putkistoon 24 5 4 R ikk mekanismi 24 5 5 Letkun asennus 25 5...

Page 24: ...etaan miten vaaran voi v ltt HUOMIO Laitevaurion vaara Huomautukset koskevat mahdollista vaaraa laitteelle mutta ei henkil ille ja tapoja joilla vaara voidaan v ltt HUOMAUTUS Ilmoitukset sis lt v t mu...

Page 25: ...a ty kalu Tarkista ett letku voidaan vet riitt v n pitk lle kelalta jousen kiristym tt liikaa 6 Huolto HUOMAUTUS Asennus korjaus ja huoltot it saa suorit taa vain p tev henkil st k ytt en ainoas taan...

Page 26: ...e on suunniteltu siten ett osien materiaalit voi daan kierr tt Eri materiaalityypit on k sitelt v pai kallisten s d sten mukaan Ota kysymyksiss yhteys j lleenmyyj n tai N e d e r m a n kun tuote heite...

Page 27: ...es techniques 28 4 Utilisation Hose Reel 876 28 5 Installation 28 5 1 Instructions de montage 28 5 2 Sortie de tuyau 28 5 3 Raccordement au syst me de tuyauterie 29 5 4 M canisme cliquet 29 5 5 Montag...

Page 28: ...Risque de blessures du per sonnel Les avertissements indiquent un danger po tentiel li la sant et la s curit du person nel et expliquent comment ce danger peut tre vit ATTENTION Risque de dommages sur...

Page 29: ...z l enrouleur voir Section 5 1 Instructions de montage 10 V rifier que la longueur totale du tuyau puisse tre d roul e sans tendre le ressort fond 11 Ouvrez le robinet et v rifiez que les raccords du...

Page 30: ...ements concernant les pi ces de rechange contac ter le distributeur agr le plus proche ou N e d e r m a n Consulter galement w w w n e d e r m a n c o m 7 1 Commande de pi ces de rechange Les informat...

Page 31: ...ecnici 32 4 Utilizzo Hose Reel 876 32 5 Installazione 32 5 1 Istruzioni di montaggio 32 5 2 Braccio uscita tubo 32 5 3 Collegamento al sistema di tubazioni 32 5 4 Salterello di bloccaggio 33 5 5 Monta...

Page 32: ...Attenzione indica un potenziale pericolo per il prodotto ma non per il personale e come que sto pericolo pu essere evitato NOTA Le note contengono altre informazioni impor tanti per il personale 3 Des...

Page 33: ...si innesti il salterello Svitare il fine corsa e l attrezzo collegato al tubo Ruotare il tamburo con tutto il tubo avvolto un giro in direzione della freccia nero per aumentare la ten sione della mol...

Page 34: ...targhetta identificativa del prodotto Il numero di riferimento del parti colare di ricambio e il nome vedi w w w n e d e r m a n c o m e n s e r v i c e s p a r e p a r t s e a r c h Quantit desidera...

Page 35: ...echnische gegevens 36 4 Gebruik van Hose Reel 876 36 5 Installatie 36 5 1 Montagehandleiding 36 5 2 Slanguitloop 36 5 3 Aansluiting op het leidingsnet 37 5 4 Vergrendelingsmechanisme 37 5 5 Slangaansl...

Page 36: ...ormatie in de vorm van waarschuwingen aanmaningen of opmerkingen om voorzichtig te zijn Zie de volgende voorbeelden WAARSCHUWING Gevaar voor persoonlijk letsel Waarschuwingen wijzen op een mogelijk ge...

Page 37: ...de slang tot de vereiste lengte kan worden afgerold zonder dat men de veer tot het uiterste spant 11 Open de vloeistoftoevoer en controleer of de slan gaansluitingen niet lekken 5 6 Instellen van de v...

Page 38: ...jzijnde erkende dealer of met N e d e r m a n voor technisch advies en re serveonderdelen Zie ook w w w n e d e r m a n c o m 7 1 Bestellen van reserveonderdelen Wanneer u reserveonderdelen bestelt di...

Page 39: ...Dane techniczne 40 4 U ytkowanie Hose Reel 876 40 5 Instalacja 40 5 1 Instrukcja monta u 40 5 2 Wylot w a 40 5 3 Pod czenie do instalacji rurowej 40 5 4 Mechanizm zapadkowy 41 5 5 Monta w a 41 5 6 Reg...

Page 40: ...g OSTRZE ENIE Ryzyko obra e cia a Ostrze enia wskazuj na potencjalne zagro enia dla zdrowia i bezpiecze stwa personelu oraz informuj o sposobach unikania takich za gro e PRZESTROGA Ryzyko uszkodzenia...

Page 41: ...strza ki powodu je zwi kszenie napr enia spr yny ka dy obr t zgodnie z kierunkiem strza ki niebieskiej zmniejsza napr enie spr yny Za ogranicznik w a i narz dzie Sprawd czy mo na wyci gn w na po dan...

Page 42: ...umer kontrolny patrz tabliczka znamionowa produktu Numer szczeg owy i nazw cz ci zamiennej patrz w w w n e d e r m a n c o m e n s e r v i c e s p a r e p a r t s e a r c h Wymagana ilo cz ci 8 Recykl...

Page 43: ...vning 44 3 1 Tekniska data 44 4 Anv nda Hose Reel 876 44 5 Installation 44 5 1 Monteringsanvisning 44 5 2 Slangutlopp 44 5 3 Anslutning till r rsystemet 44 5 4 Sp rrmekanism 44 5 5 Slangkoppling 45 5...

Page 44: ...VARSAMHET Risk f r skada p utrust ningen F rsiktigt betecknar en potentiell risk f r pro dukten men inneb r inte fara f r personal och anger hur risken kan f rhindras NOTERA Anm rkningar inneh ller an...

Page 45: ...a pilens riktning Montera tillbaka slangstopp och verktyg Kontrollera att slangen kan dras ut till erforderlig nskede l ngd utan att fj dern g r i botten strek kes helt 6 Underh ll NOTERA Installation...

Page 46: ...s p a r e p a r t s e a r c h Antal erforderliga reservdelar 8 tervinning Produkten r designad s att komponentmaterialet kan tervinnas De olika materialtyperna m ste han teras i enlighet med till mpli...

Page 47: ...www nederman com...

Reviews: