Hose Reel 893
EN
4
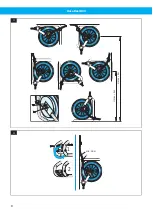
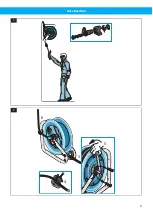
Reel the hose on to the reel by turning the spring-
loaded hub with a tommy bar, see
5. Once the hose has been wound on to the drum,
make sure that it has the correct tension by turn-
ing the hub a further 2 - 6 revolutions.
5
Fit the inlet hose, min. length of 1.0 m.
6
,
.
7
Check that the required length of hose can be un-
reeled without stretching the spring to its limit.
8
Turn on the supply and check that the hose con-
nections do not leak.
4.2 Hose outlet
See
The hose outlet can be fitted in two positions.
• Choose the position where the hose is bent as little
as possible.
4.3 Connection to the pipework system
See
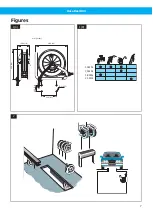
• The Hose Reel 893 must be connected to the pipe-
work system with hose only, minimum 1,0 m. The
inlet hose should go through the ring fitted on the
tubular stand. Check that the hose is not twisted or
strained after connection. A stop valve should be fit-
ted on the pipe system before the hose connection.
5 Using
5.1 Selecting hose
When selecting a hose, see the dimension and work-
ing pressure on the Hose Reel 893 identification label.
Also, see
5.2 Ratchet mechanism
See
The Hose Reel 893 is delivered with a ratchet mech-
anism that retains the hose in the required outdrawn
position. The ratchet will disengage if the hose is
drawn out a little further and the hose then recoils to
the drum. The ratchet function can be disengaged by
removing the ratchet. In that case, the hose must first
have completely recoiled.
NOTE!
The hose is to be held by the hand as long as
possible during the recoiling.
6 Maintenance
CAUTION! Risk of equipment damage
Use only Nederman original spare parts and ac-
cessories.
Perform the following maintenance regularly or at
least once a year:
• Check the spring function by testing if the hose re-
coils properly.
• Check that swivel and hose couplings do not leak.
Change the seal if required. Clean the swivel and
couplings.
• Check that the hose is intact. Clean the hose if it is
oily or dirty.
• Check the reels ratchet mechanism.
• Check the mounting of the reel on wall or ceiling.
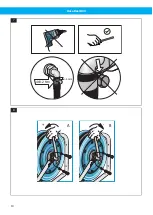
6.1 Adjustment of spring tension
.
WARNING! Risk of personal injury
Use protective gloves.
A
Increasing the spring tension
B
Decreasing the spring tension
If the spring power has been increased, check that the
required length of the hose can be drawn out without
stretching the spring to its limit.
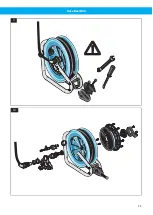
6.2 Repair instructions
WARNING! Risk of personal injury
Before repairing the hose reel:
1
Turn off the supply of air/water/oil/grease.
2
Neutralize the spring power by removing
the hose-stop and let the hose recoil.
Instructions for hose fitting, see
. Instructions for changing the spring cassette,
swivel or seal come with each spare part.
7 Spare Parts
CAUTION! Risk of equipment damage
Use only N
$
e
$
d
$
e
$
r
$
m
$
a
$
n
$
original spare parts and ac-
cessories.
Contact your nearest authorized distributor or
N
$
e
$
d
$
e
$
r
$
m
$
a
$
n
$
for advice on technical service or
if you require help with spare parts. See also
w
$
w
$
w
$
.
$
n
$
e
$
d
$
e
$
r
$
m
$
a
$
n
$
.
$
c
$
o
$
m
$
.
7.1 Ordering spare parts
When ordering spare parts always state the following:
• The part number and control number (see the
product identification plate).
• Detail number and name of the spare part (see
w
$
w
$
w
$
.
$
n
$
e
$
d
$
e
$
r
$
m
$
a
$
n
$
.
$
c
$
o
$
m
$
/
$
e
$
n
$
/
$
s
$
e
$
r
$
v
$
i
$
c
$
e
$
/
$
s
$
p
$
a
$
r
$
e
$
-
$
p
$
a
$
r
$
t
$
-
$
s
$
e
$
a
$
r
$
c
$
h
$
).
• Quantity of the parts required.
14
Summary of Contents for 893
Page 8: ...Hose Reel 893 H max 4 m H max 4 m 3 1 2 min 1 0 m 4 8...
Page 9: ...Hose Reel 893 5 3 4 5 6 6 9...
Page 10: ...Hose Reel 893 4 0 2 Nm 3 4 mm 7 A B 8 10...
Page 11: ...Hose Reel 893 9 10 11...
Page 51: ...www nederman com...


