27
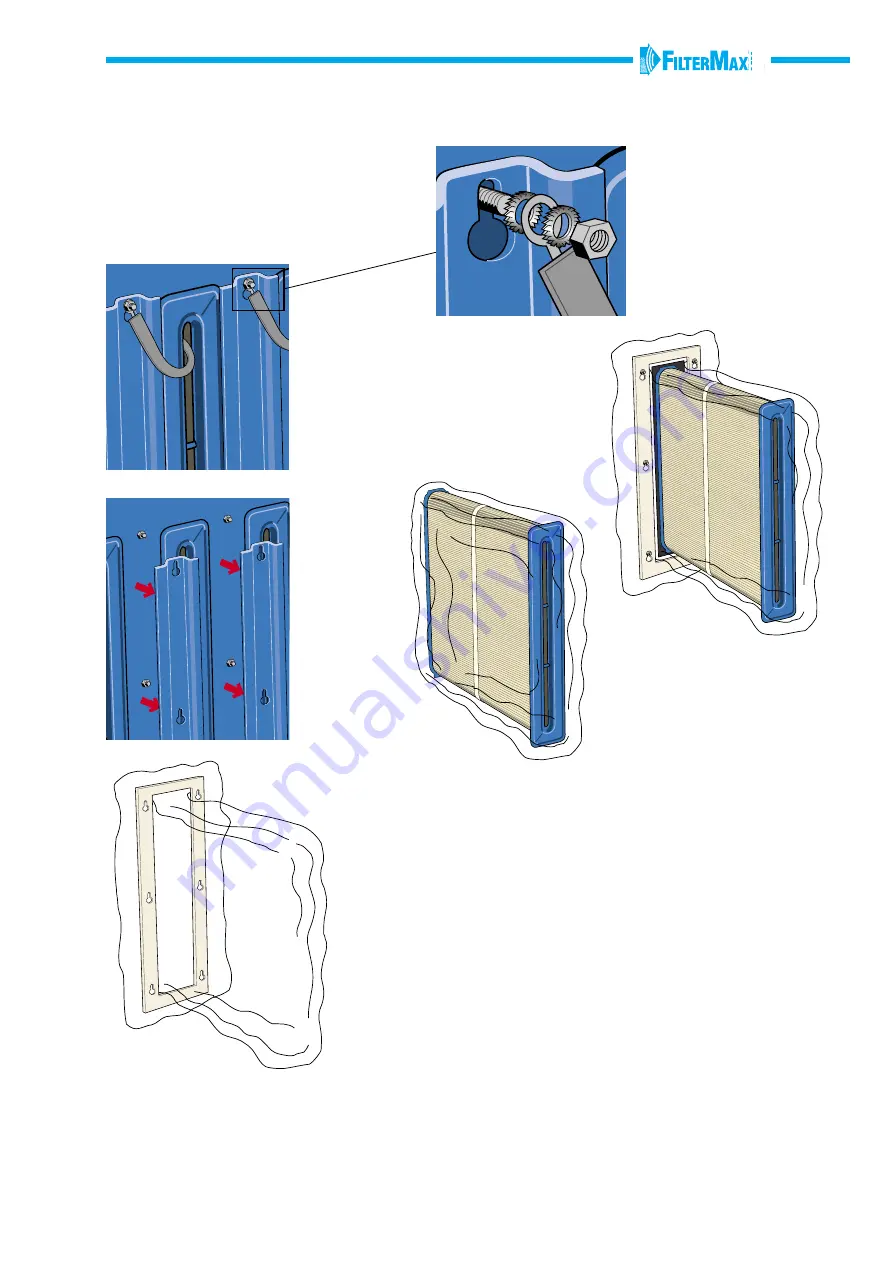
REPLACING THE FILTER CARTRIDGES
1.
Switch off FilterMax DX.
3.
Unscrew the two fixing screws on the
access door. Use the enclosed T-key or a 10 mm
standard hexagon key. Open the door.
2.
Shut off and bleed the compressed air.
5.
Loosen the earth
plates from the filter
cartridge.
4.
Loosen the nuts
on the filter holders.
6.
Remove
the filter
holders.
7.
Draw a plastic
bag through the opening
in the enclosed mounting
frame, as the picture shows.
8.
Hang the moun-
ting frame with the
plastic bag over the
plastic end of the filter
cartridge. Draw the
whole cartridge in
to the plastic bag.
9.
Remove the mounting
frame and fold the plastic bag
in a way that the filter cartridge
will be completely enclosed
and sealed.
10.
Proceed in the same way with the remaining
filter cartridges.
11.
Inspect the filter housing and look for damages,
dust layers etc. Clean inside the filter housing. A vacuum
cleaner, approved for use in explosive environments, is
recommended.
12.
Handle the new filter cartridges carefully to avoid damage.
13.
Insert the new filter cartridges. NB! The mark on the
back end of the filter cartridge should be put on the angled
sheet-metal plate just inside the filter housing.
14.
Hang the filter holders on the screws.
15.
Fit the earth plates with tooth washers and fasten the nuts.
16.
Use an Ohm-meter to check if the baskets in the filter
cartridges are connected to earth. Measure between the
basket and GND1 in the Connection Box (see also page 13).
17.
Check the access door seal. Shut the door and
fasten the two fixing screws.
18.
Turn on the compressed air supply and
set it to 0,4 - 0,6 MPa (6 bar, 87 psi).
Summary of Contents for FilterMax DX 3000
Page 36: ...36 INSTALLATION AND SERVICE PROTOCOL 4 Point no Date Note ...
Page 37: ......


