background image

NEX D/DX

1

7

Operation

WARNING! 


Ignition risk for some dust or solvents.

 Do not collect material that is caustic, explosive, highly flammable,


chemically


unstable, spontaneously ignitable, or which can release


sparks.

 Check that no objects 

that

 can cause 

spark or fire are sucked in


to the arm, or


impact against the hood.

 Avoid mixing dust from different processes, for example service

S

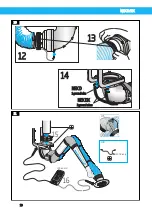
ee Figure 12. The extractor arm can easily be positioned at any point

 within its 

working area. It can be rotated 180

0

 when wall mounted and 360

0

 when ceiling 

mounted. For best capture

,

 the hood should be positioned as near the fume or dust 

generating process as possible. The hood (on some models) is equipped with a 

damper which can be adjusted with a lever.

Max

 air flow: 

1000 cfm (

1700 m

3

/h

r)

. Also check local directions.

Always check that the airflow is sufficient in the hood before work

 begins.

Insufficent airflow depends on:

The fan impeller rotating in the wrong direction.

Hood, hose or 90

0

-bend are blocked.

Filter cartridges are blocked.

Service and 

C

eaning

Treat NEX D/DX as a part of other machinery and clean it according to the cleaning 

procedure  plan. 

C

lean  and  check  it  periodically  according  to  the instructions 

in sections 6.1 to 6.4.

WARNING! 


Risk of personal injury.

 Use a dust filter mask and other necessary 

PPE 

safety equipment when


cleaning 

the


NEX D/DX.


There is a s

queeze/crush risk at 

the 

horizontal link on 4m and 5m 

models

.

The NEX D/DX can be dry or wet cleaned:

Dry cleaning: 

 V

acuum 

&

 wipe the components externally and


internally if


necessary.

Wet cleaning: Use a detergent solution that will not damage 

the product. S

ee section


3

 for materials of construction

. Follow advice from the


manufacturer of the detergent 

solution


regarding dosage and washing


method. Rinse with clean wate

r using

 low 

pressure and


hot

 water

 100-100 

0

F

Av

oid directly rinsing sleeves, joints and so on. Let the NEX-arm dry


before it is used


6.1 

Internal cleaning of hood, hose and 90

0

-bend

1.

Detach hood and hose.

2.

Carry out dry or wet cleaning according to instructions in


section 6 

above.

3.

Let the components dry.

4.

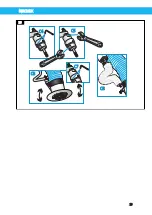
Re-fit the components. Stretch the hose along the lengths A and B.

5.

Connect the hose spiral to 

ground

, see Figure 13. Make sure the NEX


D/DX is


properly 

grounded

. See figure 11 and section 4.3


Grounding

.

Summary of Contents for NEX D Series

Page 1: ...NEX 5m 16 4 NEX 4m 13 1 NEX3m 9 10 NEX2m 6 6 2 REV 00123 P N 2130038 Instruction and Operation Manual D DX NEX Extraction Arms ...

Page 2: ......

Page 3: ...tion 15 4 2 Mounting 16 4 2 1 Rotary stop 16 4 3 Grounding 16 5 Operation 17 6 Service and Cleaning 17 6 1 Internal cleaning of hood hose and 900 bend 17 6 2 Internal cleaning arm system 18 6 3 Regular maintenance 18 6 4 Adjusting the links 18 7 Spare Parts 19 8 Recycling 19 Installation Figures 5 TableofContents Declaration of Conformity 4 ...

Page 4: ...ity that the Nederman product NEX D DX Part No and stated versions of to which this declaration relates is in conformity with all the relevant provisions of the following directives and standards Directives 2006 42 EC Standards EN ISO 12100 EN 13463 1 EN 13463 5 EN 1127 1 The name and signature at the end of this document is the person responsible for both the declaration of conformity and the tec...

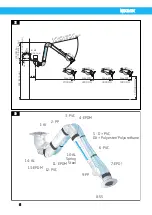
Page 5: ...5 6 Part no 10512732 Part no 10512832 Part no 10512832 Installation Figures 1 Mounting Examples NEXD DX ...

Page 6: ... R 63 1600 mm NEX 3 4 5 m 9 230 320 225 6 3 160 mm 90 5 2300 mm 500 NEX 2m 1000 NEX 3 4 5 m Ø 7 16 1 1 mm max 118 3000 mm max 157 4000 mm max 197 5000 mm 55 1400 mm 2 1 Al 2 PP 3 PVC 4 EPDM 6 PVC 7 EPDM 8 SS 9 PP 10 AL Spring Steel 12 PVC 11 EPDM 13 EPDM 14 AL 3 5 D PVC DX Polyester Polyurethane ...

Page 7: ...7 A NEX 2 m 3 m A1 B1 NEX 2 m 3 m B NEX 4 m 5 m A2 NEX 4 m 5 m B2 9 230 11 3 287 8 9 225 8 7 220 Ø 7 16 Ø 1 1 NEX 4 m 5 m 1 C B A Ø 19 64 Ø 7 5 mm M8x16 Rotary stop 4 5 NEXD DX ...

Page 8: ...NEXD DX 8 91 00 m 75 9 NEX NEX NEX ...

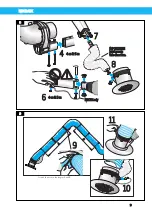
Page 9: ...NEXD DX 9 4 6 NEX DX only 7 8 IMPORTANT Joint arm in this direction 8 A B 10 11 9 Stretch the hose on the lengths A and B 9 4 m 5 m 4 m 5 m ...

Page 10: ...NEXD DX 10 15 16 17A 17B NEX DX only 11 NEX D 1 groundwire NEX DX 2 groundwires 14 12 13 10 100 ohm Ω ...

Page 11: ...11 3600 A A B 5 5 1 3 12 13 NEXD DX ...

Page 12: ...NEXD DX 12 A 13 mm 1 2 B 1 3 m m 1 2 C1 C2 C3 14 15 ...

Page 13: ...13 C5 C4 C7 C6 C8 16 NEXD DX ...

Page 14: ...oided CAUTION Indicates a potential hazard to the product not to personnel and how that hazard may be avoided NOTE Contains other relevant important information 3 Description The NEX D DX is designed to be used in environments where the atmosphere could be explosive as a result of mixing air with dust NEX D is equipped with a grounded ventilation hose made of FDA approved ingredients NEX DX has a ...

Page 15: ...ding to ATEX work directive 1999 92 EEc 4 Installation 4 1 900 bend in hanging or standing position The NEX D DX arm is recommended to be mounted according to Figure 4 item A with 900 bend in hanging position The NEX D DX arm can also be mounted according to item B with the 900 bend in standing position However the arm holder must then be revolved 1800 Revolve the arm holder in the following way 1...

Page 16: ...ure 11 and section 4 3 Earth control measurement 4 2 1 Rotary Stop Should only be fitted when the arm is mounted in a 3600 rotating position see Figure 5 Check for proper earth connection after both main installation and regular maintenance as follows NEX D has one ground wire Measure according to Figure 11 item 16 NEX DX has both the hose and the arm system are grounded Measure according to Figur...

Page 17: ...g Treat NEX D DX as a part of other machinery and clean it according to the cleaning procedure plan Clean and check it periodically according to the instructions in sections 6 1 to 6 4 WARNING Riskofpersonalinjury Use a dust filter mask and other necessary PPE safety equipment whencleaning the NEX D DX Thereisasqueeze crush risk at the horizontal link on 4m and 5m models The NEX D DX can be dry or...

Page 18: ...e all the arm covers and bellows see Figure 14 Adjust the links if necessary Check the function of the spring and spring holder 5 Check that the suction capacity in the hood is sufficient 6 4 Adjusting the links Adjusting links is recommended at least once a year see Figures 15 16 WARNING Riskofpersonalinjury Use necessary safety equipment A Adjust the inner link B Adjust the knee link C1 Loosen t...

Page 19: ... service Orderingspareparts Part number and control number see name plate Name of the spare part see www nederman com Quantity of the parts required 8 Recycling The product has been designed for component materials to be recycled Its different material types must be handled according to relevant local regulations Contact the distributor or Nederman if uncertainties arise when scrapping the product...

Page 20: ... to choose a certified technician to service your Nederman equipment as they have the correct tools and knowledge to solve any machinery issues and improve its performance Be sure to ask if your technician is certified by Nederman Our services for dust collection systems are customized to your particular needs We work with you to understand your needs then develop a program to meet your specific n...

Reviews: