NEX D/DX
18
6.2
Internal cleaning, arm system
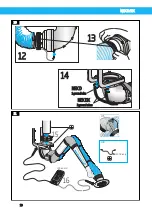
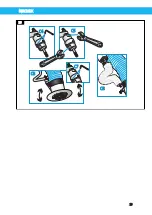
Internal cleaning is recommended approximately once a year, see Figure 14.
1.
Hold the arm straight
at a
slight angle.
2.
Detach hose, arm covers and bellows but not the arm system,
see Figure 13.
3.
Carry out dry or wet cleaning according to instructions in section
6
-
Service
and
cleaning.
4.
Let the components dry.
5.
Re-fit the components. (Hose: see Figure 13.)
6.
Make sure the NEX D/DX is properly
grounded
. See
figure 11 and
section 4.3
-
Grounding.
6.3
Regular
M
aintenance
Regular maintenance is recommended at least once a year.
1.
Check that the NEX
arm is
grounded
, see Figure 11.
2.
Check that the hose is intact. If necessary, change the hose.
3.
Check the mounting of the arm on wall or ceiling.
4.
Remove all the arm covers and bellows, see Figure 14. Adjust the
links if
necessary. Check the function of the spring and spring
holder.
5.
Check that the suction capacity in the hood is sufficient.
6.4
Adjusting the links
Adjusting links is recommended at least once a year, see Figures 15
&
16.
WARNING!
Risk of personal injury.
Use necessary safety e
q
uipment.
A.
Adjust the inner link.
B.
Adjust the knee link.
C1. Loosen the below.
C2. Unscrew the ball joint from the hood.
C3. Remove the below.
C4. Loosen the two socket head cap screws.
C5. Tighten the ball joint using two
adjustable
spanners
C6. Remount the ball joint at the hood and test the hood movement. If necessary
tighten the ball joint more.
C7. Tighten the two socket head cap screws.
C8. Unscrew the ball joint from the hood. Refit the bellow. Fasten the bellow at the
outer arm cover. Fasten the ball joint at the hood.
D.
Make sure the NEX D/DX is properly
grounded
. See figure
11 and section
4.3
-
Grounding
.
Summary of Contents for NEX D Series
Page 2: ......
Page 8: ...NEXD DX 8 91 00 m 75 9 NEX NEX NEX ...
Page 11: ...11 3600 A A B 5 5 1 3 12 13 NEXD DX ...
Page 12: ...NEXD DX 12 A 13 mm 1 2 B 1 3 m m 1 2 C1 C2 C3 14 15 ...
Page 13: ...13 C5 C4 C7 C6 C8 16 NEXD DX ...

