background image

FilterCart

L1 L2 L3

L1 L2 L3 PE

Black

Brown

Grey

Black

Grey

Brown

E1

A

Brown

Black

Blue

Q

Q

K2

3

96

95

97

98

F1

1

2

3

4

5

6

PE

M01

U

V

W

M

A1

A2

13

14

K1

1

2

3

4

5

6

T1

A

B

a

b

11

14

12

PTC

PTC

3

2

1

H1

H2

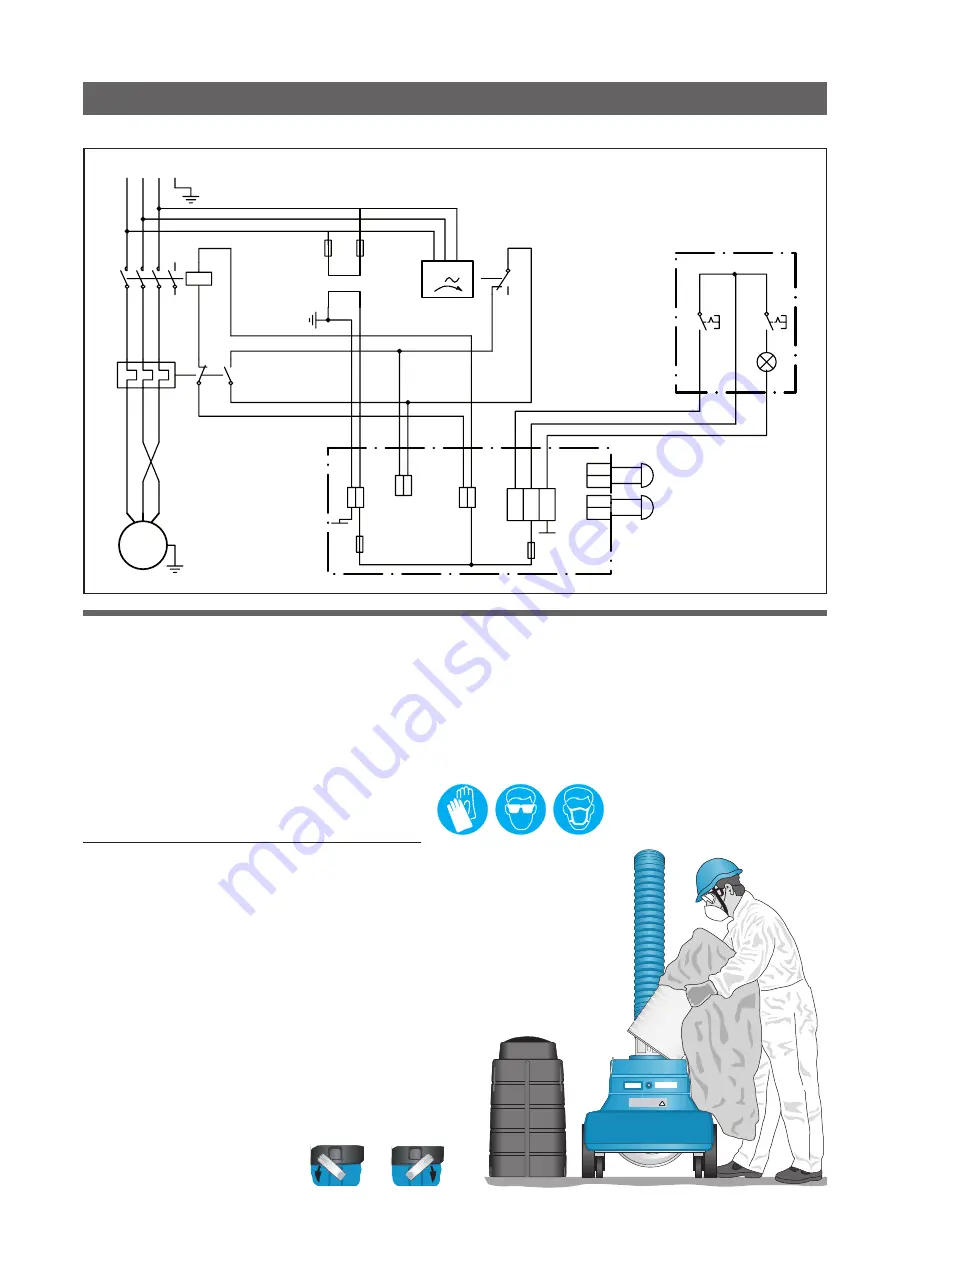
Changing the filter cartridge

The filter cartridge is disposable and should be thrown-away after use.

The life of the filter cartridge varies greatly depending on how the

FilterCart is used and how much and what type of pollutants are

collected. Regularly check the light emitting diodes on the pressure

drop symbol on the control board to know when to change the filter

cartridge (see page 5). Always check that the hoses for the extraction

arm and the fan inlet not are damaged before it is decided to replace

the filter cartridge.

Use necessary personal safety equipment

when replacing the filter cartridges.
Change the filter cartridge in the following way:
1.

Disconnect the mains connection cable.

2.

 Unlock the eccentric locks and remove the filter casing.

3.

Use the plastic bag which comes with the new filter

cartridge and pull it over the used cartridge. Fold the

plastic bag under the cartridge.

4.

Use a duster to wipe off the filter cartridge contact surfaces

in the FilterCart. Put the duster in the plastic bag with the filter
cartridge and close the bag with the band supplied.

5.

Handle the used filter cartridge according to the relevant

regulations for the substances that have been collected.

6.

Check that the pressure drop hose (from the control

board) not is damaged and is fitted properly.

7.

Check that the new filter cartridge is not damaged. Also

check that the seal fitted on the underside of the cartridge

is not damaged. Then fit the cartridge on the FilterCart.

8.

 Refit the filter casing. Make sure the eccentric locks

tighten the filter casing properly.

A.

 Increasing the locking power

B.

 Decreasing the locking power

M: 0,9 kW

Wiring

diagram

K1: Fan relay

K2: Phase-sequence relay

T1: Transformar, 24 V secondary

F1: Overload protector relay

H1/H2: Alarm

signal, 2,9 kHz

A: Circuit card

E1:

Spotlight

20 W, 24 V

200 V, 50/60 Hz, 3~

A

B

Summary of Contents for W 3 200 V 3~

Page 1: ...FilterCart FilterCart No 144029 03 2019 04 16 S M E T S Y S R E T L I F N O I T C A R T X E INSTRUCTION MANUAL W 3 200 V 3 ...

Page 2: ...ISO 15012 1 non alloy steel to high alloy steel with nickel and chromium 30 also pay attention to local regulations horizontally swiveling arm 240 Dimensions Foreword To guarantee a correct function and a minimal service it is important to read and understand the information in this instruction manual The manual contains important work safety regulations and warning directions which have to be rea...

Page 3: ...Start the FilterCart with the switch A or as an alternative with the switch on the hood of the extractor arm The light emission at C indicates fixed green light The fan operates Overload protector The FilterCart is equipped with an overload protector which means that the power will disconnect auto matically if the fan motor should be overloaded C Red light emission light indicates disconnected pow...

Page 4: ...Cart must not be used for extracting toxic substances except welding fumes The FilterCart must not be used without filter cartridge and casing The FilterCart must not be used in closed rooms without general ventilation 4 The extraction arm should be positioned with the wheels locked The Filtercart should be moved from behind and with wheels unlocked The hood is provided with an efficient spotlight...

Page 5: ...crease which will result in having to change the filter cartridge E The light emission diodes indicate fixed light The pressure drop has increased Pre warning for changing the filter cartridge F The light emission diodes indicate fixed light and after about 30 s an intermittent alarm signal starts Change the filter cartridge If you want to finish the work in progress before the filter cartridge is...

Page 6: ...ccentric locks and remove the filter casing 3 Use the plastic bag which comes with the new filter cartridge and pull it over the used cartridge Fold the plastic bag under the cartridge 4 Use a duster to wipe off the filter cartridge contact surfaces in the FilterCart Put the duster in the plastic bag with the filter cartridge and close the bag with the band supplied 5 Handle the used filter cartri...

Page 7: ...nd that the seal is downwards Check that the seal not is damaged Note the UP arrows 6 Refit the top cover Fasten it securaly Maintenance Is recommended at least once a year WARNING Risk for personal injuries Disconnect the mains connection cable before starting any maintenance work Use necessary personal safety equipment Change the filter cartridge and optional HEPA filter if necessary Check the a...

Page 8: ...onformity We AB Ph Nederman Co declare under our sole responsibility that the Nederman product FilterBox Kit W3 with accessories to which this declaration relates are in conformity with the following Directives 2006 42 EC 2014 30 EU 2011 65 EU Standards EN 60204 1 EN ISO 12100 2010 EN ISO 15012 2013 EN 61000 3 3 EN 61000 6 2 EN 61000 6 4 For W3 products The products are approved by BGIA Institut f...

Reviews: