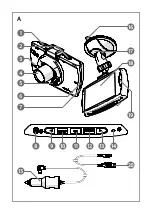
8
Connecting the product to a power source
Option 1:
1. Plug the auxiliary power plug
A
y
into an auxiliary power outlet.
2. Plug the other end of
A
y
into the mini USB port
A
2
.
Option 2:
•
Charge the product using the USB port
A
2
.
4
The product automatically switches on and starts recording when you switch
on your car engine.
Using the product
1. Press power button
A
8
for 3 seconds to switch the product on or off.
4
When switching off the product automatically saves the recordings.
2. Press
A
q
twice to enter the setup menu.
3. Press left
A
9
or right
A
r
to navigate through the menu.
4. Press OK
A
w
to confirm a selection.
5. Press menu
A
q
to go back one step.
6. Press
A
e
to exit the menu.
Menu
1. Press Menu
A
q
to enter the menu.
2. Press left
A
9
or right
A
q
to navigate through the menu.
3. Press OK
A
w
to confirm a selection.
4. Press menu
A
q
to go back one step.
5. Press
A
q
twice to exit the menu.
Press the mode button
A
e
to toggle between video mode, photo mode and
playback mode.
Video mode
1. Press
A
e
to select video mode.
2. Press
A
w
to confirm your selection.
3. Press
A
w
to start or stop recording.
Press
A
9
to switch the microphone on or off.
Press
A
8
to switch the infrared light on or off.
Emergency lock
In video mode, press the lock button
A
p
to save the recording as a read-only
file.


