

5
Spraying a spray of steam
Press the spray button
A
3
to spray steam.
After use
1. Set the thermostat dial
A
r
to the minimum position.
2. Place the product on the back cover
A
w
.
3. Unplug the power cable
A
1
from the power outlet.
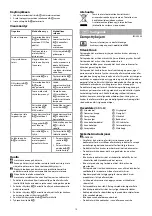
Troubleshooting
Problem
Possible cause
Possible solution
The product doesn’t
produce heat.
The thermostat
dial
A
r
is rotated
to
OFF
.
Set the thermostat
dial
A
r
to the
correct setting for
your fabric.
The product is not
plugged in.
Plug the power
cable
A
1
into a
power outlet.
The burst of steam
doesn’t function.
The burst of steam
function has been
used to often.
Continue ironing in
horizontal position
and wait a while
before using the
burst of steam
function again.
The water reservoir
A
6
is empty.
Fill the water
reservoir
A
6
with
distilled water.
The ironing plate
A
8
leaks water.
The thermostat dial
A
r
is out of the
steam range.
Set the thermostat
dial
A
r
to the
MAX
position.
The product has not
fully heated up yet.
Wait until the LED
indicator
A
e
switches off to
indicate the product
is heated up.
The amount of
water exceeds the
MAX
indicator of
the water reservoir
A
6
.
Pour out the excess
water from the
water reservoir
A
6
.
The product doesn’t
produce enough
steam.
Set the steam
selector
A
4
to
0
.
Set the steam
selector
A
4
to
the desired steam
output.
The steam holes
A
9
are blocked.
Clean the steam
holes
A
9
with
distilled water.
The water reservoir
A
6
is empty.
Fill the water
reservoir
A
6
with
distilled water.
The spray nozzle
A
7
doesn’t spray.
There is not enough
pressure or air inside
of the product.
1. Push the spray
nozzle
A
7
by
hand.
2. Push the spray
button
A
3
multiple times.
Maintenance
-
Disconnect the product before cleaning.
-
Before cleaning and maintenance, switch off the product and
disconnect the power. Let the product cool down completely.
-
Do not use aggressive chemical cleaning agents such as
ammonia, acid or acetone when cleaning the product.
-
Do not clean the inside of the product.
-
Disconnect the product from the power source before service
and when replacing parts.
1. Clean the product regularly with a soft, clean, dry cloth. Avoid
abrasives that can damage the surface.
2. Clean the ironing plate
A
8
with a damp cloth and a non-
abrasive cleaner.
3. Clean the ironing plate
A
8
with a damp cloth with vinegar if
fiber is stuck to the ironing plate
A
8
.
4. Remove any limescale from the steam holes
A
9
with a
toothpick.
5. Empty the water reservoir
A
6
.
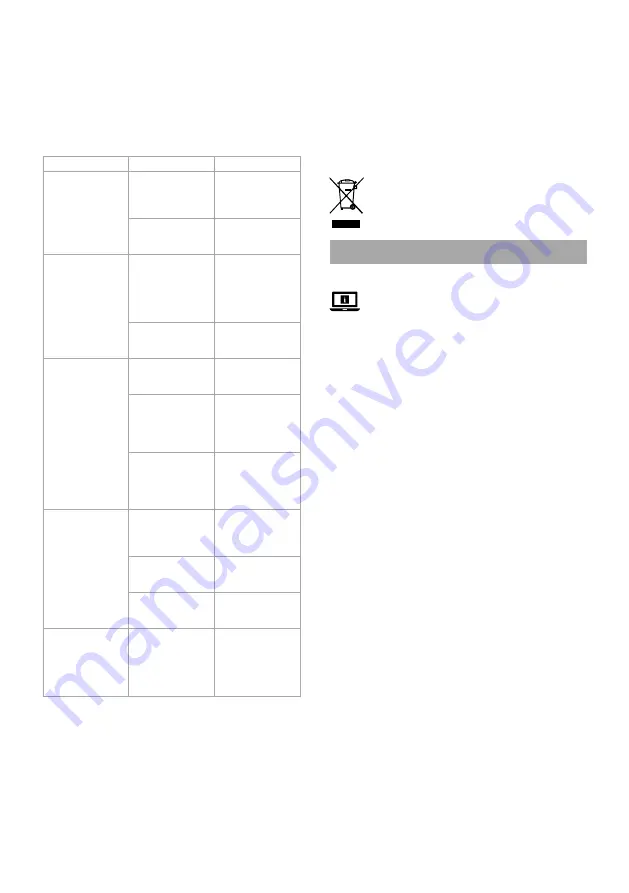
Disposal
The product is designated for separate collection at
an appropriate collection point. Do not dispose of the
product with household waste.
For more information, contact the retailer or the local
authority responsible for the waste management.
c
Kurzanleitung
Dampfbügeleisen
IRON1000
Weitere Informationen finden Sie in der erweiterten
Anleitung online:
ned.is/iron1000
Bestimmungsgemäße Verwendung
Dieses Produkt ist ein Dampfbügeleisen, das für eine breite Auswahl
von Stoffen verwendet werden kann.
Dieses Produkt ist dafür gedacht, Knitter und Falten aus Stoffen zu
entfernen.
Dieses Produkt ist nur zur Verwendung in Innenräumen gedacht.
Jegliche Modifikation des Produkts kann Folgen für die Sicherheit,
Garantie und ordnungsgemäße Funktionalität haben.
Kinder ab dem achten Lebensjahr und Personen mit
eingeschränkten körperlichen, sensorischen oder geistigen
Fähigkeiten oder ohne ausreichende Erfahrung und Kenntnis dürfen
dieses Produkt nur dann verwenden, wenn sie beaufsichtigt werden
oder in die sichere Benutzung des Produkts eingewiesen wurden
und die bestehenden Gefahren verstehen. Kinder dürfen nicht mit
dem Produkt spielen. Reinigung und Wartung durch den Benutzer
dürfen nicht von unbeaufsichtigten Kindern durchgeführt werden.
Das Produkt ist zur Verwendung in Haushaltsumgebungen
für typische Haushaltsfunktionen gedacht, die auch von nicht
fachkundigen Benutzern ausgeführt werden können, wie z. B.:
in Geschäften, Büros und ähnlichen Arbeitsumgebungen,
Bauernhäusern, von Kunden in Hotels, Motels und anderen
Unterkünften und/oder in Pensionen.
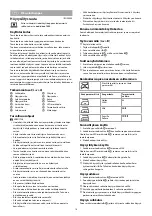
Hauptbestandteile
(Abbildung
A
)
1
Stromkabel
2
Dampfstoßtaste
3
Sprühtaste
4
Dampfregler
5
Wassertankabdeckung
6
Wasserbehälter
7
Sprühdüse
8
Bügelsohle
9
Dampflöcher
q
Griff
w
Hintere Abdeckung
e
LED-Anzeige
r
Thermostatdrehrad
t
Messbecher
Sicherheitshinweise
-
WARNUNG
•
Vergewissern Sie sich, dass Sie die Anweisungen in diesem
Dokument vollständig gelesen und verstanden haben, bevor Sie
das Produkt installieren oder verwenden. Heben Sie die
Verpackung und dieses Dokument zum späteren Nachschlagen
auf.
•
Verwenden Sie das Produkt nur wie in diesem Dokument
beschrieben.
•
Öffnen Sie das Produkt nicht. Es befinden sich keine vom
Benutzer zu wartenden Teile im Inneren.
Summary of Contents for IRON1000
Page 1: ...ned is iron1000 Steam Iron IRON1000...
Page 3: ...7 5 6 4 3 2 t r e w q 1 8 9 A B...
Page 34: ......
Page 35: ......
Page 36: ...Nedis BV De Tweeling 28 5215 MC s Hertogenbosch The Netherlands...


