background image

4

a

 Quick start guide

Steam Iron

IRON2000

For more information see the extended manual online: 

ned.is/iron2000

Intended use

This product is a steam iron that can be used on a wide range of 
fabrics.
The product is equipped with an anti-drip system that prevents 
water from leaking out of the ironing plate when the product is cold.
This product is intended to remove creases and wrinkles out of 
fabric.
This product is intended for indoor use only.
Any modification of the product may have consequences for safety, 
warranty and proper functioning.
This product can be used by children aged from 8 years and above 
and persons with reduced physical, sensory or mental capabilities 
or lack of experience and knowledge if they have been given 
supervision or instruction concerning use of the product in a safe 
way and understand the hazards involved. Children shall not play 
with the product. Cleaning and user maintenance shall not be done 
by children without supervision.
The product is intended for use in household environments for 
typical housekeeping functions that may also be used by non-expert 
users for typical housekeeping functions, such as: shops, offices 
other similar working environments, farm houses, by clients in 
hotels, motels and other residential type environments and/or in 
bed and breakfast type environments.

Main parts 

(image 

A

)

1

  Power cable

2

  Burst button

3

  Spray button

4

  Steam selector

5

  Water reservoir cover

6

  Water reservoir

7

  Spray nozzle

8

  Ironing plate

9

  Steam holes

q

 Handle

w

  Back cover

e

  LED indicator

r

  Thermostat dial

t

  Self-cleaning button

y

  Measuring cup

Safety instructions


-

WARNING

• 

Ensure you have fully read and understood the instructions in 
this document before you install or use the product. Keep the 
packaging and this document for future reference.

• 

Only use the product as described in this document.

• 

Do not open the product, there are no user serviceable parts 
inside.

• 

Do not use the product if a part is damaged or defective. Replace 
a damaged or defective product immediately.

• 

Do not drop the product and avoid bumping.

• 

This product may only be serviced by a qualified technician for 
maintenance to reduce the risk of electric shock.

• 

Keep the product out of reach for children under 8 years of age 
when the product is switched on or cooling down.

• 

Do not leave the product unattended when connected to the 
power source.

• 

Place the product on a stable, flat and heat resistant surface.

• 

Do not use the product when it is visibly damaged or when it is 
leaking.

• 

Disconnect the product from the power source and allow the 
product to cool down before filling the water reservoir.

• 

Do not open the water reservoir during use.

• 

Do not immerse the product in water or other liquids.

• 

Always check that the voltage of the product corresponds to the 
mains voltage.

• 

Do not disconnect the product by pulling on the cable. Always 
grasp the connector and pull.

• 

Do not pull the power cable to move the product.

• 

Do not pull the power cable over sharp edges.

• 

Do not use chemically descaled water to fill the product.

• 

Avoid contact of the ironing plate with metal objects. The ironing 
plate can damage.

• 

Do not touch the ironing plate when using the product. The 
ironing plate is hot.

• 

Do not direct steam towards people or other living objects. The 
ejected steam is hot.

Before first use

Remove all packaging material, protective stickers and covers from 
the product.

Fill the water reservoir 

(image 

B

)


4

Use distilled water.

1.  Fill the measuring cup 

A

y

 with water.

2.  Open the water reservoir cover 

A

5

.

3.  Empty the measuring cup 

A

y

 into the water reservoir 

A

6

.

4.  Close the water reservoir cover 

A

5

.

Connecting the product

1.  Place the product on the back cover 

A

w

.

2.  Plug the power cable 

A

1

 into a power outlet.


4

When the product heats up for the first time, the product may 
emit some smoke. This is normal and does not affect the safety 
of the product.


4

When the product heats up or cools down, the anti-drip system 
may emit some clicking sounds.

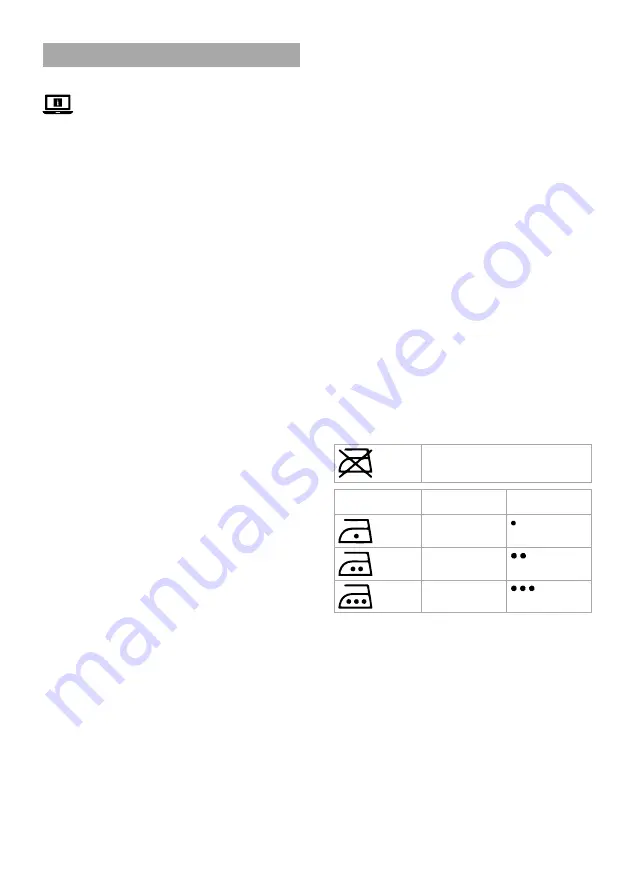
Selecting the correct setting for your fabric

Do not iron items that contain this washing 

symbol.

Icon on washing 

label

Type of fabric

Thermostat dial

Nylon

Silk

Wool

Cotton

Linen

Using dry ironing

1.  Set the steam selector 

A

4

 to the minimum position.

2.  Set the thermostat dial 

A

r

 to the correct setting for your fabric.

Wait until the LED indicator 

A

e

 switches off to indicate the product 

is heated up.
3.  Start dry ironing your fabric.


4

The product automatically switches off after 8 minutes of 
inactivity in vertical position or 30 seconds in horizontal position.

Using steam ironing

1.  Set the thermostat dial 

A

r

 to the second or third position.

Wait until the LED indicator 

A

e

 switches off to indicate the product 

is heated up.
2.  Set the steam selector 

A

4

 to the desired steam output.

3.  Start steam ironing your fabric.


4

Do not use steam ironing on synthetic fabric, nylon, or (synthetic) 
silk. Steam ironing these fabrics can damage the fabric.


4

The product automatically switches off after 8 minutes of 
inactivity in vertical position or 30 seconds in horizontal position.

Summary of Contents for IRON2000

Page 1: ...ned is iron2000 Steam Iron IRON2000...

Page 2: ...inicia o r pida 16 eSnabbstartsguide 18 gPika aloitusopas 20 fHurtigguide 22 2Vejledning til hurtig start 24 kGyors be zemel si tmutat 26 nPrzewodnik Szybki start 28 x 30 1R chly n vod 32 lRychl n vod...

Page 3: ...5 6 7 4 3 2 y r t e w q 1 8 9 A B...

Page 4: ...sistant surface Do not use the product when it is visibly damaged or when it is leaking Disconnect the product from the power source and allow the product to cool down before filling the water reservo...

Page 5: ...h as ammonia acid or acetone when cleaning the product Do not clean the inside of the product Disconnect the product from the power source before service and when replacing parts 1 Clean the product r...

Page 6: ...cht wenn es sichtbar besch digt ist oder undicht ist Trennen Sie das Produkt von der Stromversorgung und lassen Sie es abk hlen bevor Sie den Wassertank f llen ffnen Sie den Wassertank nicht w hrend d...

Page 7: ...7 Stellen Sie den Thermostatregler Ar auf die maximale Position Warten Sie bis sich die LED Anzeige Ae ausschaltet um anzuzeigen dass das Produkt aufgeheizt ist 8 Ziehen Sie das Netzkabel A1 aus der S...

Page 8: ...zu trocknen 13 Ziehen Sie das Netzkabel A1 aus der Steckdose Entsorgung Dieses Produkt muss an einer entsprechenden Sammelstelle zur Entsorgung abgegeben werden Entsorgen Sie das Produkt nicht mit de...

Page 9: ...2 Ouvrez le couvercle du r servoir d eau A5 3 Videz la tasse mesurer Ay dans le r servoir d eau A6 4 Fermez le couvercle du r servoir d eau A5 5 Mettez le produit sur le couvercle arri re Aw Utiliser...

Page 10: ...tof selecteren Strijk geen artikelen met dit wassymbool 6 Branchez le c ble d alimentation A1 dans une prise de courant 7 R glez la molette du thermostat Ar sur la position maximum Attendez que le voy...

Page 11: ...tjes A9 5 Maak het waterreservoir A6 leeg 4Om al het water uit het waterreservoir A6 en het product te verwijderen sluit u het product aan op een stopcontact en stelt u de thermostaatknop Ar twee minu...

Page 12: ...are il cavo di alimentazione A1 alla presa elettrica 4De ingebouwde antikalkpatroon vermindert de vorming van kalkaanslag De ingebouwde antikalkpatroon kan het natuurlijke proces van kalkaanslag niet...

Page 13: ...n un panno asciutto morbido e pulito Evitare sostanze abrasive che possono danneggiare la superficie 4Quando il prodotto si scalda per la prima volta pu emettere un po di fumo Questo normale e non ha...

Page 14: ...ra di stiratura A8 con un panno umido e un detergente non abrasivo 3 Pulire la piastra di stiratura A8 con un panno umido e aceto se le fibre sono incrostate sulla piastra di stiratura A8 4 Rimuovere...

Page 15: ...agen B 4Utilice agua destilada 1 Llene el vaso de medida Ay con agua 2 Abra la tapa del dep sito de agua A5 3 Vac e el vaso de medida Ay en el dep sito de agua A6 4 Cierre la tapa del dep sito de agua...

Page 16: ...duto N o puxe o cabo de alimenta o sobre arestas afiadas N o utilize gua quimicamente descalcificada para encher o produto Evite o contacto da chapa de engomar com objetos met licos A chapa de engomar...

Page 17: ...de vapor A9 com gua destilada O dep sito de gua A6 est vazio Encha o dep sito de gua A6 com gua destilada N o toque na chapa de engomar ao utilizar o produto A chapa de engomar est quente N o dirija o...

Page 18: ...nan vattentanken fylls p ppna aldrig vattentanken under anv ndning S nk inte ner produkten i vatten eller annan v tska Kontrollera alltid att produktens sp nning motsvarar n tsp nningen O bico de vapo...

Page 19: ...alltid i kontakten och dra Dra inte i n tsladden f r att flytta produkten Dra inte n tkabeln ver vassa kanter Produkten f r inte fyllas med kemiskt avkalkat vatten Undvik att strykplattan kommer i kon...

Page 20: ...a Silityslevy on kuuma l suuntaa h yry ihmisi tai muita el vi olentoja kohti Purkautuva h yry on kuumaa Ennen ensimm ist k ytt kertaa Poista kaikki pakkausmateriaalit sek suojatarrat ja muut suojukset...

Page 21: ...yslevy A8 kostealla liinalla ja etikalla jos kankaan kuituja on juuttunut silityslevyyn A8 4 Poista kalkki h yryaukoista A9 hammastikulla 5 Tyhjenn vesis ili A6 T yt vesis ili kuva B 4K yt tislattua v...

Page 22: ...likkelyder fra det dryppforebyggende systemet 4Kaiken veden poistamiseksi vesis ili st A6 ja tuotteesta yhdist tuote pistorasiaan ja s d termostaattivalitsin Ar enimm isasentoon kahdeksi minuutiksi 4S...

Page 23: ...Den integrerte kalkforebyggende patronen reduserer dannelsen av kalk Den integrerte kalkforebyggende patronen stopper ikke den naturlige kalkdannelsesprosessen Selvrengj ringsfunksjon Bruk selvrengj r...

Page 24: ...uttak 7 Sett termostatbryteren Ar i maksimum posisjon Vent til LED indikatoren Ae sl s av og viser at produktet er oppvarmet 8 Koble str mkabelen A1 fra str muttaket 9 Hold produktet vannrett over en...

Page 25: ...Ay i vandbeholderen A6 4 Luk vandbeholderens d ksel A5 5 Placer produktet p bagd kslet Aw 6 S t str mkablet A1 ind i en stikkontakt 7 S t termostatdrejeknappen Ar til maksimum positionen Ikon p vaskem...

Page 26: ...D indikatoren Ae slukker hvilket indikerer at produktet er opvarmet 8 Tr k str mkablet A1 ud af str mstikket 9 Hold produktet vandret over vasken 10 Tryk p og hold selvreng ring knappen At indtil vand...

Page 27: ...tassa a term ket egy h l zati csatlakoz aljzathoz majd k t percre ll tsa a h fok ll t t rcs t Ar maxim lis ll sba 4A be p tett v zk elleni patron cs kkenti a v zk felhalmoz d s t A be p tett v zk elle...

Page 28: ...z ntiszt t s funkci t 4Haszn ljon desztill lt vizet 1 T ltse fel a m r poharat Ay v zzel 2 Nyissa fel a v ztart ly fedel t A5 3 r tse a m r poh r tartalm t Ay a v ztart lyba A6 4 Z rja le a v ztart ly...

Page 29: ...zkodzi powierzchni 2 Wyczy stop elazka A8 wilgotn ciereczk i nie ciernym rodkiem czyszcz cym 3 Wyczy stop elazka A8 wilgotn ciereczk z octem je li do stopy elazka przyklei y si w kna A8 4Gdy produkt n...

Page 30: ...Pod cz przew d zasilaj cy A1 do gniazdka 7 Ustaw pokr t o termostatu Ar na warto maksymaln Poczekaj a wska nik LED Ae zga nie wskazuj c e produkt jest nagrzany 8 Wyjmij kabel zasilaj cy A1 z gniazdka...

Page 31: ...r 2 Aw 3 A1 Ar OFF Ar A1 A6 A6 A8 Ar Ar LED Ae MAX A6 A6 A4 0 A4 A9 A9 A6 A6 A7 1 A7 2 A3 B 4 1 Ay 2 A5 3 Ay A6 4 A5 1 Aw 2 A1 4 4 1 A4 2 Ar LED Ae 3 4 8 30 1 Ar LED Ae 2 A4 3 4 4 8 30 1 Ar 2 A4 3 A2...

Page 32: ...n technik aby sa zn ilo nebezpe enstvo poranenia elektrick m pr dom V robok uchov vajte mimo dosahu det mlad ch ako 8 rokov ke je v robok zapnut alebo sa chlad Nenech vajte v robok bez dozoru ke je pr...

Page 33: ...by mohli po kodi povrch Plnenie n dr ky na vodu obr zok B 4Pou vajte destilovan vodu 1 Napl te odmerku Ay vodou 2 Otvorte kryt n dr ky na vodu A5 3 Obsah odmerky nalejte Ay do n dr ky na vodu A6 4 Za...

Page 34: ...u octom ak do lo k prilepeniu l tky k ehliacej ploche A8 4 Odstr te ak ko vek usadeniny vodn ho kame a z naparovac ch otvorov A9 pomocou p radla 5 Vypr zdnite n dr ku na vodu A6 4Ak chcete odstr ni v...

Page 35: ...ad kem s trochou octa 4 Vodn k men z parn ch otvor A9 odstra te p r tkem P ipojen v robku 1 Polo te v robek na zadn kryt Aw 2 Zapojte nap jec kabel A1 do st nov z suvky 4Kdy se v robek poprv zah v m e...

Page 36: ...picurare poate emite sunete scurte 5 Vypr zdn te n dr ku na vodu A6 4Chcete li odstranit v echnu vodu z n dr ky na vodu A6 a v robku p ipojte v robek do z suvky a nastavte regul tor termostatu Ar na d...

Page 37: ...avaria suprafa a 2 Cur a i talpa fierului A8 cu o lavet umed i un produs de cur at neabraziv 3 Cur a i talpa fierului A8 cu o lavet mbibat cu o et dac pe talpa fierului s au lipit fibre textile A8 Sel...

Page 38: ...5 Pune i produsul pe capacul din spate Aw 6 Conecta i cablul electric A1 la priza electric 7 Seta i cadranul termostatului Ar pe pozi ia maxim A tepta i p n ce indicatorul LED Ae se stinge indic nd as...

Page 39: ......

Page 40: ...Nedis BV De Tweeling 28 5215 MC s Hertogenbosch The Netherlands...

Reviews: