background image


Theodolite ET-5 

Operating Instructions 

15 

1 General 

Information 

EN 

1.1 

For your safety 


Documentation 


Please familiarise yourself with these operating instructions and the safety 
information it contains before starting to work with the 

ET-5

. Observing these 

instructions and information ensures safe working. 
 

Danger 


Never turn the telescope of the 

ET-5

 directly into the sun, as this may harm the 

eyes. 
 

1.2 Proper 

use 


Use 


The 

ET-5

 is an electronic instrument for measuring angles. It is used to measure 

angles between horizontal directions and the zenith or vertical angle. 
 

Repair 


Repairs are to be carried out by Nedo or an authorised customer service agent only. 
Never open the unit yourself; doing so cancels the warranty. 
 

Careful handling/important operating information 


The 

ET-5

 is a high-precision instrument and therefore requires careful handling. 

  Avoid shock and severe jarring. 

  Strong variations in temperature will lead to the lens steaming up. Therefore, the 

instrument must be acclimatised prior to use. 

  Do not expose the instrument to direct sunlight for long periods. 

  Remove the batteries if the batteries are not used for a long time. 

  After use, ensure the 

ET-5

 is dry and store in the case. 

  Check the levels for sudden change at regular intervals and adjust them if 

necessary. 


1.3 Environment 


Disposal 


Dispose of the unit in accordance with the applicable materials recycling regulations. 
 

Batteries/rechargeable batteries 


Batteries/rechargeable batteries are hazardous waste and may not be put into 
domestic waste. They must be properly disposed of according to the respective 
national guidelines. 

Summary of Contents for ET-5

Page 1: ...T 5 FR Mode d emploi Théodolite ET 5 NL Gebruiksaanwijzing Theodoliet ET 5 ES Manual de instrucciones Teodolito ET 5 RU Инструкция по эксплуатации Теодолит ET 5 Theodolit ET 5 NEDO GmbH Co KG Hochgerichtstraße 39 43 D 72280 Dornstetten Tel 49 7443 2401 0 Fax 49 7443 2401 45 www nedo com info nedo com ...

Page 2: ...ssung 7 4 3 Initialisieren des Vertikalkreises 8 4 4 Einstellung Änderung der Datum und Zeitanzeige 8 5 Betrieb 9 5 1 Vertikale Winkel und Neigungen messen 9 5 1 1 Bezugspositionen der vertikalen Winkelmessung 9 5 1 2 Neigungsmessung 9 5 2 Horizontale Winkel messen 9 5 2 1 Festlegung des Bezugspunktes 9 5 2 2 Richtung der Winkelmessung ändern 10 5 2 3 Anzeige einfrieren 10 6 Technische Daten 11 7 ...

Page 3: ...tige Handhabung Wichtige Bedienungshinweise Der ET 5 ist ein hochgenaues und empfindliches Instrument und sollte daher mit entsprechender Sorgfalt behandelt werden Harte Stöße und starke Erschütterungen sind zu vermeiden Starke Temperaturschwankungen führen zum Beschlagen des Objektivs Daher sollte das Instrument vor Gebrauch unbedingt akklimatisiert werden Das Instrument sollte nicht für längere ...

Page 4: ...Bedienungsanleitung Theodolit ET 5 4 2 Lieferumfang DE 1 Transportkoffer 2 ET 5 3 Regenschutz 4 Ladegerät Abbildung ähnlich 5 Akkufach 6 Batteriefach 7 Werkzeug 8 Senklot 2 3 1 2 3 4 5 6 7 8 ...

Page 5: ...verschluss für Dreifuß 6 Dosenlibelle 7 Dreifuß 8 Stellschraube 9 Display und Bedienfeld 10 Röhrenlibelle 11 Objektiv 12 Tragegriff abnehmbar Teilansicht Okular und Fokusring 1 Fokussierung des Bildes 2 Fokussierung des Fadenkreuzes 1 Winkel der Horizontalanzeige im Display einfrieren 2 Richtung der Winkelmessung des Horizontalkreises 3 Umschaltung vertikal Winkel Stei gung und Bestätigung des Men...

Page 6: ...enstehend abgebildet abgenommen und geöffnet werden 1 Verriegelungsknopf auf unlock drehen 2 Batteriefach abnehmen Batteriefachdeckel abnehmen und Batterien austauschen Besondere Hinweise Auf die richtige Polung der Batterien achten siehe Abbildung auf dem Batteriefach Die Batterien sollten vom gleichen Typ sein und im möglichst gleichen Ladezustand Nasse Batterien unverzüglich aus dem Instrument ...

Page 7: ...n zwei Stellschrauben befinden Mit Hilfe dieser beiden Stellschrauben hier A und B wird das Instrument so ausgerichtet dass die Luftblase der Horizontallibelle exakt in der Mitte der beiden Markierungen steht 5 Danach wird der Theodolit um 90 gedreht TIPP Theodolit mit der Taste einschalten und die Winkelanzeige des Horizontalkreises mit der Taste auf 0 setzen Anzeige 0 00 00 Jetzt den Theodolit e...

Page 8: ...en Abbildung ähnliche Anzeige Obere Zeile Anzeige des Vertikalwinkels V Vertikal Messung Untere Zeile Anzeige des Horizontalwinkels H Horizontal Messung 4 4 Einstellung Änderung der Datum und Zeitanzeige 1 Am ausgeschalteten Gerät die beiden Tasten und gleichzeitig gedrückt halten und danach die Taste drücken Die Taste lösen wenn in der Anzeige alle Segmente zu sehen sind Nachdem in der Anzeige AD...

Page 9: ...ung Zum Messen von Neigungen in muss die Taste gedrückt werden Die Messung der Neigung arbeitet in einem Bereich von 45 bezogen auf die Horizontale 100 Darüber oder darunter ist keine Messung möglich Die Anzeige erlischt 5 2 Horizontale Winkel messen 5 2 1 Festlegung des Bezugspunktes Der Bezugs oder Nullpunkt des Horizontalkreises kann an beliebiger Stelle gesetzt werden Hierzu die Taste drücken ...

Page 10: ... dem Uhrzeiger sinn Anzeige HL geändert werden Durch erneutes Drücken der Taste wird wieder im Uhrzeigersinn gemessen Uhrzeigersinn Gegenuhrzeigersinn 5 2 3 Anzeige einfrieren Die Winkelanzeige des Horizontalkreises kann jederzeit durch Drücken der Taste eingefroren werden Im Display blinkt der eingefrorene Messwert die Richtungsanzeige blinkt HRL Durch weiteres Drücken der Taste wird die Anzeige ...

Page 11: ...play LCD auf zwei Seiten zuschaltbare Beleuchtung Kompensator Kompensatorart automatischer Vertikalkompensator Kompensatorbereich 3 Optisches Lot Bild aufrecht Vergrößerung 3x Sehfeld 5 Fokusbereich 0 5 m bis unendlich Lot Genauigkeit 0 5 mm 1 5 m 0 33 mm m Laserlotstrahl Laserklasse 2 Wellenlänge 650nm Laserleistung 1mW Genauigkeit 1 5 mm 1 5 m Allgemeines Genauigkeit Röhrenlibelle 30 2 mm Genaui...

Page 12: ...kelmaßsystems Durch Drücken der Taste zum Parameter UNIT gelangen In diesem Mode kann zwischen den Einheiten Grad 0 360 UNIT A Gon G 0 400 UNIT B oder MIL 0 6400 UNIT C gewählt werden Dazu die Taste betätigen Einstellung Änderung der Bezugsart Durch weiteres Drücken der Taste in den Mode VERTICAL kommen Hier lässt sich mit der Taste zwischen ZEN 0 und Zenit bei 0 ZEN 90 wählen Zenit bei 90 Einstel...

Page 13: ...risierten Kundendienst oder von NEDO überprüft werden Fehler Ursache Abhilfe Das Gerät lässt sich nicht einschalten Keine Stromversorgung Akkus nach Vorgabe aufladen s Kapitel 3 1 E 01 Zählfehler wenn bei einer Peilung sich die Messwertanzeige ständig ändert Reparatur erforderlich TOO FAST Das Teleskop wird zu schnell für den Vertikalsensor gedreht Irgendeine Taste drücken jedoch nicht und E 04 Ho...

Page 14: ...4 3 Initialising the vertical circle 20 4 4 Setting Changing the date and time display 20 5 Operation 21 5 1 Measuring vertical angles and inclinations 21 5 1 1 Reference positions of the vertical angle measurement 21 5 1 2 Inclination measurement 21 5 2 Measuring the horizontal angle 21 5 2 1 Definition of the reference point 21 5 2 2 Changing the direction of the angle measurement 22 5 2 3 Freez...

Page 15: ...cancels the warranty Careful handling important operating information The ET 5 is a high precision instrument and therefore requires careful handling Avoid shock and severe jarring Strong variations in temperature will lead to the lens steaming up Therefore the instrument must be acclimatised prior to use Do not expose the instrument to direct sunlight for long periods Remove the batteries if the ...

Page 16: ... ET 5 Operating Instructions 16 2 Scope of Delivery EN 1 Case 2 ET 5 3 Weather protection 4 Charger figure similar 5 Rechargeable battery compartment 6 Battery compartment 7 Tools 8 Plumb bob 2 3 1 2 3 4 5 6 7 8 ...

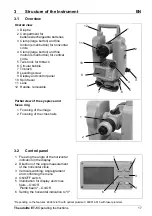
Page 17: ...circle 5 Twist lock for tribrach 6 Circular bubble 7 Tribrach 8 Levelling screw 9 Display and control panel 10 Spirit level 11 Lens 12 Handle removable Partial view of the eyepiece and focus ring 1 Focusing of the image 2 Focusing of the cross hairs 1 Freezing the angle of the horizontal indication in the display 2 Direction of the angle measurement of the horizontal circle 3 Vertical switching An...

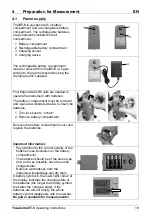
Page 18: ...y compartment must be removed and opened as illustrated below to insert the batteries 1 Turn lock knob to unlock 2 Remove battery compartment Remove the battery compartment cover and replace the batteries Important information Pay attention to the correct polarity of the batteries see illustration on the battery compartment The batteries should be of the same type and as far as possible have the s...

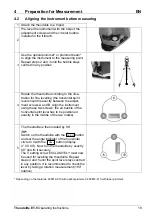
Page 19: ...tween the adjust ment screws A and B Align the instrument using these two screws the air bubble of the horizontal spirit level has to be positioned exactly in the middle of the two marks 5 The theodolite is then rotated by 90 TIP Switch on the theodolite with the button and set the angle indicator of the horizontal circle to 0 with the button display 0 00 00 Now turn the theodolite by exactly 90 a...

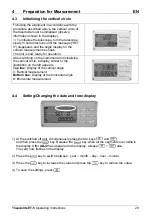
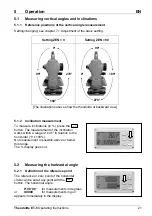
Page 20: ...ing on the instrument and initialising the vertical circle a display similar to the illustration on the left appears Top line Display of the vertical angle V Vertical measurement Bottom line Display of the horizontal angle H Horizontal measurement 4 4 Setting Changing the date and time display 1 At the switched off unit simultaneously press the two keys and and then press the key Release the key w...

Page 21: ...ment To measure inclinations in press the button The measurement of the inclination works within a range of 45 in relation to the horizontal 100 No measurement is possible above or below this range The display goes out 5 2 Measuring the horizontal angle 5 2 1 Definition of the reference point The reference or zero point of the horizontal circle can be set at any point with the button The horizonta...

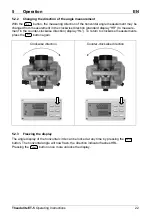
Page 22: ...standard display HR to measure ment in the counter clockwise direction display HL To return to clockwise measurements press the button again Clockwise direction Counter clockwise direction 5 2 3 Freezing the display The angle display of the horizontal circle can be locked at any time by pressing the button The horizontal angle will now flash the direction indicator flashes HRL Pressing the button ...

Page 23: ...s illumination can be connected Compensator Type of compensator automatic vertical compensator Compensator range 3 Optical plummet Image upright Magnification 3x Field of view 5 Focusing range 0 5 m to infinity Plummet accuracy 0 5 mm 1 5 m 0 33 mm m Laser plummet beam Laser class 2 Wavelength 650nm Laser power 1mW Accuracy 1 5 mm 1 5 m General information Accuracy of spirit level 30 2 mm Accuracy...

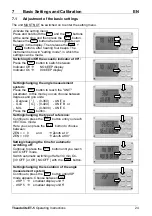
Page 24: ...ent system Press the button to reach the UNIT parameter In this mode you can choose between degrees and gon units Degrees 0 360 UNIT A Gon G 0 400 UNIT B or MIL 0 6400 UNIT C Press the button Setting changing the type of reference Continue to press the button until you reach VErTICAL mode Here you can press the button to choose between ZEN 0 and Zenith at 0 ZEN 90 Zenith at 90 Setting changing the...

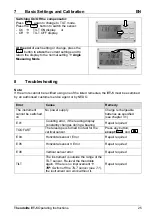
Page 25: ...ustomer service agent or by NEDO Error Cause Remedy The instrument cannot be switched on No power supply Charge rechargeable batteries as specified see chapter 3 1 E 01 Counting error if the reading display constantly changes during a bearing Repair required TOO FAST The telescope is turned too fast for the vertical sensor Press any button except and E 04 Horizontal sensor I Error Repair required ...

Page 26: ...isation du cercle vertical 32 4 4 Réglage modification de l affichage de la date et de l heure 32 5 Fonctionnement 33 5 1 Mesure d angles verticaux et de pentes 33 5 1 1 Position de la référence pour la mesure des angles verticaux 33 5 1 2 Mesure de pentes 33 5 2 Mesure d angles horizontaux 33 5 2 1 Définition du point de référence 33 5 2 2 Changement du sens de mesure d angles 34 5 2 3 Gel de l a...

Page 27: ...5 est un instrument de précision il doit être manipulé avec soin Eviter les chocs brutaux et les fortes secousses Un changement important de température peut apporter de la condensation sur l objectif Pour cette raison attendre que l instrument soit à la température ambiante avant usage L instrument ne doit pas être exposé en plein soleil pendant une période prolongée En cas de non utilisation pro...

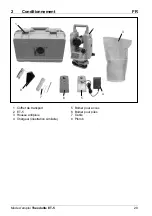
Page 28: ...emploi Theodolite ET 5 28 2 Conditionnement FR 1 Coffret de transport 2 ET 5 3 Housse antipluie 4 Chargeur illustration similaire 5 Boîtier pour accus 6 Boîtier pour piles 7 Outils 8 Plomb 2 3 1 2 3 4 5 6 7 8 ...

Page 29: ...tical 5 Verrouillage du théodolite sur l embase 6 Nivelle sphérique 7 Embase 8 Vis calante 9 Ecran et panneau de commande 10 Nivelle tubulaire 11 Objectif 12 Poignée de transport détachable Vue partielle oculaire et bague de focalisation 1 Mise au point de l image 2 Mise au point du réticule 1 Geler l angle horizontal sur l écran 2 Changer le sens de mesure de l angle horizontal 3 Commutation vert...

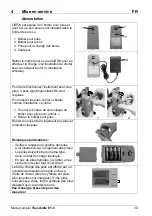
Page 30: ...illustration ci contre 1 Tourner le bouton de verrouillage du boîtier pour piles sur unlock 2 Retirer le boîtier pour piles Retirer le couvercle du logement des piles et remplacer les piles Remarques particulières Veillez à respecter la polarité des piles voir illustration sur le logement des piles Les piles doivent être du même type dans un état de charge identique En cas de piles humides les ret...

Page 31: ...ivelle tubulaire parallèlement aux vis calantes A et B agir sur A ou B pour centrer la nivelle 5 Tourner le théodolite de 90 CONSEIL Mettre en marche le théodolite avec la touche et mettre à zéro l affichage d angles du cercle horizontal avec la touche sur 0 affichage 0 00 00 Pivoter le théodolite d exactement 90 et le bloquer Utiliser EXCLUSIVEMENT la vis de calante C centrer la nivelle tubulaire...

Page 32: ...raît un affichage similaire à l illustration ci contre Ligne supérieure Affichage de l angle vertical V mesure verticale Ligne inférieure Affichage de l angle horizontal H mesure horizontale 4 4 Réglage modification de l affichage de la date et de l heure 1 Sur l appareil éteint maintenir les deux touches et simultanément enfoncées puis presser la touche Relâcher la touche lorsque tous les segment...

Page 33: ...re de pentes Pour mesurer des pentes en appuyer sur la touche La mesure de pentes travaille dans une plage de 45 par rapport à l horizontale 100 Au delà aucune mesure n est possible L affichage du s éteint 5 2 Mesure d angles horizontaux 5 2 1 Définition du point de référence Le point de référence ou d origine du cercle horizontal peut être défini à n importe quel endroit Appuyer sur la touche Sur...

Page 34: ...re standard HL sens anti horaire Appuyer à nouveau sur la touche permet de revenir à la mesure dans le sens horaire Sens horaire Sens anti horaire 5 2 3 Gel de l affichage L affichage de l angle du cercle horizontal peut à tout moment être gelé en appuyant sur la touche A l écran la valeur gelée clignote l affichage du sens clignote HRL En appuyant à nouveau sur la touche l affichage est déverroui...

Page 35: ...e écran 2 écrans LCD éclairage commutable Compensateur Type compensateur compensateur vertical automatique Plage de compensation 3 Plomb optique Image droite Grossissement 3x Champ de vision 5 Plage de mise au point 0 5 m à l infini Plomb précision 0 5 mm 1 5 m 0 33 mm m Rayon de plomb laser Classe 2 Longueur d onde 650nm Puissance du laser 1mW Précision 1 5 mm 1 5 m Informations générales Précisi...

Page 36: ...En pressant la touche vous accédez au paramètre UNIT Dans ce mode il est possible de choisir entre les unités degrés 0 360 UNIT A Gon G 0 400 UNIT B ou MIL 0 6400 UNIT C Actionner pour cela la touche Sélection de la référence du cercle vertical En appuyant sur la touche vous parvenez au mode VErTICAL Il est possible ici de faire son choix avec la touche entre ZEN 0 et Zénith à 0 ZEN 90 Zénith à 90...

Page 37: ...l ne peut être mis hors service Pas d alimentation Charger les accumulateurs comme prescrit voir chapitre 3 1 E 01 Erreur de calcul lorsque l affichage de la valeur mesurée se modifie en permanence lors d une visée Réparation indispensable TOO FAST La lunette est pivotée trop rapidement pour l initialisation du cercle vertical Appuyer sur une touche quelconque hormis et E 04 Erreur du capteur hori...

Page 38: ...eren van de verticale cirkel 44 4 4 Ajuste modificación de la indicación de la fecha y hora 44 5 Werking 45 5 1 Verticale hoek en hellingshoeken meten 45 5 1 1 Referentieposities van de verticale hoekmeting 45 5 1 2 Hellingshoekmeting 45 5 2 Horizontale hoek meten 45 5 2 1 Vastleggen van het referentiepunt 45 5 2 2 Richting van de hoekmeting wijzigen 46 5 2 3 Weergave bevriezen 46 6 Technische spe...

Page 39: ... uiterst nauwkeurig instrument en moet op grond daarvan met uiterste zorgvuldigheid worden behandeld Harde schokken en krachtige trillingen moeten worden vermeden Extreme temperatuurschommelingen leiden tot het beslaan van de lens Daarom moet het instrument voor gebruik eerst absoluut acclimatiseren Het instrument mag niet gedurende langere tijd aan de brandende zon worden blootgesteld Batterijen ...

Page 40: ...Gebruiksaanwijzing Theodoliet ET 5 40 2 Inhoud NL 1 Transportkoffer 2 ET 5 3 Regenbescherming 4 Oplader afbeelding identiek 5 Accuvak 6 Batterijfak 7 Gereedschap 8 Schietlood 2 3 1 2 3 4 5 6 7 8 ...

Page 41: ...irkel 5 Draaisluiting voor driepoot 6 Doosniveau 7 Driepoot 8 Stelschroef 9 Display en bedieningspaneel 10 Buisniveau 11 Lens 12 Draaggreep afneembaar Deelaanzicht oculair en focusring 1 Focussen van het beeld 2 Focussen van het draadkruis 1 Hoek van de horizontale as op het display bevriezen 2 Richting van de hoekmeting van de horizontale cirkel 3 Omschakeling verticaal hoek stijging en bevestigi...

Page 42: ...worden zoals hiernaast afgebeeld 1 Vergrendelknop op unlock draaien 2 Batterijvak verwijderen Deksel van batterijvak nemen en de batterijen vervangen Bijzondere instructie Op de juiste polen van de batterijen letten zie de afbeelding op het batterijvak De batterijen moeten van hetzelfde type zijn en bij voorkeur in dezelfde laadtoestand Natte batterijen onmiddellijk uit het instrument nemen en dro...

Page 43: ... tussen de twee stelbouten bevinden Met behulp van beide stelbouten hier A en B wordt het instrument zo uitgelijnd dat de luchtbel van de horizontale libel exact in het midden van de beide markeringen staat 5 Daarna wordt de theodoliet 90 gedraaid TIP Theodoliet met de toets inschakelen en de hoekaanduiding van de horizontale cirkel met de toets op 0 zetten weergave 0 00 00 Dan de theodoliet exact...

Page 44: ...afbeelding vergelijkbare weergave Bovenste regel weergave van verticale hoek V verticaalmeting Onderste regel weergave van de horizontale hoek HR horizontaalmeting 4 4 Ajuste modificación de la indicación de la fecha y hora 1 En el aparato desconectado mantener las teclas y pulsadas al mismo tiempo y después pulsar la tecla Soltar la tecla cuando en la indicación se vean todos los segmentos Despué...

Page 45: ... Voor het meten van hellingen in moet de toets ingedrukt worden De meting van de hellingshoek werkt in een gebied van 45 gerelateerd aan de horizontale as 100 Daarboven of onder is geen meting mogelijk De aanduiding gaat uit 5 2 Horizontale hoek meten 5 2 1 Vastleggen van het referentiepunt Het referentie of nulpunt van de horizontale cirkel kan op een willekeurige plaats worden ingesteld Daarvoor...

Page 46: ... van de klok in weergave HL worden gewijzigd Door nogmaals op de toets te drukken wordt weer met de wijzers van de klok mee gemeten Met de klok mee Tegen de klok in 5 2 3 Weergave bevriezen De hoekaanduiding van de horizontale cirkel kan op ieder moment met de toets worden bevroren Op het display knippert de bevroren meetwaarde de richtingsaanduiding knippert HRL Door nogmaals op de toets te drukk...

Page 47: ...eergave display LCD aan twee zijden inschakelbare verlichting Compensator Type compensator automatische verticaalcompensator Compensatiebereik 3 Optisch lood Beeld rechtopstaand Vergroting 3x Blikveld 5 Focusbereik 0 5 m tot oneindig Loodnauwkeurigheid 0 5 mm 1 5 m 0 33 mm m Laserloodlijn Laserklasse 2 Golflengte 650nm Laservermogen 1mW Nauwkeurigheid 1 5 mm 1 5 m Algemeen Nauwkeurigheid buislibel...

Page 48: ...ysteem Door op de toets te drukken naar de parameter UNIT gaan In deze modus kan tussen de eenheden graden 0 360 UNIT A Gon G 0 400 UNIT B of MIL 0 6400 UNIT C worden gekozen Daarvoor met de toets bevestigen Instelling wijziging van de soort referentie Door nogmaals indrukken van de toets naar de modus VERTICAL gaan Hier kan met de toets tussen ZEN 0 en Zenit bij 0 ZEN 90 selecteren Zenit bij 90 I...

Page 49: ...nservice of door NEDO worden gecontroleerd Storing Oorzaak Remedie Instrument kan niet worden ingeschakeld Geen voedingsspanning Accu s volgens voorschrift opladen zie hoofdstuk 3 1 E 01 Telfout als de weergave van de meetwaarde bij een peiling continu verandert Reparatie vereist TOO FAST De telescoop wordt te snel voor de verticaalsensor gedraaid Op willekeurige toets drukken maar niet en E 04 Ho...

Page 50: ...ción 55 4 3 Inicialización del círculo vertical 56 4 4 Ajuste modificación de la indicación de la fecha y hora 56 5 Funcionamiento 57 5 1 Medir ángulos verticales e inclinaciones 57 5 1 1 Posiciones de referencia de la medición angular vertical 57 5 1 2 Medición de inclinación 57 5 2 Medir ángulos horizontales 57 5 2 1 Determinación del punto de referencia 57 5 2 2 Modificar la orientación de la m...

Page 51: ...ntes de manejo El ET 5 es un instrumento sensible y de alta precisión y por tanto debe tratarse con el cuidado que corresponde Se deben evitar golpes duros o intensas sacudidas Intensas oscilaciones de temperatura conducen al empañamiento del objetivo Por esta razón antes del uso el instrumento debe ser imprescindiblemente aclimatado El instrumento no debe estar expuesto por tiempo prolongado a lo...

Page 52: ...o ET 5 52 2 Volumen de suministro ES 1 Maleta de transporte 2 ET 5 3 Protección contra la lluvia 4 Cargador similar a la ilustración 5 Compartimento de acumuladores 6 Compartimento de pilas 7 Herramientas 8 Plomada 2 3 1 2 3 4 5 6 7 8 ...

Page 53: ... base niveladora 6 Nivel esferico 7 Base nivelante 8 Tornillo de regulación 9 Display y campo de uso 10 Nivel de burbuja 11 Objetivo 12 Asa de transporte desmontable Vista parcial ocular y anillo de enfoque 1 Enfoque ajuste de la nitidez de la imagen 2 Ajuste de la nitidez de la cruz reticular 1 Congelar el ángulo de la indicación horizontal en el display 2 Orientación de la medición angular del c...

Page 54: ...as pilas se debe extraer y abrir el compartimento como se ilustra a un lado 1 Girar el botón de enclavamiento a unlock 2 Retirar el compartimento de pilas Quitar la tapa del compartimento y sustituir las pilas Indicaciones especiales Observar la correcta polaridad de las pilas véase ilustración sobre el compartimento de pilas Las pilas deben ser del mismo tipo en lo posible con el mismo estado de ...

Page 55: ...tamente entre dos tornillos de regulación Con ayuda de estos dos tornillos de regulación aquí A y B se nivela el instrumento de tal manera que la burbuja de aire del nivel horizontal se encuentre exactamente en el centro de ambas marcaciones 5 A continuación se gira el teodolito en 90º SUGERENCIA Conectar el teodolito con la tecla y colocar la indicación angular del círculo hori zontal en 0 con la...

Page 56: ... una indicación similar a la ilustración a un lado Línea superior Indicación del ángulo vertical V Medición Vertical Línea inferior Indicación del ángulo horizontal H Medición Horizontal 4 4 Ajuste modificación de la indicación de la fecha y hora 1 En el aparato desconectado mantener las teclas y pulsadas al mismo tiempo y después pulsar la tecla Soltar la tecla cuando en la indicación se vean tod...

Page 57: ...a la medición de inclinaciones en se debe oprimir la tecla La medición de la inclinación trabaja en un rango de 45 referido a la horizontal 100 Sobre ello o por debajo no es posible una medición La indicación de apaga 5 2 Medir ángulos horizontales 5 2 1 Determinación del punto de referencia El punto de referencia o punto cero del círculo horizontal puede ser colocado el cualquier punto Para ello ...

Page 58: ...gujas del reloj indicación HL Oprimiendo nuevamente la tecla se mide nuevamente en el sentido de las agujas del reloj Sentido de las agujas del reloj Sentido contrario al de las agujas del reloj 5 2 3 Congelar la indicación La indicación del ángulo del círculo horizontal se puede congelar en todo momento oprimiendo la tecla En el display parpadea el valor de medición congelado la indicación de dir...

Page 59: ...lay LCD sobre dos lados iluminación conectable Compensador Tipo compensador compensador vertical automático Rango 3 Plomada óptica Imagen vertical Aumento x3 Campo de visión 5 Rango de enfoque de 0 5 m hasta infinito Exactitud de plomada 0 5 mm 1 5 m corresponde a 0 33 mm m Rayo láser de plomada Clase de láser 2 Longitud de onda 650nm Potencia de láser 1mW Exactitud 1 5 mm 1 5 m Generalidades Prec...

Page 60: ...istema de medición angular Oprimiendo la tecla alcanzar el parámetro UNIT En este modo se puede seleccionar entre las unidades Grados 0 360 UNIT A Gonio G 0 400 UNIT B o MIL 0 6400 UNIT C Para ello accionar la tecla Ajuste modificación del tipo de referencia Oprimiendo nuevamente la tecla arribar al modo VErTICAL Aquí se puede seleccionar con la tecla entre ZEN 0 y Cenit a 0 ZEN 90 Cenit a 90 Ajus...

Page 61: ... NEDO Fallo Causa Remedio El aparato no permite ser conectado No hay suministro de corriente Cargar el acumulador de acuerdo a las especificaciones ver capítulo 3 1 E 01 Error de conteo cuando en una orientación se modifica constantemente la indicación de valor de medición Requiere reparación TOO FAST El telescopio se gira demasiado rápido para el sensor vertical Oprimir cualquier tecla sin embarg...

Page 62: ...змерением 67 4 3 Инициализация вертикального круга 68 4 4 Дополнительная информация дата время 68 5 Работа с прибором 69 5 1 Измерение вертикального угла и уклона 69 5 1 1 Базовые позиции для измерения вертикального угла 69 5 1 2 Измерение уклона 69 5 2 Измерение горизонтального угла 69 5 2 1 Установка базовой точки 69 5 2 2 Изменение направления измерения угла 70 5 2 3 Фиксирование индикации 70 6...

Page 63: ...сторожное обращение важные рекомендации по применению ET 5 представляет собой чувствительный и высокоточный измерительный прибор поэтому он требует особо бережного обращения Оберегайте прибор от сильных ударов и сотрясений Сильные колебания температуры ведут к запотеванию объектива Поэтому перед использованием нужно обязательно акклиматизировать прибор Прибор нельзя длительное время держать на сол...

Page 64: ...и Теодолит ET 5 64 2 Комплектация RU 1 Транспортный чемоданчик 2 ET 5 3 Защитный чехол от дождя 4 Зарядное устройство похожее изображение 5 Отсек с аккумуляторами 6 Отсек с батарейками 7 Инструменты 8 Отвес 2 3 1 2 3 4 5 6 7 8 ...

Page 65: ...татива 6 Пузырьковый уровень 7 Тренога 8 Регулировочный винт 9 Дисплей и панель управления 10 Пузырьковый уровень 11 Объектив 12 Съемная ручка Окуляр и фокусирующее кольцо 1 Фокусировка настройка резкости изображения 2 Настройка резкости перекрестия 1 Фиксирование показания горизонтального угла на дисплее 2 Направление измерения угла горизонтального круга 3 Переключение вертикального измерения уго...

Page 66: ...ля установки батареек нужно снять и открыть отсек как показано на рисунке 1 Поверните фиксирующую кнопку на unlock 2 Снимите отсек с батарейками Откройте крышку отсека и замените батарейки Специальные указания Учитывайте полярность батареек см изображение на отсеке Батарейки должны быть одного типа и по возможности с одинаковой степенью зарядки Мокрые батарейки сразу же выньте из прибора и высушит...

Page 67: ... на рисунке горизонтальный пузырьковый уровень должен находиться точно между двумя регулировочными винтами Этими двумя винтами здесь A и B прибор выравнивается так чтобы пузырек уровня стоял точно в середине между метками 5 Затем поверните теодолит на 90 СОВЕТ Включите теодолит кнопкой кнопкой установите показание угла горизонтального круга на 0 индикация 0 00 00 Теперь поверните теодолит точно на...

Page 68: ...ения и инициализации вертикального круга появляется подобная здесь индикация Верхняя строка показание вертикального угла V вертикальное измерение Нижняя строка показание горизонтального угла Hгоризонтальное измерение 4 4 Дополнительная информация дата время 1 На выключенном приборе одновременно нажмите и удерживайте нажатыми кнопки и затем нажмите кнопку Отпустите кнопку когда на дисплее будут вид...

Page 69: ...е уклона Для измерения уклона в нужно нажать кнопку Измерение уклона работает в диапазоне 45 относительно горизонтали 100 Выше или ниже измерение невозможно Индикация исчезает 5 2 Измерение горизонтального угла 5 2 1 Установка базовой точки Базовая или нулевая точка горизонтального круга может быть установлена в любом месте Для этого нажмите кнопку На дисплее сразу появится горизонтальный угол 0 0...

Page 70: ...ние против часовой стрелки индикация HL При повторном нажатии кнопки происходит возврат на измерение по часовой стрелке по часовой стрелке против часовой стрелки 5 2 3 Фиксирование индикации Показание угла горизонтального круга можно в любое время зафиксировать нажатием кнопки На дисплее будет мигать зафиксированная величина угла и индикация направления HRL При повторном нажатии кнопки происходит ...

Page 71: ...сталлический с двух сторон с подсветкой Компенсатор Тип компенсатора автоматический вертикальный компенсатор Диапазон компенсации 3 Оптический отвес Изображение вертикальное Увеличение 3x Поле зрения 5 Диапазон фокусирования от 0 5 м до бесконечности Точность отвеса 0 5 мм 1 5 м соответствует 0 33 мм м Лазерный вертикальный луч Класс лазера 2 Длина волны 650нм Мощность лазера 1мВт Точность 1 5 мм ...

Page 72: ...мерений При нажатии кнопки перейти к параметру UNIT В этом режиме можно выбрать следующие единицы измерений Градус 0 360 UNIT A Гон G 0 400 UNIT B или MIL 0 6400 UNIT C Для этого нажмите кнопку Установка изменение базовой точки При следующем нажатии кнопки перейти в режим VErTICAL Здесь можно кнопкой выбрать ZEN 0 зенит при 0 ZEN 90 зенит при 90 Установка изменение времени автоматического выключен...

Page 73: ...ой сервисной организации или на фирме NEDO Неисправность Причина Рекомендации по устранению Прибор не включается Отсутствует электропитание Зарядите аккумуляторы см главу 3 10 E 01 Ошибка счета если при одном измерении измеряемое значение постоянно меняется Требуется ремонт TOO FAST Зрительная труба поворачивается слишком быстро для датчика вертикали Нажмите какую нибудь кнопку но не и E 04 Ошибка...

Page 74: ......
Reviews: