background image

5

Risk of injury!

Scratched glass in the appliance door may 

develop into a crack. Do not use a glass 

scraper, sharp or abrasive cleaning aids or 

detergents.

Risk of electric shock!

Incorrect repairs are dangerous. Repairs 

may only be carried out by one of our 

trained after-sales engineers. If the 

appliance is faulty, unplug the mains plug 

or switch off the fuse in the fuse box. 

Contact the after-sales service.

Risk of electric shock and serious injury!

The cable insulation on electrical 

appliances may melt when touching hot 

parts of the appliance. Never bring 

electrical appliance cables into contact 

with hot parts of the appliance.

Risk of electric shock!

Do not use any high-pressure cleaners or 

steam cleaners, which can result in an 

electric shock.

Risk of electric shock!

When replacing the cooking compartment 

bulb, the bulb socket contacts are live. 

Before replacing the bulb, unplug the 

appliance from the mains or switch off the 

circuit breaker in the fuse box.

Risk of electric shock!

A defective appliance may cause electric 

shock. Never switch on a defective 

appliance. Unplug the appliance from the 

mains or switch off the circuit breaker in 

the fuse box. Contact the after-sales 

service.

Causes of damage

Caution!

Accessories, foil, greaseproof paper or ovenware on the 

cooking compartment floor: do not place accessories on the 

cooking compartment floor. Do not cover the cooking 

compartment floor with any sort of foil or greaseproof paper. 

Do not place ovenware on the cooking compartment floor if a 

temperature of over 50 ºC has been set. This will cause heat 

to accumulate. The baking and roasting times will no longer 

be correct and the enamel will be damaged.

Water in a hot cooking compartment: do not pour water into 

the cooking compartment when it is hot. This will cause 

steam. The temperature change can cause damage to the 

enamel.

Moist food: do not store moist food in the cooking 

compartment when it is closed for prolonged periods This will 

damage the enamel.

Fruit juice: when baking particularly juicy fruit pies, do not 

pack the baking tray too generously. Fruit juice dripping from 

the baking tray leaves stains that cannot be removed. If 

possible, use the deeper universal pan.

Cooling with the appliance door open: only allow the cooking 

compartment to cool when it is closed. Even if the appliance 

door is only open a little, front panels of adjacent units could 

be damaged over time.

Very dirty door seal: If the door seal is very dirty, the 

appliance door will no longer close properly when the 

appliance is in use. The fronts of adjacent units could be 

damaged.Always keep the door seal clean.

Appliance door as a seat, shelf or worktop: Do not sit on the 

appliance door, or place or hang anything on it. Do not place 

any cookware or accessories on the appliance door.

Inserting accessories: depending on the appliance model, 

accessories can scratch the door panel when closing the 

appliance door. Always insert the accessories into the 

cooking compartment as far as they will go.

Carrying the appliance: do not carry or hold the appliance by 

the door handle. The door handle cannot support the weight 

of the appliance and could break.

Energy and environment tips

Here you can find tips on how to save energy when baking and 

roasting and how to dispose of your appliance properly.

Saving energy

Only preheat the oven if this is specified in the recipe or in the 

operating instruction tables.
Use dark, black lacquered or enamelled baking tins. They 

absorb the heat particularly well.
Open the appliance door as little as possible during cooking, 

baking or roasting.
It is best to bake several cakes one after the other. The cooking 

compartment is still warm. This may reduce the baking time for 

the second cake.
For longer cooking times, you can switch the oven off 

10 minutes before the end of the cooking time and use the 

residual heat to finish cooking.

Environmentally-friendly disposal

Dispose of packaging in an environmentally-friendly manner.

This appliance is labelled in accordance with 

European Directive 2012/19/EU concerning used 

electrical and electronic appliances (waste electrical 

and electronic equipment - WEEE). The guideline 

determines the framework for the return and recycling 

of used appliances as applicable throughout the EU.

Summary of Contents for B12S53.3GB

Page 1: ...en Instruction manual Built in oven B12S53 3GB...

Page 2: ......

Page 3: ...evel 11 Baking on two or more levels 11 Baking table 11 Baking table for ready made products 12 Tips and tricks 13 Roasting and braising 14 Roasting 14 Braising 14 Tables for roasting and braising 14...

Page 4: ...ent correctly See Description of accessories in the instruction manual Risk of fire Combustible items stored in the cooking compartment may catch fire Never store combustible items in the cooking comp...

Page 5: ...es do not pack the baking tray too generously Fruit juice dripping from the baking tray leaves stains that cannot be removed If possible use the deeper universal pan Cooling with the appliance door op...

Page 6: ...5RWDU VHOHFWRU 2SHUDWLQJ PRGH VHOHFWRU 7HPSHUDWXUH VHOHFWRU Operating mode Use 3 CircoTherm For baking and roasting on one or more levels Top bottom heating For baking and roasting on one level Ideal...

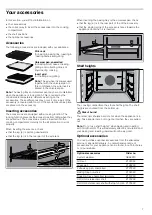
Page 7: ...ry faces towards the appliance door when it is inserted Shelf heights The cooking compartment has four shelf heights The shelf heights are counted from the bottom up Risk of burns The telescopic shelv...

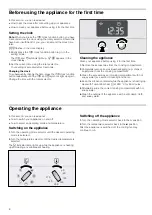
Page 8: ...cessories from the cooking compartment 2 Completely remove any residual packaging e g chips of polystyrene from the cooking compartment 3 Clean the accessories and cooking compartment with hot soapy w...

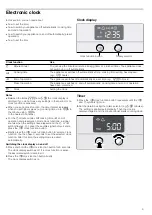
Page 9: ...function After this time the setting mode is exited automatically Switching the clock display on and off 1 Press and hold the KJclock function button for 6 seconds The clock display switches off If a...

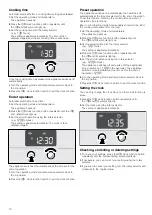
Page 10: ...e end of operation To set this function combine the cooking time and end of operation clock functions Bear in mind that food which spoils easily should not be left in the cooking compartment for too l...

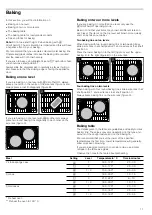
Page 11: ...s may brown at different rates on each level The items on the top level will brown more quickly and can be taken out earlier Two baking tins on two levels When baking with two round baking tins or two...

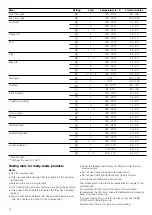
Page 12: ...ou are baking on more than one level only use the 3 CircoTherm operating mode Observe the notes in the table about preheating Light fruit cake 3 1 140 150 80 100 Rich fruit cake 3 1 140 150 220 240 Ja...

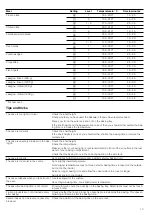
Page 13: ...he baking time or reduce the temperature The cake is unevenly browned in the bak ing tin Check the shelf height Check the temperature Make sure that your baking tin is not placed directly in front of...

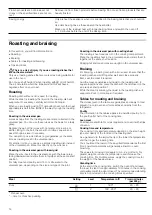
Page 14: ...ish and lid fit together well and close properly First sear the meat if required Add the meat vegetables and liquid to the roasting dish in equal proportions and place the dish with the lid closed on...

Page 15: ...30 25 Gammon Joint 3 1 160 30 30 2 190 30 30 Chicken Whole chicken 3 1 170 180 20 25 2 190 200 20 25 Portion boned 3 1 190 20 25 2 200 210 20 25 Quarter 3 1 190 20 25 2 200 210 20 25 Turkey Drumstick...

Page 16: ...he food to stand for approximately 10 minutes in the cooking compartment with the door closed The recommended standing time is not included in the grilling times specified Radiant grilling For flat it...

Page 17: ...120 150 Shoulder bone in 4 2 170 190 100 130 Shoulder boned and rolled 4 2 170 190 120 150 Steaks high 2 3 cm 4 270 1st side 5 7 2nd side 3 5 Chops high 2 3 cm 4 270 1st side 6 8 2nd side 4 7 Pork Ro...

Page 18: ...sories and hook in racks telescopic shelves or separate fitting systems 2 Heat 1 litre of long life milk 3 5 fat or fresh pasteurised milk to 40 C or Bring 1 litre of fresh milk to the boil once and a...

Page 19: ...available washing up liquid with a soft damp cloth or chamois dry with a soft cloth Use cleaners for matted stainless steel if very dirty Painted surfaces Apply commercially available washing up liqui...

Page 20: ...d pull it out figure B Fitting the appliance door 1 Insert the hinges in the left and right hand holders figure C The notch on both hinges must engage 2 Open the appliance door fully 3 Close the locki...

Page 21: ...rack with the indentation a facing downwards so that the shelf heights match 5 Insert the hook in rack at the rear to the limit stop and push to the rear figure C 6 Insert the hook in rack at the fro...

Page 22: ...the correct advice The rating plate bearing these numbers can be found on the lower left hand side when you open the appliance door You can make a note of the numbers of your appliance and the teleph...

Page 23: ...ray 3 1 3 4 130 140 35 50 3x baking tray Small cakes x 20 3 160 170 25 30 Baking tray 3 1 150 160 25 30 Baking tray 3 1 3 140 150 30 40 2x baking tray 3 1 3 4 140 150 35 45 3x baking tray Fat free spo...

Page 24: ...www neff international com Register your product online 9000986077 9000986077 950901 Constructa Neff Vertriebs GmbH Carl Wery Stra e 34 D 81739 M nchen GERMANY...

Reviews: