background image

20

Defrosting and Cooking

Defrosting and cooking using the Circotherm 

v

Important heating system information:

For defrosting and cooking of frozen
foods, use circotherm.

With all frozen foods, follow the food
manufacturers instructions on the
package.

As a rule, 

defrosted frozen foods

(especially meats) require less cooking
time than fresh products, since freezing
has a pre-cooking effect.

If 

frozen meat 

is placed in the oven, the

defrosting time must be added to the
required cooking time.

Always defrost 

frozen poultry 

before

cooking because the giblets must be
removed.

For cooking 

frozen fish

, use the same

temperatures as for fresh fish.

Frozen ready-to-eat meals 

in

aluminium dishes may be placed into
the oven several at a time.

Frozen vegetables 

(i.e., when cooking

complete meals) should be cooked in a
covered pot together with the roast. Use
only approximately half of the liquid
specified in the recipe. Use fat only for
adding flavour.

Standard defrosting of various foods:

Shelf-in levels:
With 1 baking sheet:

Slide-in level 

3

With 2 baking sheets:

Slide-in levels

1

and

3

All stated times

are approximate

guidelines that vary with the shape and
volume of frozen products.

Raw frozen products or foods from a
freezer 

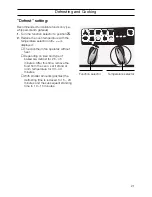
always defrost at 50° C.

Higher defrosting temperatures may
cause the food to dry out.

Defrost 

frozen meals packed in

aluminium foil or closed aluminium
containers 

at a setting of 130 – 140° C.

Place frozen meals 

packed in plastic

bags or plastic containers 

in a pot

filled with water. Cover the pot and
defrost of 130 – 140° C.

Attention:

Pot handles must be oven-

proof.

Defrost and warm up 

frozen baked

goods 

at 100 – 140° C. Brush bread,

rolls or yeast pastry lightly with egg to
make the crust more appealing.

Defrost 

dry frozen yeast cakes 

at 

160 – 170° C for 20 – 30 minutes.

Defrost 

moist frozen yeast cakes 

(with

fruit topping) at 160 – 170° C for 
30 – 50 minutes after wrapping in
aluminium foil to prevent cake from
drying out.

Defrost and toast 

frozen toast 

(with

topping) at 160 – 170° C for about 
20 minutes.

Defrost and bake

frozen pizzas 

at 180 –

190 °C for 15 – 25 minutes. 
Place on wire grill covered with
greaseproof paper.
Please ensure that the greaseproof
paper is suitable for use at these
temperatures.

Summary of Contents for B1641S2GB

Page 1: ...How to connect up build in set up use and look after your B1641 oven NEFF UK Ltd...

Page 2: ...ng Roasting and Grilling Definition of Oven Features 12 13 Switching the oven ON and OFF 14 Safety features 15 Baking 16 Roasting 17 Grilling 18 Cooking Tips and Helpful Hints 19 Defrosting and Cookin...

Page 3: ...e carefully They contain important information concerning your personal safety as well as on use and care of the appliance The Instructions for Use apply to several versions of this appliance Accordin...

Page 4: ...ng electrical system Do not store combustible items in the oven They could ignite if the oven is switched on accidentally Do not clean the oven with steam or high pressure cleaners If using hot air v...

Page 5: ...ventional top and bottom heat 0 Radiant grill full element Z Radiant grill centre element only for small amounts of food I Circo roasting n Bread baking position w Bottom heat S Dough proving setting...

Page 6: ...X2 Z 1330 X0 Z 1340 X2 Small grill set Z 1240 X2 Supplementary equipement set Telescopic Z 1750 X0 The following accessories can be obtained from the supplier of your oven 2 Wire shelves 1 Roasting g...

Page 7: ...current time with the rotary knob e g Note The time cannot be set if an automatic function is active see Electronic clock for cancelling automatic function Preliminary cleaning 1 Clean the appliance...

Page 8: ...e for the first time Minute timer 1 Press the t button and set the cooking time e g minutes When the timer switches on the remaining time is displayed 2 If you want to display the current time press t...

Page 9: ...et the cooking time with the rotary knob e g hour and minutes When the cooking time has been set the time of day is displayed The displayed above the g button indicates automatic mode 3 When the time...

Page 10: ...e displayed above the h button indicates automatic mode e g 4 The oven is automatically switched on and off at the preset times e g and 5 When the time has expired a signal is emitted and the flashes...

Page 11: ...ayed at any time by pressing the relevant button To cancel the preset time Press the g button and reset the time to Special functions Masking out the display 1 Press the button for 4 seconds The displ...

Page 12: ...ed is exposed to heat from the grill element at the top of the oven cavity Advantages Particularly suitable for flat small cuts of meat i e steaks and sausages fish vegetables and toast Full width gri...

Page 13: ...ooklet Use this function with a cold oven only Advantages takes the toil out of oven cleaning protects the enamel on interior surfaces constitutes an environmentally friendly cleaning method Dough pro...

Page 14: ...ator light for the oven temperature C glows red during the heating phase and during reheating When the set temperature has been reached the indicator light goes out Switching off the oven To switch of...

Page 15: ...layed The oven cannot be unintentionally switched on e g by children To release the oven switch 3 x from the position to the oven light m Oven light goes out Automatic safety off function Depending on...

Page 16: ...urned upside down to accommodate different size tins If the cake base gets too dark Check the shelf level Shorten the baking time and possibly use a lower baking temperature If the cake base stays too...

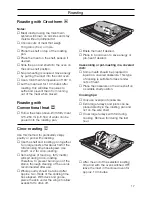
Page 17: ...be prepared in liquid in a covered casserole This type of cooking is suitable for less tender cuts of meat Place the casserole on the wire shelf on a suitable shelf position Cooking tips Only use ove...

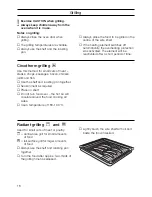
Page 18: ...ent will be reactivated after a short period of time Exercise CAUTION when grilling Always keep children away from the oven when it is in use Notes on grilling Always close the oven door when grilling...

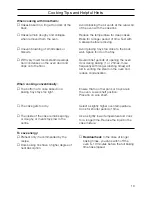
Page 19: ...stays too light The cake gets too dry The inside of the cake remains spongy or doughy or meat stays raw in the centre Avoid blocking the air vents at the rear wall of the oven with the cake tins Reduc...

Page 20: ...ing sheet Slide in level 3 With 2 baking sheets Slide in levels 1 and 3 All stated times are approximate guidelines that vary with the shape and volume of frozen products Raw frozen products or foods...

Page 21: ...selector until is displayed The circotherm fan operates without heat Depending on size and type of bakeware defrost for 25 45 minutes After this time remove the food from the oven Let it stand at room...

Page 22: ...d Cakes up to 0500 g 1 20 25 min Cakes up to 0500 750 g 1 25 30 min Dough for plaited loaf 0500 g 1 30 35 min Dough for plaited loaf 0750 g 1 30 40 min Dough for normal loaf 1000 g 1 35 60 min Yoghurt...

Page 23: ...t suds for cleaning Remove the oven door before cleaning the enamel surface Oven interior Clean the oven after each use especially after roasting or grilling Food remnants burn in when the oven is reh...

Page 24: ...quid into the floor pan of the oven cavity In the case of heavy soil build up you may wish to allow the cleaning solution to soak in for a while before you activate the cleaning function 3 Close the o...

Page 25: ...the detergent soaked sponge cloth a soft brush or a nylon scrubber wipe off the oven interior Stubborn soil remnants can be removed with a nylon scourer 3 Lime deposits may be removed with a cloth soa...

Page 26: ...ceptacles on the left and right and swing the oven door downward 2 Close the catch levers on the left and right 3 Close the oven door Switching on the oven light Turn the function selector one setting...

Page 27: ...acing the oven door seal 1 Remove the defective oven door seal by simply unhooking it You may obtain the new oven door seal from our spares department Trouble shooting Guide Calling the customer servi...

Page 28: ...he hinges pull up and remove Doors with 3 panels Disengage inner door glass at the corner pieces and lift it up using for example a pair of frying tongs made of plastic or wood Installing the cleaned...

Page 29: ...29 Assembly Instructions...

Page 30: ...safety of the appliance can be ensured only if the equipment earth in the building installation has been installed according to regulations On the installation side a isolating device shall be provid...

Page 31: ...at the built in oven is positioned securely and in a level position and that the required installation dimensions have been maintained In units featuring automatic oven cleaning after filling 0 4 l of...

Page 32: ...NEFF UK Ltd Grand Union House Old Wolverton Road Old Wolverton Milton Keynes MK12 5PT Tel 01908 328300 Fax 01908 328399 5750 201 847 Printed in Germany 0703 Es...

Reviews: