background image

  Operating the appliance   

en

15

Notes

The cooling fan may continue to run while an 

operation is interrupted.

After a temperature change, the paused running time 

continues to count. After a change in the type of 

heating, the running time starts again from zero.

Cancelling the appliance operation


Press and hold the 

#

 touch button until the appliance 

operation is cancelled.

Note: 

 Operating modes such as the cleaning function 

cannot be cancelled.

Heating up the appliance quickly

You can use the "Rapid heat-up" and "PowerBoost" 

functions to reduce the preheat time. Whether the 

appliance is preheated with the "Rapid heat-up" function 

or the "PowerBoost" function depends on the type of 

heating that has been set. With the "PowerBoost" 

function, unlike with the "Rapid heat-up" function, you 

can place your food into the cold cooking compartment 

even before preheating has begun. Only cook on one 

level when using the "PowerBoost" function.

Notes

If the 

°

 touch button is lit, the "Rapid heat-up" or 

"PowerBoost" function can be activated.

To deactivate the "Rapid heat-up" or "PowerBoost" 

function before it has finished, touch the 

°

 touch 

button.

Activating the "Rapid heat-up" function

1.

Set top/bottom heating 

ƒ

 and the temperature.

Note: 

Set a temperature above 100 °C to allow the 

appliance to preheat quickly. 

2.

Touch the 

#

 touch button to start the appliance 

operation.

3.

Touch the 

°

 touch button to activate the "Rapid 

heat-up" function.

The 

°

 symbol appears on the display.

4.

Once the set temperature has been reached, the 

"Rapid heat-up" function switches itself off 

automatically. The 

°

 symbol disappears from the 

display. Place the food in the cooking compartment

Activating the "PowerBoost" function

1.

Set CircoTherm hot air 

 or the bread baking 

setting 

 and the temperature.

Note: 

Set a temperature above 100 °C to allow the 

appliance to preheat quickly. 

2.

Place the food on a single level in the cooking 

compartment.

3.

Touch the 

#

 touch button to start the appliance 

operation.

4.

Touch the 

°

 touch button to activate the 

"PowerBoost" function.

The 

°

 symbol appears on the display.

Once the set temperature has been reached, the 

"PowerBoost" function switches itself off 

automatically. The 

°

 symbol disappears from the 

display.

Function

Type of heating

Place the food in 

the cooking 

compartment

Rapid heat-up

Top/bottom heating 

ƒ

after preheating

PowerBoost*

CircoTherm hot air 

before preheating

Bread-baking setting 

* Do not use more than one level for cooking

Summary of Contents for B47VR32.0B

Page 1: ...en INSTRUCTION MANUAL Built in oven B47VR32 0B...

Page 2: ......

Page 3: ...assisted cooking 16 Dough proving setting 16 Reheating 17 Filling the water tank 17 After every steam operation 18 O Time setting options 19 Showing and hiding the time setting options 19 Setting the...

Page 4: ...acking it Do not connect the appliance if it has been damaged in transport Only a licensed professional may connect appliances without plugs Damage caused by incorrect connection is not covered under...

Page 5: ...you open the appliance door hot steam can escape Steam may not be visible depending on its temperature When opening do not stand too close to the appliance Open the appliance door carefully Keep chil...

Page 6: ...t discolouration of the door glass Water in a hot cooking compartment do not pour water into the cooking compartment when it is hot This will cause steam The temperature change can cause damage to the...

Page 7: ...an the water tank with a soft cloth and standard washing up liquid 7Environmental protection Environmentalprotection Your new appliance is particularly energy efficient Here you can find tips on how t...

Page 8: ...appliance on and off on page 14 Steam assisted cook ing Switching on steam assisted cooking VarioSteam Steam assisted cooking on page 16 0 Main menu Selecting operating modes and set tings Setting and...

Page 9: ...ture Use CircoTherm hot air 40 200 C For baking and cooking on one or more levels The fan distributes the heat from the ring heating element in the back panel evenly around the cooking compartment Top...

Page 10: ...ickly after the operation the cooling fan continues to run for a certain period afterwards Note You can change how long the cooling fan continues to run for in the basic settings Basic settings on pag...

Page 11: ...Locking function The accessories can be pulled out approximately halfway until they lock in place The locking function prevents the accessories from tilting when they are pulled out The accessories m...

Page 12: ...ter or uncarbonated mineral water Notes If your water is very hard we recommend that you use softened water If you only use softened water you can set the water hardness range to softened in this case...

Page 13: ...play Cleaning the cooking compartment To remove the new appliance smell heat up the cooking compartment when it is empty and with the oven door closed 1 Remove the accessories from the cooking compart...

Page 14: ...e or button to select the setting 5 Touch the touch button to start the appliance operation The heating bar and run time appear on the display Note If you would like to go directly to the 0 main menu...

Page 15: ...he touch button Activating the Rapid heat up function 1 Set top bottom heating and the temperature Note Set a temperature above 100 C to allow the appliance to preheat quickly 2 Touch the touch button...

Page 16: ...7 Touch the touch button The appliance starts the operation Note If the water tank runs dry during an operation with steam assistance a message appears on the display prompting you to fill up the wate...

Page 17: ...ids e g alcoholic drinks into the water tank Due to hot surfaces vapours from flammable liquids may catch fire in the cooking compartment explosion The appliance door may spring open Hot steam and jet...

Page 18: ...the cooking compartment floor The remaining water is pumped back into the water tank after every operation with steam Then empty and dry the water tank Moisture remains in the cooking compartment Dry...

Page 19: ...ime has elapsed a signal sounds and the appliance stops the operation automatically To cancel the signal tone touch the 0 touch button Start delay Ready at The appliance switches on automatically and...

Page 20: ...uch button until Childproof lock deactivated appears on the display 2 Touch the touch button 3 Switch on the required appliance operation Deactivating 1 Press and hold the 0 touch button until Childpr...

Page 21: ...ine 9 Use the or button to select Activated or Deactivated Note If you have selected Activated the heating type is shown in the heating types menu If you have selected Deactivated the heating type is...

Page 22: ...ctions can be found in the relevant sections Steam on page 16 Warning Risk of scalding When you open the appliance door hot steam can escape Steam may not be visible depending on its temperature When...

Page 23: ...le cleaning agents To ensure that the different surfaces are not damaged by using the wrong cleaning agent observe the information in the table Depending on the appliance model not all of the areas li...

Page 24: ...ping the appliance clean Always keep the appliance clean and remove dirt immediately so that stubborn deposits of dirt do not build up Tips Clean the cooking compartment after each use This will ensur...

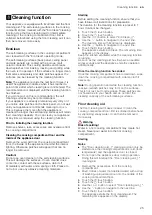
Page 25: ...th these surfaces dab it off immediately with water and a sponge cloth Please to not rub or use any abrasive cleaning materials Starting Before setting the cleaning function ensure that you have follo...

Page 26: ...the locking position approx 30 2 Touch the touch button 3 Start CircoTherm hot air at 50 C 4 After 5 minutes switch off the appliance and close the appliance door Removing heavy deposits of dirt You h...

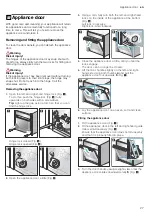
Page 27: ...Fig fully upwards on both sides with a screwdriver Tip Light up the gap using a torch so that you can find the hinge lock Hinge lock closed Fig Hinge lock opened Fig 2 Open the appliance door a littl...

Page 28: ...the removed glass panels on an even soft and clean surface 1 Remove the appliance door 2 Lay the appliance door with the front side facing down on an even soft and clean surface 3 Push on the left an...

Page 29: ...to the power supply Power cut Check whether other kitchen appliances are working The circuit breaker is faulty Check in the fuse box to make sure that the fuse for the appliance is OK Operations with...

Page 30: ...y Check in the fuse box to make sure that the fuse for the appliance is OK Faulty sensor for the touch button Call the after sales service If required empty the water tank Open the appliance door take...

Page 31: ...artment when cooking food Your appliance is very energy efficient and radiates very little heat to its surroundings during operation Due to the high difference in temperature between the appliance int...

Page 32: ...is suitable for the selected temperature Always cut greaseproof paper to size Recommended setting values You can find the ideal heating type for various pastries in the table The temperature and bakin...

Page 33: ...15 25 Meringue baking tray 3 80 90 120 150 Pavlova baking tray 3 90 100 120 180 Souffl 1 2L souffl dish 2 160 170 35 45 Souffl 1 2L souffl dish 2 160 180 2 35 45 Souffl individual moulds 2 170 190 65...

Page 34: ...s too light on top and too dark underneath Bake the cake one level higher in the oven the next time The cake is too dark on top and too light underneath Bake the cake one level lower in the oven the n...

Page 35: ...the cooking compartment more easily in the cookware and prepare the sauce in the cookware itself Only use cookware which is suitable for use in an oven Check whether the cookware fits in the cooking...

Page 36: ...a basis for determining the cooking time The individual pieces should be approximately equal in size A general rule the larger the poultry or piece of meat is the lower the cooking temperature and th...

Page 37: ...weight of meat see table above 15 25 for yorkshire pudding With chicken wire rack wire rack universal pan 4 1 180 weight of chicken see table above Dish Accessories cookware Shelf po sition Type of he...

Page 38: ...ake the joint out of the cooking compartment more easily in the cookware and prepare the sauce in the cookware itself Only use cookware which is suitable for use in an oven Check whether the cookware...

Page 39: ...osition and temperature of the food Settings ranges are indicated for this reason Try using the lower values at first You can use a higher setting next time if necessary The setting values are based o...

Page 40: ...40 Chicken breast boneless 150 g each wire rack 4 275 1st side 10 15 2nd side 10 15 Chicken breast boneless 150 g each wire rack 3 200 210 2 20 30 Chicken whole wire rack 2 200 220 20 15 Chicken whol...

Page 41: ...e rack Insert the wire rack with the open side facing the appliance door and the outer rail pointing downwards Universal pan or baking tray Slide the universal pan or the baking tray in carefully as f...

Page 42: ...ersal pan baking tray 3 1 190 210 30 40 Croquettes universal pan 3 200 220 25 35 Hash browns universal pan 3 200 220 25 35 Potatoe wedges universal pan 3 190 210 25 35 Baked goods frozen prebaked Roll...

Page 43: ...round Wire rack Insert the wire rack with the open side facing the appliance door and the outer rail pointing downwards Universal pan or baking tray Slide the universal pan or the baking tray in caref...

Page 44: ...nes baking tray 3 190 210 15 20 Jam tarts 12 cup tin 3 180 200 20 30 Souffl 1 2L souffl dish 2 160 170 40 50 Pie rectangular pie tin 2 190 200 40 55 Jacket Potatoes baking tray 3 150 170 60 90 Meat Be...

Page 45: ...compartment to warm up for approx 15 minutes with the cookware inside Sear the meat on the hotplate at a very high heat and for a sufficiently long time on all sides even on the ends Place into the p...

Page 46: ...an and undamaged preserving jars Only use heat resistant clean and undamaged rubber rings Check clips and clamps in advance For each preserving process only use preserving jars that are the same size...

Page 47: ...e of heating used CircoTherm hot air Allowing the dough to prove at dough proving setting Yeast dough will prove considerably more quickly using the Dough proving heating type than at room temperature...

Page 48: ...have already defrosted from the cooking compartment Leave the defrosted food to rest for another 10 to 30 minutes in the appliance whilst it is switched off so that the temperature balances out Type...

Page 49: ...st and then extend the time if necessary The values in the table apply to dishes placed into a cold cooking compartment Preheating is necessary for selected dishes and this is indicated in the table R...

Page 50: ...ke Hot water sponge cake on two levels vertically stack springform cake tins in an offset manner on the wire racks Notes The setting values apply to dishes placed into a cold cooking compartment Pleas...

Page 51: ...aught and the cooking compartment stays cleaner Type of heating used Grill large area Dish Accessories Shelf posi tion Type of heating Tempera ture in C Cooking time in mins Grilling Toasting bread Wi...

Page 52: ...www neff international com 9001003572 9001003572 941209 Constructa Neff Vertriebs GmbH Carl Wery Stra e 34 D 81739 M nchen Register your product online...

Reviews: