background image

en

    Customer service

32

Replacing the bulb in the top of the cooking 
compartment

If the cooking compartment light bulb fails, it must be 
replaced. Heat-resistant, 40 watt, 230 V halogen bulbs 
are available from the after-sales service or specialist 
retailers.

When handling the halogen bulb, use a dry cloth. This 
will increase the service life of the bulb. Only use these 
bulbs.

:

Warning – Risk of electric shock! 

When replacing the cooking compartment bulb, the 
bulb socket contacts are live. Before replacing the bulb, 
unplug the appliance from the mains or switch off the 
circuit breaker in the fuse box.

:

Warning – Risk of burns! 

The appliance becomes very hot. Never touch the 
interior surfaces of the cooking compartment or the 
heating elements. Always allow the appliance to cool 
down. Keep children at a safe distance.

1.

Place a tea towel in the cold cooking compartment 
to prevent damage.

2.

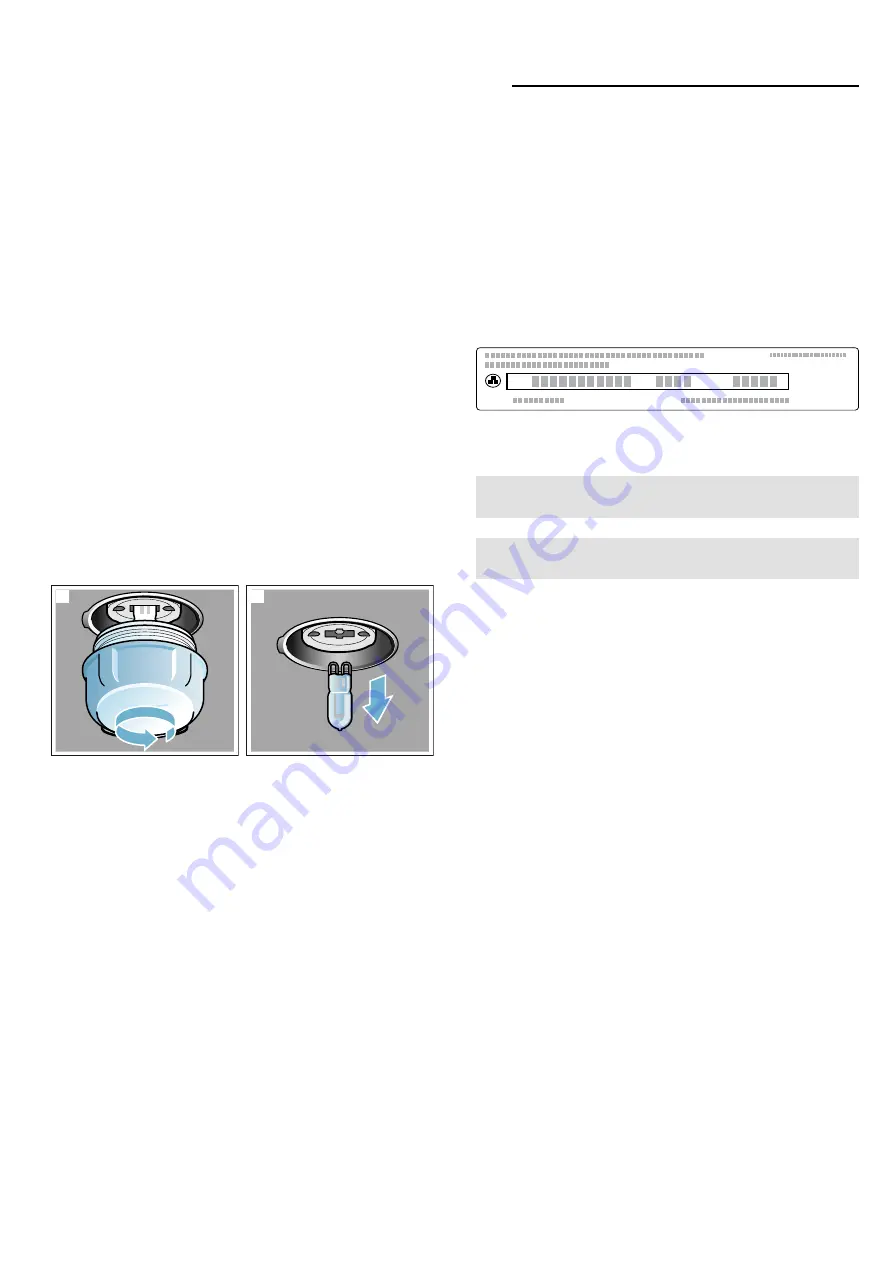
Turn the glass cover anti-clockwise to remove it 
(figure 

!

).

3.

Pull out the bulb – do not turn it (figure 

"

). 

Insert the new bulb, making sure that the pins are in 
the correct position. Push the bulb in firmly.

4.

Screw the glass cover back on. 
Depending on the appliance model, the glass cover 
may have a sealing ring. If the glass cover has a 
sealing ring, put it back in place before screwing the 
cover back on.

5.

Remove the tea towel and switch on the circuit 
breaker.

Glass cover

If the glass cover of the halogen bulb is damaged, it 
must be replaced. You can obtain a new glass cover 
from the after-sales service. Please specify the E 
number and FD number of your appliance.

4

Customer service

Customer service

Our after-sales service is there for you if your appliance 

needs to be repaired. We will always find an 
appropriate solution, also in order to avoid after-sales 
personnel having to make unnecessary visits.

E number and FD number

When calling us, please give the full product number (E 
no.) and the production number (FD no.) so that we can 
provide you with the correct advice. The rating plate 
bearing these numbers can be found on the base of the 
appliance when you open the appliance door.

To save time, you can make a note of the number of 
your appliance and the telephone number of the after-
sales service in the space below, should it be required.

Please note that a visit from an after-sales service 
engineer is not free of charge in the event that the 
appliance has been misused, even during the warranty 
period.

Please find the contact data of all countries in the 
enclosed customer service list.

To book an engineer visit and product advice

Rely on the professionalism of the manufacturer. You 
can therefore be sure that the repair is carried out by 
trained service technicians who carry original spare 
parts for your appliances.

2

1

E no.

FD no.

After-sales service 

O

GB

0344 892 8989 
Calls charged at local or mobile rate.

IE

01450 2655 
0.03 € per minute at peak. Off peak 0.0088 € 
per minute.

=1U

)'

(1U

7\SH

Summary of Contents for B57CS26 0B Series

Page 1: ...en INSTRUCTION MANUAL BUILT IN OVEN B57CS26 0B...

Page 2: ......

Page 3: ...r 16 Setting the cooking time 16 Start delay Ready at 16 Checking changing or deleting settings 16 A Childproof lock 17 Automatic childproof lock 17 One time childproof lock 17 Q Basic settings 18 Cha...

Page 4: ...ed in transport Only a licensed professional may connect appliances without plugs Damage caused by incorrect connection is not covered under warranty This appliance is intended for domestic use only T...

Page 5: ...during operation Never touch the hot parts Keep children at a safe distance Risk of scalding When you open the appliance door hot steam can escape Steam may not be visible depending on its temperature...

Page 6: ...ing against the front of the appliance Keep children away from the appliance Warning Risk of serious damage to health The appliance will become very hot during the cleaning function The non stick coat...

Page 7: ...y leave the cooking compartment to dry with the door open if a lot of moisture was produced whilst the oven was operating Fruit juice when baking particularly juicy fruit pies do not pack the baking t...

Page 8: ...ger cooking times you can switch the appliance off 10 minutes before the end of the cooking time and use the residual heat to finish cooking Environmentally friendly disposal Dispose of packaging in a...

Page 9: ...n you stop scrolling through the values quickly LUFR7KHUP KRW DLU Display 0 Touch buttons 8 ShiftControl control Touch button Use on off Switching the appliance on or off Switching the appliance on an...

Page 10: ...ately The fan circulates the hot air around the food Circotherm intensive 50 275 C For preparing pizza and dishes which require a lot of heat from underneath The bottom heating element and the ring he...

Page 11: ...settings on page 18 _Accessories AccessoriesYour appliance is accompanied by a range of accessories Here you can find an overview of the accessories included and information on how to use them correct...

Page 12: ...can insert the wire rack and the universal pan at the same time to catch drops of liquid When inserting the wire rack ensure that both spacers are at the rear edge When the universal pan is inserted...

Page 13: ...he button repeatedly until Date appears 8 Use the button to apply the settings The initial use is complete Notes You can change these settings at any time in the basic settings Basic settings on page...

Page 14: ...tton to select the temperature Note Depending on the operating mode different settings are available For each further setting use the button to navigate to the next line Use the or button to select th...

Page 15: ...s lit the Rapid heat up or PowerBoost function can be activated To deactivate the Rapid heat up or PowerBoost function before it has finished touch the touch button Activating the Rapid heat up functi...

Page 16: ...s soon as the cooking time has elapsed an audible signal sounds and the appliance ends the operation automatically Touch the 0 touch button to end the audible signal Start delay Ready at The appliance...

Page 17: ...ch button until Childproof lock deactivated appears on the display 2 Touch the touch button 3 Switch on the required appliance operation Deactivating 1 Press and hold the 0 touch button until Childpro...

Page 18: ...e next line 9 Use the or button to select Activated or Deactivated Note If you have selected Activated the heating type is shown in the heating types menu If you have selected Deactivated the heating...

Page 19: ...utton to select the Baking and roasting assistant 4 Use the button to navigate to the next line 5 Use the or button to select the required category 6 Use the button to navigate to the next line 7 Use...

Page 20: ...thermometer supplied You can purchase it as a spare part from the after sales service After use always remove the meat thermometer from the cooking compartment Never store it inside the cooking compar...

Page 21: ...maged Only use the meat probe which is recommended for this appliance Notes The set cooking compartment temperature must be at least 10 C higher than the core temperature To prevent the meat thermomet...

Page 22: ...ts To ensure that the different surfaces are not damaged by using the wrong cleaning agent observe the information in the table Depending on the appliance model not all of the areas listed may be on i...

Page 23: ...Enamelled sur faces Hot soapy water or a vinegar solution Clean with a dish cloth and then dry with a soft cloth Soften baked on food remnants with a damp cloth and soapy water Use stainless steel wir...

Page 24: ...Keep children and pets away Follow the instructions even when using the Delayed start function with a delayed end time Preparation Warning Risk of fire Loose food residues grease and meat juices may...

Page 25: ...partment to cool down 2 Wipe off any ash that has been left behind in the cooking compartment and around the appliance door with a damp cloth 3 If you have left an accessory inside the cooking compart...

Page 26: ...osits of dirt Leave the soapy water to work for some time before starting the cleaning aid Rub soapy water onto the dirt on the smooth surfaces before starting the cleaning aid Repeat the cleaning aid...

Page 27: ...r horizontally and use it to push the door lock black component on each side of the door all the way up fig Tip Use a torch to light up the gap so that you can see the door locks Door lock closed fig...

Page 28: ...ide rollers simultaneously fig and Ensure that the appliance door is not wedged at an angle and that it is properly fitted in place 2 Rotate the door handle upwards slightly fig The appliance door wil...

Page 29: ...ont side facing down on an even surface that is soft and clean 3 Push on the left and right hand side on the outside of the appliance door until the inner glass is released on both sides Fig 4 Careful...

Page 30: ...eals and spacers The arrow on the intermediate panel must line up with the arrow on the frame Fig 4 Insert the second intermediate panel without the seals and spacers and push it in the direction of t...

Page 31: ...e Notes remedy The appliance does not work The plug is not plugged into the mains Connect the appliance to the power supply Power cut Check whether other kitchen appliances are working The circuit bre...

Page 32: ...Glass cover If the glass cover of the halogen bulb is damaged it must be replaced You can obtain a new glass cover from the after sales service Please specify the E number and FD number of your appli...

Page 33: ...an Level 3 Baking tray Level 1 Baking tins dishes on the wire rack First wire rack Level 3 Second wire rack Level 1 By preparing several dishes at the same time you can make energy savings of up to 45...

Page 34: ...pie tin 2 170 190 55 70 Quiche quiche tin dark coated 3 190 210 30 40 White Bread loaf tin 1x 900 g or 2x 450 g 2 190 210 25 40 White Bread loaf tin 1x 900 g or 2x 450 g 2 180 200 20 30 Scones baking...

Page 35: ...d increase the temperature if necessary or extend the baking time The cake is too light on top and too dark underneath Bake the cake one level higher in the oven the next time The cake is too dark on...

Page 36: ...led or dark metal roasting dish it will need a little more liquid than if cooked in glass cookware The steam evaporates in the cookware when roasting Carefully pour in more liquid if required Shiny ro...

Page 37: ...0 35 40 Top side Top rump wire rack 2 160 170 30 25 Lamb Leg bone in wire rack 2 160 170 25 25 Shoulder bone in wire rack 2 160 170 25 20 Shoulder boned and rolled wire rack 2 170 180 25 25 Rack of la...

Page 38: ...arger poultry or for multiple pieces at the same time Depending on the size and type of the meat add up to litres of water to the universal pan Any dripping fat and meat juices will be caught You can...

Page 39: ...eaks drumsticks and burgers can be prepared well using the Grill heating type Excellent results are also achieved when grilling toast Grilling Keep the appliance door closed when using the grill Never...

Page 40: ...2nd side 7 9 Leg bone in wire rack 2 170 180 25 30 Shoulder bone in wire rack 2 170 190 25 15 Shoulder boned and rolled wire rack 2 170 180 20 15 Rack of lamb wire rack 2 190 200 15 25 Pork Steaks hei...

Page 41: ...ware tins and dishes on the wire rack Universal pan or baking tray Slide the universal pan or the baking tray in carefully as far as the limit stop with the bevelled edge facing the appliance door Gre...

Page 42: ...C Cooking time in mins Pizza chilled Pizza chilled wire rack 3 190 210 10 15 Pizza frozen Pizza thin base wire rack 3 190 210 15 20 Pizza thin base 2 levels universal pan wire rack 3 1 190 210 20 25...

Page 43: ...t stop with the bevelled edge facing the appliance door Baking tins and cookware Dark coloured metal baking tins are most suitable These allow you to make energy savings of up to 35 per cent Cookware...

Page 44: ...on in the tips on slow cooking attached to the settings table Your appliance features the heating type Slow cook Only start operation when the cooking compartment has fully cooled down Allow the cooki...

Page 45: ...the more aromatic the dried food will remain Setting ranges are indicated for this reason Dish Cookware Shelf posi tion Heating function Searing time in mins Tempera ture in C Cooking time in mins Pou...

Page 46: ...erving process Fruit After a short while small bubbles will form at short intervals Switch off the appliance once all preserving jars are bubbling Remove the jars from the cooking compartment after th...

Page 47: ...re only meant to be average values Type of heating used Dough proving Defrosting The defrost setting is suitable for defrosting frozen fruit vegetables and baked items Poultry meat and fish should ide...

Page 48: ...o each other Apple pie on two levels position dark coloured springform cake tins above each other so that they are offset Cakes in tinplate springform cake tins bake on one level with top bottom heati...

Page 49: ...70 30 40 Fatless sponge cake 2 levels Springform cake tin diameter 26 cm 3 1 150 170 30 50 Apple pie 2 x black plate tins diameter 20 cm 2 170 180 60 80 Apple pie 2 x black plate tins diameter 20 cm 2...

Page 50: ...6...

Page 51: ...6...

Page 52: ...9001126165 9001126165 980212 en...

Reviews: