background image

en 

Cleaning and servicing

8

1.

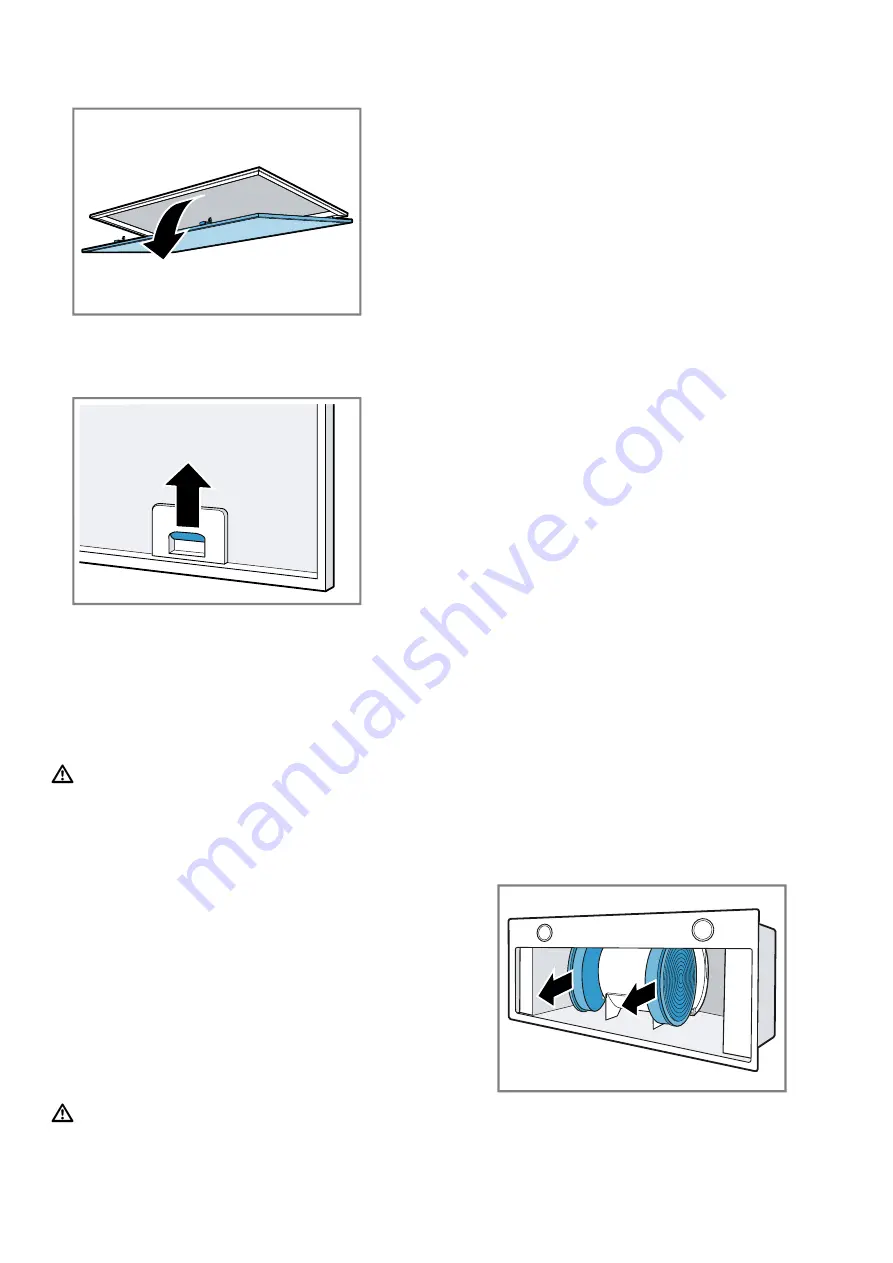
Open the filter cover by pulling it downwards.

2. ATTENTION!

Falling grease filters may damage the hob below.

Grip below the grease filter with one hand.

Open the locks on the grease filters.

3.

Remove the grease filters from the holders.
To prevent grease from dripping, hold the grease fil-
ter horizontally.

8.5 Cleaning grease filters manually

The grease filters filter the grease from the cooking va-
pour. Regularly cleaned grease filters guarantee a high
level of grease removal.

WARNING ‒ Risk of fire!

Fatty deposits in the grease filters may catch fire.

Requirement:

 The grease filters have been removed.

1.

Observe the information regarding the cleaning
agents.

2.

Soak the grease filter in hot soapy water.
Use special grease solvent for stubborn dirt. You
can obtain grease solvents from after-sales service
or the online shop.

3.

Use a brush to clean the grease filters.

4.

Rinse the grease filters thoroughly.

5.

Allow the grease filters to drain.

8.6 Cleaning grease filters in the
dishwasher

The grease filters filter the grease from the cooking va-
pour. Regularly cleaned grease filters guarantee a high
level of grease removal.

WARNING ‒ Risk of fire!

Fatty deposits in the grease filters may catch fire.

ATTENTION!

The grease filters may become damaged if they are
squeezed.

Do not squeeze the grease filters.

Note: 

When cleaning the grease filter in the dish-

washer, light discolouration may occur. This discoloura-
tion has no effect on the performance of the metal
grease filters.

Requirement:

 The grease filters have been removed.

1.

Observe the information regarding the cleaning
agents.

2.

Place the grease filters loosely into the dishwasher.
Do not clean heavily soiled grease filters with
utensils.
Use special grease solvent for stubborn dirt. You
can obtain grease solvents from after-sales service
or the online shop.

3.

Start the dishwasher.
Select a temperature of no more than 70 °C.

4.

Allow the grease filters to drain.

8.7 Fitting grease filters

ATTENTION!

Falling grease filters may damage the hob below.

Grip below the grease filter with one hand.

1.

Fit the grease filters.

2.

Fold the grease filters upwards and engage the
locks.

3.

Make sure that the locks engage.

4.

Close the filter cover.

8.8 Odour filter for recirculating air mode

Odour filters bind odorous substances in air recircula-
tion mode. Regularly replaced odour filters guarantee a
high level of odour removal.
With normal use (approx. one hour a day), the odour fil-
ter must be replaced every 4  months. The odour filter
cannot be cleaned or regenerated.
You can obtain odour filters from the after-sales service
or the online shop. Only use original odour filters.

Removing the odour filter

1.

Remove the grease filters.

2.

Remove the odour filter from the holder.

Summary of Contents for D55ML66N1

Page 1: ...Extractor hood en User manual and installation instructions D55ML66N1 D57ML6 N1 D58ML66N1...

Page 2: ...e of max 2000 m above sea level Do not use the appliance With an external timer 1 3 Restriction on user group Avoid risks to children and vulnerable per sons This appliance may be used by children age...

Page 3: ...s very quickly Always supervise hot oil and fat Never extinguish burning oil or fat with wa ter Switch off the cooking zone Extinguish flames carefully using a lid fire blanket or something similar Wh...

Page 4: ...ean controls with a wet cloth Incorrect cleaning damages the surfaces Follow the cleaning instructions Do not use harsh or abrasive detergents Clean stainless steel surfaces in the direction of the fi...

Page 5: ...air must not be discharged into a flue that is used for exhausting fumes from appliances burning gas or other fuels not applicable to appliances that only discharge the air back into the room If the e...

Page 6: ...or filter replacement Z51IXB1X6 LongLife air recirculation set Z51ITD1X1 Long Life odour filter re placement Z51ITP0X0 7 Basic operation 7 1 Switching on the appliance Press a The appliance starts at...

Page 7: ...n the interior of the appliance may cause explosions Never use highly caustic alkaline or highly acidic cleaning agents In particular do not use commer cial or industrial cleaning agents in conjunctio...

Page 8: ...aged if they are squeezed Do not squeeze the grease filters Note When cleaning the grease filter in the dish washer light discolouration may occur This discoloura tion has no effect on the performance...

Page 9: ...cessary costs WARNING Risk of injury Improper repairs are dangerous Repairs to the appliance should only be carried out by trained specialist staff If the appliance is defective call Customer Service...

Page 10: ...ning used elec trical and electronic appliances waste electrical and electronic equip ment WEEE The guideline determines the frame work for the return and recycling of used appliances as applicable th...

Page 11: ...e sucked back into the living space Always ensure adequate fresh air in the room if the appliance is being operated in exhaust air mode at the same time as a room air dependent heat producing appli an...

Page 12: ...rous Never operate a damaged appliance Call Customer Service Page 10 Repairs to the appliance should only be carried out by trained specialist staff Incorrect repairs are dangerous Repairs to the appl...

Page 13: ...side directly next to a high sided unit or a wall The distance between the appliance and wall or high sided unit must be at least 50 mm 12 8 Instructions for the exhaust air pipe The appliance manufa...

Page 14: ...r cover and pull it down in a single swift motion 3 Undo the hinge lock and remove the filter cover 4 Remove the grease filters To avoid causing damage do not bend the grease filters 5 Undo the contro...

Page 15: ...he grease filters To avoid causing damage do not bend the grease filters 7 Attach and close the filter cover Establishing the exhaust air connection 1 Secure the exhaust pipe to the air pipe connector...

Page 16: ...Disconnect the appliance from the power supply 2 Loosen the exhaust pipe 3 Open the filter cover if required 4 Remove the grease filters To avoid causing damage do not bend the grease filters 5 Remove...

Page 17: ......

Page 18: ......

Page 19: ......

Page 20: ...Wery Stra e 34 81739 M nchen GERMANY 9001604421 9001604421 001215 en Valid within Great Britain Imported to Great Britain by BSH Home Appliances Ltd Grand Union House Old Wolverton Road Wolverton Mil...

Reviews: