background image

en 

Before using for the first time

6

Before using for the first time

Configure the settings for initial start-up. Clean the ap-
pliance and accessories.

Basic operation

You can find out everything you need to know about
operating your appliance here.

Switching on the appliance

Requirement:

 Align the remote control as precisely as

possible to the infrared receiver for the LED display.

Press ⁠  to switch on the appliance.

a

The appliance starts at fan setting 2.

a

The LED for the set fan setting lights up in the LED
display.

Switching off the appliance

Switch the appliance off when you are not using it.

Press ⁠ .

a

The fan run-on is switched on, LED 6 flashes in the
LED display for the fan run-on.

a

The fan automatically switches off after approx. 10
minutes.

Selecting a fan setting

Press ⁠  or ⁠ .

a

The LED for the set fan setting lights up in the LED
display.

Switching on intensive mode

If particularly strong odours or vapours develop, you
can use intensive mode.

1.

 so oft drücken, bis in der LED-Anzeige die LED 4

für die Intensivstufe 1 leuchtet.

2.

 so oft drücken, bis in der LED-Anzeige die LED 5

für die Intensivstufe 2 leuchtet.

a

After approx. 6 minutes, the appliance automatically
switches to fan setting 3.

Switching off intensive mode

To select a fan setting of your choice, press ⁠ .

a

After approx. 6 minutes, the appliance automatically
switches to fan setting 3.

Switching on the fan run-on

During the fan run-on, the appliance continues to run
for a short time and then switches off automatically.
The fan run-on removes remaining odours and is used
to dry the odour filter after the cooking process.

Press ⁠ .

a

LED 1 for the fan setting lights up in the LED dis-
play. LED 6 flashes for the fan run-on.

a

The appliance switches off automatically after ap-
prox. 10 minutes.

Switching off the fan run-on

Press ⁠ .

a

This immediately stops the fan run-on.

a

The appliance switches to the fan setting that was
previously selected.

Switch on automatic mode

1

The optimum fan setting is set automatically using a
sensor.

Press ⁠ .

a

In the LED display, LED 6 lights up for automatic
mode.

Switch off automatic mode 

1

Press ⁠ .

a

The appliance switches to the fan setting that was
previously set.

a

The ventilation is automatically ended when the
sensor detects no further change in the room air
quality.

a

Automatic mode runs for a maximum of four hours.

Intermittent ventilation

With interval ventilation, the ventilation system switches
on and off in the selected setting for the selected time.

Note: 

This function is only available via a mobile device

with the Home Connect app.

If the interval ventilation is switched on, LED 6 continu-
ously flashes in the LED display for the interval ventila-
tion and the LED for the selected fan setting lights up.
As soon as the ventilation time ends, the LED for the
fan setting you have selected goes out. LED 6 contin-
ues to flash.

Sensor control

In automatic mode, a sensor in the appliance detects
the intensity of the cooking and roasting fumes. De-
pending on the setting of the sensor sensitivity, the op-
timum fan setting automatically switched on.
If the sensor control system reacts too weakly or too
strongly, the setting for the sensor sensitivity may
change.

¡

Default setting: Fan setting 3

¡

Lowest setting: Fan setting 1

¡

Highest setting: Fan setting 5

Setting the sensor control

Requirement:

 The appliance is switched off.

1.

Press and hold ⁠  and ⁠  for approx. three seconds.

2.

Press ⁠  or ⁠  to change the setting.
To cancel the setting, press ⁠ .

1

Depending on the appliance specifications

Summary of Contents for I16RPS8S5

Page 1: ...Ceiling mounted ventilation system en User manual and assembly instructions I16RPS8S5...

Page 2: ...nstaller is responsible for en suring that the appliance works perfectly at its installation location Only use this appliance In accordance with these instructions for in stallation and use In private...

Page 3: ...parts Keep children at a safe distance The appliance will become hot during op eration Allow the appliance to cool down be fore cleaning it WARNING Risk of injury Components inside the appliance may h...

Page 4: ...rosion damage To prevent condensation from building up switch on the appliance during cooking If moisture gets into the controls this may result in damage Never clean controls with a wet cloth Incorre...

Page 5: ...air mode can be found in our catalogue Alternatively ask your dealer The required accessor ies are available from specialist retail ers from customer service or from the Online Shop Familiarising you...

Page 6: ...n the LED dis play LED 6 flashes for the fan run on a The appliance switches off automatically after ap prox 10 minutes Switching off the fan run on Press a This immediately stops the fan run on a The...

Page 7: ...pliance has this function Switching on the button tone The button tones can be switched on Requirement The appliance is switched off 1 Press and hold and for approx three seconds a In the LED display...

Page 8: ...e display Tips Please consult the documents supplied by Home Connect Please also follow the instructions in the Home Con nect app Notes Please note the safety precautions in this instruction manual an...

Page 9: ...al settings in the app software updates can also be set to download automatically We recommend that you install security updates as soon as possible Resetting the connection Saved connections to the h...

Page 10: ...water in the direction of the finish 3 Dry with a soft cloth 4 Apply a thin layer of the stainless steel cleaning product with a soft cloth Tip You can obtain stainless steel cleaning products from a...

Page 11: ...e been removed 1 Observe the information regarding the cleaning agents Cleaning products Page 10 2 Place the grease filters loosely into the dishwasher Do not clean heavily soiled grease filters with...

Page 12: ...e reach of children Keep an eye on any children when you are repla cing batteries Batteries may explode Do not charge the batteries Do not short circuit the batteries Do not throw batteries into a fir...

Page 13: ...d for approx three seconds LED 1 flashes in the LED display The grease filters are saturated Cleaning grease filters in the dish washer Page 11 Cleaning grease filters manually Page 11 LED 2 flashes i...

Page 14: ...from the mains 2 Cut through the power cord 3 Dispose of the appliance in an environmentally friendly manner This appliance is labelled in accord ance with European Directive 2012 19 EU concerning use...

Page 15: ...ns Do not make any changes to the electrical or mechanical assembly Risk of falling when working on the appliance Use a stable stepladder Do not lean over the hob Do not step on the hob or the work su...

Page 16: ...nstallation Ensure that the protection against contact is guaran teed during installation Only a licensed professional may connect appli ances without plugs They are subject to the require ments of th...

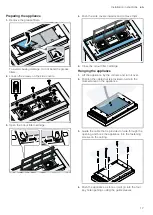
Page 17: ...nwards and remove them 5 Close the odour filter cartridge Hanging the appliance 1 Lift the appliance by the corners and turn it over 2 Position the cable that is provided on site in the marked area on...

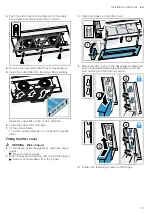
Page 18: ...ing installation 1 Guide the cable that is provided on site through the opening in the appliance Maintain the bending radius of the cable that is provided on site for connecting the appliance The cabl...

Page 19: ...e 7 Fit the grease filters To avoid causing damage do not bend the grease filters Fitting the filter cover WARNING Risk of injury Components inside the appliance may have sharp edges Wear protective g...

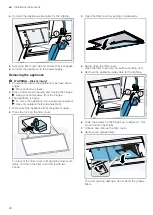
Page 20: ...ce two people are required Use only suitable tools and equipment 1 Disconnect the appliance from the power supply 2 Press the lock on the filter cover To prevent the filter cover from swinging down su...

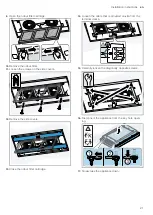
Page 21: ...screws on the side covers 20 12 Remove the side covers 13 Close the odour filter cartridge 14 Loosen the cable that is provided on site from the terminal clamp L N 15 Carefully loosen the diagonally o...

Page 22: ......

Page 23: ......

Page 24: ...Constructa Neff Vertriebs GmbH Carl Wery Stra e 34 81739 M nchen GERMANY 9001521608 9001521608 en 000226...

Reviews: