background image

operation

 en

13

Condensation may form in the fruit
and vegetable container depending
on the food and quantity stored.
Remove the condensation with a dry
cloth.
To ensure that the quality and aroma
are retained, store fruit and veget-
ables that are sensitive to cold out-
side of the appliance at temperatures
of approx. 8 °C to 12 °C, e.g. pine-
apple, bananas, citrus fruits, cucum-
bers, courgettes, peppers, tomatoes
and potatoes.

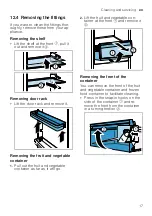
6.3 Door rack

To adjust the door rack as required,
you can remove the door rack and
re-insert elsewhere. 
→ 

"Removing door rack", Page 17

6.4 Accessories

Use original accessories. These have
been made especially for your appli-
ance.
The accessories for your appliance
depend on the model.

Egg tray

Store eggs safely on the egg tray.

operation

7 Basic operation

operation

7.1 Switching on the appli-

ance

1.

Electrically connect the appliance.
→ 

Page 10

Note: 

If the appliance has been

previously switched off using the
control panel, press and hold

 for three seconds.

a

The motor starts after a delay of
up to 8 minutes.

a

The appliance begins to cool.

2.

Set the required temperature.
→ 

Page 13

7.2 Operating tips

¡

Once you have switched on the
appliance, it may take up to
8 minutes for the motor to start up.

¡

Once you have switched on the
appliance, the set temperature is
only reached after several hours.
Do not put any food in the appli-
ance until the set temperature has
been reached.

¡

When you close the door, a va-
cuum may be created. The door is
then difficult to open again. Wait a
moment until the vacuum is offset.

¡

The temperature in the appliance
varies due to the following condi-
tions:
– How often the appliance is

opened

– Load capacity
– Temperature of newly stored

food

– Ambient temperature
– Direct sunlight

7.3 Switching off the appli-

ance

Press and hold 

 for

three seconds.

7.4 Setting the temperature

Setting the refrigerator
compartment temperature

Press   repeatedly until the tem-
perature display shows the re-
quired temperature.
The recommended temperature in
the refrigerator compartment is
4 °C. 
→ 

""OK" sticker", Page 15

Summary of Contents for KI141

Page 1: ...Refrigerator en Information for Use KI141 KI131 KI121...

Page 2: ...4 Accessories 13 7 Basic operation 13 7 1 Switching on the appliance 13 7 2 Operating tips 13 7 3 Switching off the appliance 13 7 4 Setting the temperature 13 8 Additional functions 14 8 1 Super cool...

Page 3: ...3 Restriction on user group This appliance may be used by children aged 8 or over and by people who have reduced physical sensory or mental abilities or inadequate experience and or knowledge provide...

Page 4: ...angerous Never let the power cord come into contact with heat sources WARNING Risk of explosion If the appliance s ventilation openings are sealed a leak in the re frigeration circuit may result in a...

Page 5: ...children Do not let children play with small parts WARNING Risk of explosion If the cooling circuit is damaged flammable refrigerant may es cape and explode To accelerate the defrosting process do not...

Page 6: ...ended period of time switch off the appliance defrost it clean it and leave the door open to prevent the formation of mould Metal or metal style parts in the appliance may contain aluminium If acidic...

Page 7: ...Customer Service WARNING Risk of fire If the tubes are damaged flammable refrigerant and harmful gases may escape and ignite Keep naked flames and ignition sources away from the appli ance Ventilate t...

Page 8: ...led Sort the individual components by type and dispose of them separ ately 3 2 Saving energy If you follow these instructions your appliance will use less power Selecting the installation location Kee...

Page 9: ...age 12 The weight of the appliance ex works may be up to 45 kg depending on the model The subfloor must be sufficiently stable to bear the weight of the appli ance Permitted room temperature The permi...

Page 10: ...appliance in accordance with the enclosed installation in structions 4 4 Preparing the appliance for the first time 1 Remove the informative material 2 Remove the protective foil and transit bolts e g...

Page 11: ...ith your appliance 5 1 Appliance You can find an overview of the parts of your appliance here Note Deviations between your appliance and the diagrams may differ with re gard to their features and size...

Page 12: ...2 lights up when the Super function is switched on 3 Displays the set temperature for the refrigerator compart ment in C 6 Features The features of your appliance de pend on the model 6 1 Shelf To var...

Page 13: ...off using the control panel press and hold for three seconds a The motor starts after a delay of up to 8 minutes a The appliance begins to cool 2 Set the required temperature Page 13 7 2 Operating tip...

Page 14: ...tone is switched off 10 Refrigerator compart ment You can keep meat sausage fish dairy products eggs prepared meals and pastries in the refrigerator com partment The temperature can be set from 2 C to...

Page 15: ...efrosting in the refri gerator compartment When the appliance is operating condensation droplets or frost form on the rear panel of the refrigerator compartment due to functional reas ons The back pan...

Page 16: ...th a high alcohol content If liquid gets into the drainage hole the evaporation pan may overflow The rinsing water must not get into the drainage hole If you clean fittings and accessories in the dish...

Page 17: ...remove it Removing the fruit and vegetable container 1 Pull out the fruit and vegetable container as far as it will go 2 Lift the fruit and vegetable con tainer at the front and remove it Removing the...

Page 18: ...8 minutes until the appliance audibly starts No action required The appliance is not cooling the displays and lighting are lit Showroom mode is switched on Carry out the appliance self test Page 20 a...

Page 19: ...refrigerating unit fan Refrigerant flows through the pipes The motor switches or solenoid valves are switching on or off No action required The appliance makes noises Fittings wobble or stick Check t...

Page 20: ...ce 14 Storage and disposal 14 1 Taking the appliance out of operation 1 Switch off the appliance Page 13 2 Disconnect the appliance from the power supply Unplug the appliance from the mains or switch...

Page 21: ...available from our after sales service your retailer or on our website If you contact Customer Service you will require the product number E Nr and the production number FD of your appliance The conta...

Page 22: ...en Technical data 22 ternatively you can also find the model identifier in the first line of the EU energy label...

Page 23: ......
Page 24: ...Stra e 34 81739 M nchen GERMANY Valid within Great Britain Imported to Great Britain by BSH Home Appliances Ltd Grand Union House Old Wolverton Road Wolverton Milton Keynes MK12 5PT United Kingdom 90...

Reviews: