background image

en 

Storage and disposal

26

Conducting an appliance self-
test

1.

Switch off the appliance.
→ 

Page 18

2.

Switch the appliance back on after
approx. five minutes. → 

Page 17

3.

Within the first 10 seconds after
switching on, press and hold 
3 to 5 seconds.

a

The appliance self-test starts.

a

While the appliance self-test is run-
ning, a long audible signal sounds.

a

If, at the end of the appliance self-
test, two audible signals sound
and the temperature display indic-
ates the set temperature, your ap-
pliance is OK. The appliance then
switches to normal operation.

a

If, at the end of the appliance self-
test, five audible signals sound
and 

 flashes for 10 seconds,

inform the after-sales service.

Storage and disposal

Storage and disposal

You can find out here how to prepare
your appliance for storage. You will
also find out how to dispose of old
appliances.

Switching off the appliance

1.

Switch off the appliance.
→ 

Page 18

2.

Disconnect the appliance from the
power supply.
Unplug the appliance from the
mains or switch off the circuit
breaker in the fuse box.

3.

Defrost the appliance. → 

Page 19

4.

Clean the appliance. → 

Page 20

5.

Leave the appliance door open.

Disposing of old appliance

Valuable raw materials can be re-
used by recycling.

WARNING

Risk of harm to health!

Children can lock themselves in the
appliance, thereby putting their lives
at risk.

Leave shelves and containers in-
side the appliance to prevent chil-
dren from climbing in.

Keep children away from the re-
dundant appliance.

WARNING

Risk of fire!

If the tubes are damaged, flammable
refrigerant and harmful gases may
escape and ignite.

Do not damage the tubes of the re-
frigerant circuit or the insulation.

1.

Unplug the appliance from the
mains.

2.

Cut through the power cord.

3.

Dispose of the appliance in an en-
vironmentally friendly manner.

This appliance is labelled in ac-
cordance with European Direct-
ive 2012/19/EU concerning
used electrical and electronic
appliances (waste electrical and
electronic equipment - WEEE).
The guideline determines the
framework for the return and re-
cycling of used appliances as
applicable throughout the EU.

Summary of Contents for KI1813FE0G

Page 1: ...Refrigerator en User manual KI181...

Page 2: ...able container with humidity control 16 Butter and cheese compartment 17 Door racks 17 Accessories 17 Basic operation 17 Switching on the appliance 17 Operating tips 18 Switching off the appliance 18...

Page 3: ...en 3 Customer Service 27 Product number E Nr and pro duction number FD 27 Technical data 27...

Page 4: ...nsit Intended use Read the information on intended use to ensure that you use the appliance correctly and safely This appliance is only intended to be fully fitted in a kitchen Only use this appliance...

Page 5: ...NING Risk of electric shock Improper installation is dangerous Connect and operate the appliance only in accordance with the specifications on the rating plate Connect the appliance to a power supply...

Page 6: ...may overheat and cause a fire Do not place portable multiple socket strips or power sup ply units on the back of the appliance Safe use Follow these safety instructions when using the appliance WARNI...

Page 7: ...Do not operate electrical devices within the appliance WARNING Risk of injury Injury to the eyes caused by escaping flammable refrigerant and hazardous gases Do not damage the tubes of the refrigeran...

Page 8: ...to the appliance should only be carried out by trained specialist staff Improper repairs are dangerous Repairs to the appliance should only be carried out by trained specialist staff Only use genuine...

Page 9: ...Safety en 9 Call after sales service Page 27...

Page 10: ...nents by type and dispose of them separ ately Information about current disposal methods are available from your specialist dealer or local authority Saving energy If you follow these instructions you...

Page 11: ...connec tion You can find out where and how best to install your appliance here You will also learn how to connect your appliance to the power supply Scope of delivery After unpacking all parts check f...

Page 12: ...C N 16 C to 32 C ST 16 C to 38 C T 16 C to 43 C The appliance is fully functional within the permitted room temperature If an appliance with climate class SN is operated at colder room temperat ures t...

Page 13: ...Installation and connection en 13 2 Check the mains plug is inserted properly a The appliance is now ready for use...

Page 14: ...ng yourself with your appliance Familiarise yourself with the parts of your appliance Appliance You can find an overview of the parts of your appliance here 1 2 3 4 5 6 7 8 4 1 1 Controls 2 Variable s...

Page 15: ...sed to configure all functions of your appliance and to obtain information about the operating status 1 2 4 5 3 2 1 switches the warning signal off 2 sets the temperature of the refriger ator compartm...

Page 16: ...t ables that are sensitive to cold out side of the appliance at temperatures of approx 8 C to 12 C Fruit that is sensitive to cold Pineapples Bananas Mangoes Papayas Citrus fruits Vegetables that are...

Page 17: ...cheese compartment To open the butter and cheese com partment press down lightly on the centre of the flap Note The compartment opens down wards The flap slides under the com partment Door racks To a...

Page 18: ...make it as cold as possible This cools food and drinks quickly through Switch on Super cooling before pla cing large quantities of food in the freezer compartment Note When Super cooling is switched o...

Page 19: ...od e g fish sausage meat in the coldest zone Warmest zone The warmest zone is at the very top of the door and in the lower veget able container Tip Store food that does not spoil easily in the warmest...

Page 20: ...pli ance Page 21 Cleaning the appliance Clean the appliance as specified to ensure that it is not damaged by in correct cleaning or unsuitable clean ing products WARNING Risk of electric shock An ingr...

Page 21: ...oughly remove these from your ap pliance Removing the shelf Pull out and remove the shelf Removing the extendable shelf 1 Pull out the extendable shelf until the locking catch is released 2 Lower the...

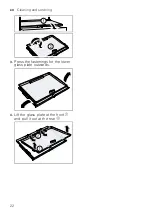
Page 22: ...en Cleaning and servicing 22 3 Press the fastenings for the lower glass plate outwards 4 Lift the glass plate at the front and pull it out at the rear...

Page 23: ...nect the mains plug Fuse has been tripped Check the fuses The power has failed 1 Check whether the power is on 2 Place ice packs if available on the top shelf The appliance is not cooling the displays...

Page 24: ...is too warm check the temperature again after a couple of hours If the temperature is too cold check the temperature again on the following day Noise Fault Cause troubleshooting Appliance has a hummi...

Page 25: ...asant smell Different causes are pos sible 1 Prepare the appliance for cleaning Page 20 2 Clean the appliance Page 20 3 Clean all food packaging 4 To prevent odours from forming store strong smelling...

Page 26: ...power supply Unplug the appliance from the mains or switch off the circuit breaker in the fuse box 3 Defrost the appliance Page 19 4 Clean the appliance Page 20 5 Leave the appliance door open Dispos...

Page 27: ...a period of at least 10 years from the date on which your appliance was placed on the market within the European Eco nomic Area Note Under the terms of the manu facturer s warranty applicable to the l...

Page 28: ...time of printing its web address had not yet been published Please then fol low the instructions on searching for models The model identifier is made up of the characters before the slash in the prod...

Page 29: ......

Page 30: ......

Page 31: ......

Page 32: ...Constructa Neff Vertriebs GmbH Carl Wery Stra e 34 81739 M nchen GERMANY 9001483040 9001483040 en 000218...

Reviews: