background image

en 

Installation and connection

12

Criteria for the installation
location

Follow these instructions when in-
stalling your appliance.

WARNING

Risk of explosion!

If the appliance is in a space that is
too small, a leak in the refrigeration
circuit may result in a flammable mix-
ture of gas and air.

Only install the appliance in a
space with a volume of at least
1 m

3

 per 8 g refrigerant. The

volume of refrigerant is indicated
on the rating plate. 

→ "Appliance",

Fig. 

1

/

4

Page 15

The weight of the appliance ex works
may be up to 65 kg depending on
the model.
The subfloor must be of sufficient sta-
bility to bear the weight of the appli-
ance.

Permitted room temperature

The permitted room temperature de-
pends on the appliance's climate
class.
The climate class can be found on
the rating plate. 

→ "Appliance", Fig.

1

/

4

Page 15

Climate class Permitted room temperat-

ure

SN

10 °C to 32 °C

N

16 °C to 32 °C

ST

16 °C to 38 °C

T

16 °C to 43 °C

The appliance is fully functional within
the permitted room temperature.
If an appliance with climate class SN
is operated at colder room temperat-
ures, the appliance will not be dam-
aged up to a room temperature of
5 °C.

Niche dimensions

Observe the niche dimensions if you
install your appliance in the furniture
recess. If this is not the case, prob-
lems may occur when installing the
appliance.

Niche depth

Install the appliance in the recom-
mended niche depth of 560 mm.
If the niche depth is smaller, the en-
ergy consumption increases slightly.
The niche depth must be a minimum
550 mm.

Niche width

An inside niche width of at least
560 mm is required for the appli-
ance.

Side-by-side installation

If you want to install two appliances
side by side, you must maintain a
distance of at least 150 mm between
the appliances.

Preparing the appliance for
the first time

1.

Remove the informative material.

2.

Remove the protective foil and
transit bolts, e.g. remove the ad-
hesive strips and carton.

3.

Clean the appliance for the first
time. → 

Page 22

Connecting the appliance to
the electricity supply

1.

Insert the mains plug of the appli-
ance's power cable in a socket
nearby.
The connection data of the appli-
ance can be found on the rating
plate. 

→ "Appliance", Fig. 

1

/

4

,

Page 15

Summary of Contents for KI58 Series

Page 1: ...Fridge freezer en User manual KI58...

Page 2: ...asic operation 17 Switching on the appliance 17 Operating tips 17 Switching off the appliance 17 Setting the temperature 17 Additional functions 18 Super function 18 Refrigerator compartment 18 Tips f...

Page 3: ...ours 26 Conducting an appliance self test 27 Storage and disposal 27 Switching off the appliance 27 Disposing of old appliance 27 Customer Service 27 Product number E Nr and pro duction number FD 28 T...

Page 4: ...ety instructions and warnings Keep the instruction manual and the product information safe for future reference or for the next owner Check the appliance after unpacking it Do not connect the ap plian...

Page 5: ...s old and younger than eight years old may load and unload the the fridge freezer Safe transport Follow these safety instructions when transporting the appliance WARNING Risk of injury The high weight...

Page 6: ...e manufacturer Portable multiple socket strips or portable power supply units may overheat and cause a fire Do not position portable multiple socket strips or portable power supply units behind the ap...

Page 7: ...devices or other devices may damage the refri geration circuit flammable refrigerant may escape and ex plode To accelerate the defrosting process do not use any other mechanical devices or devices oth...

Page 8: ...tment into your mouth Avoid prolonged contact of skin with frozen food ice and the tubes in the freezer compartment CAUTION Risk of harm to health To prevent food from being contaminated you must obse...

Page 9: ...carried out by trained specialist staff Improper repairs are dangerous Repairs to the appliance should only be carried out by trained specialist staff Only use genuine spare parts when repairing the...

Page 10: ...r ately Information about current disposal methods are available from your specialist dealer or local authority Saving energy If you follow these instructions your appliance will use less power Select...

Page 11: ...freezer compart ment against severe icing Installation and connection Installation and connec tion Scope of delivery After unpacking all parts check for any transport damage and check the completenes...

Page 12: ...If an appliance with climate class SN is operated at colder room temperat ures the appliance will not be dam aged up to a room temperature of 5 C Niche dimensions Observe the niche dimensions if you i...

Page 13: ...Installation and connection en 13 2 Check the mains plug is inserted properly a The appliance is now ready for use...

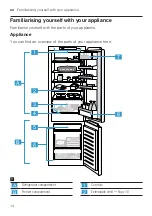
Page 14: ...pliance Familiarising yourself with your appliance Familiarise yourself with the parts of your appliance Appliance You can find an overview of the parts of your appliance here 1 2 3 4 5 6 7 8 A B 1 A...

Page 15: ...and size Controls The controls are used to configure all functions of your appliance and to obtain information about the operating status 1 2 3 4 2 1 sets the temperature of the refriger ator compartm...

Page 16: ...Remove the condensation with a dry cloth To ensure that the quality and aroma are retained store fruit and veget ables that are sensitive to cold out side of the appliance at temperatures of approx 8...

Page 17: ...ched after several hours Do not put in any food in the appli ance until the temperature is reached The housing around the freezer compartment is temporarily heated slightly This prevents condensa tion...

Page 18: ...ature in the refrigerator compartment is 4 C OK sticker Page 19 The refrigerator compartment can also be used to store highly perish able foods in the short to medium term The lower the selected tempe...

Page 19: ...e time between putting fresh food in the freezer compartment and it freezing solid depends on various factors Set temperature Food size and type Quantity and type of storage Quantity and type of food...

Page 20: ...prepare certain food for freezing Vegetables Wash chop up blanch Fruit Wash pit and perhaps peel possibly add sugar or ascorbic acid solution Additional information on how to do this can be found in t...

Page 21: ...as been defrosted or started to de frost Refreeze food only after cooking The frozen items should no longer be stored for the maximum stor age period Defrosting method Food Refrigerator com partment A...

Page 22: ...compartment 6 Wipe up the condensation water with a soft cloth or sponge 7 Rub the freezer compartment dry with a soft dry cloth 8 Electrically connect the appliance Page 12 9 Switch on the appliance...

Page 23: ...rm water and a little pH neutral washing up liquid 3 Dry thoroughly with a soft dry cloth 4 Insert the fittings 5 Electrically connect the appliance Page 12 6 Switch on the appliance Page 17 7 Putting...

Page 24: ...etable container 1 Pull the container out all the way 2 Lift the container at the front and remove it Removing the frozen food container 1 Take out the frozen food container as far as it will go 2 Lif...

Page 25: ...r is on 2 Place ice packs if available on the frozen food The refrigeration unit is switching on more fre quently and for longer The appliance door was opened frequently Do not open appliance door unn...

Page 26: ...he appliance using a spirit level If required place something underneath it Fittings wobble or stick Check the removable fittings and if required replace these Bottles or containers are touching Move...

Page 27: ...appliance Page 22 5 Leave the appliance door open Disposing of old appliance Valuable raw materials can be re claimed by recycling WARNING Risk of harm to health Children can lock themselves in the a...

Page 28: ...legislation Detailed information about the war ranty period and terms of warranty in your country are available from Cus tomer Service your dealer or our website When contacting Customer Service you...

Page 29: ......

Page 30: ......

Page 31: ......

Page 32: ...Constructa Neff Vertriebs GmbH Carl Wery Stra e 34 81739 M nchen GERMANY 9001483733 9001483733 en 990930...

Reviews: