background image

en 

Features

14

Features

6 Features

Features

The features of your appliance de-
pend on the model.

6.1 Shelf

To vary the shelf as required, you
can remove the shelf and re-insert it
elsewhere. 
→ 

"Removing the shelf", Page 21

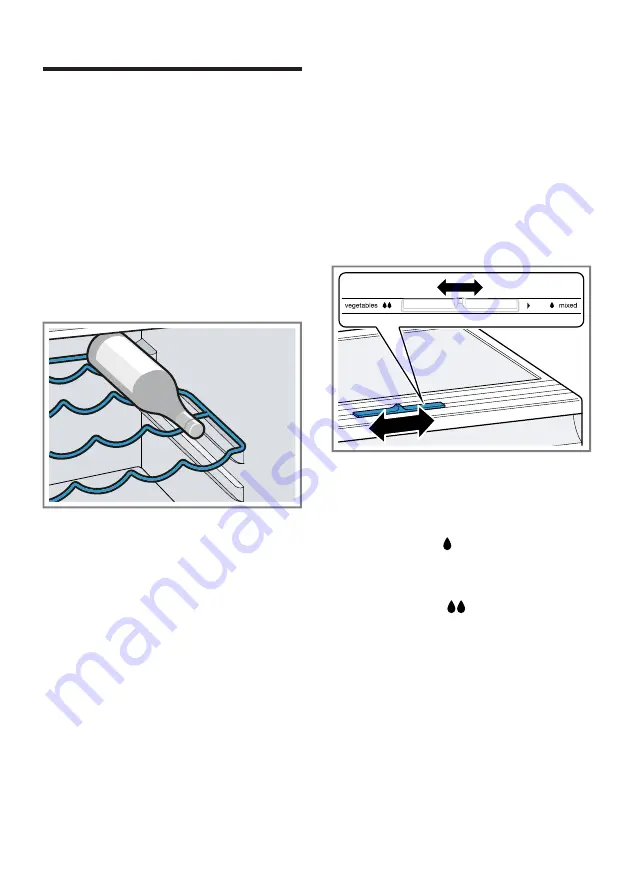
6.2 Bottle shelf

Store bottles securely on the bottle
shelf.

To vary the bottle shelf as required,
you can remove the bottle shelf and
re-insert it elsewhere. 
→ 

"Removing the shelf", Page 21

6.3 Storage container

The temperatures in the storage con-
tainer are lower than in the refriger-
ator compartment. Temperatures be-
low 0 °C may occur occasionally.
In order to reach temperatures close
to 0 °C in the storage container, set
the refrigerator compartment temper-
ature to 2 °C.
Use the lower temperatures in the
storage container to store highly per-
ishable food, e.g. fish, meat and
sausages.

6.4 Fruit and vegetable con-

tainer with humidity con-
trol

Store fresh fruit and vegetables in the
fruit and vegetable container.
You can adjust the humidity in the
fruit and vegetable container using
the humidity controller. This allows
fresh fruit and vegetables to be
stored for longer than with conven-
tional storage.

The air humidity in the fruit and
vegetable container can be set
according to the type and amount of
food to be stored by moving the
humidity control:

¡

Low humidity   required when
primarily storing fruit or mixed
items, or if the appliance is very
full.

¡

High humidity 

 required when

primarily storing vegetables or
when the appliance is not very full.

Condensation may form in the fruit
and vegetable container depending
on the food and quantity stored.
Remove the condensation with a dry
cloth and adjust the air humidity in
the vegetable container using the hu-
midity controller.
To ensure that the quality and aroma
are retained, store fruit and veget-
ables that are sensitive to cold out-
side of the appliance at temperatures

Summary of Contents for KI786 Series

Page 1: ...Fridge freezer en User manual KI786...

Page 2: ...sories 15 7 Basic operation 15 7 1 Switching on the appliance 15 7 2 Operating tips 15 7 3 Switching off the appliance 15 7 4 Setting the temperature 16 8 Additional functions 16 8 1 Super function 16...

Page 3: ...hooting 23 15 Storage and disposal 25 15 1 Taking the appliance out of operation 25 15 2 Disposing of old appliance 25 16 Customer Service 26 16 1 Product number E Nr and production number FD 26 17 Te...

Page 4: ...00 m above sea level 1 3 Restriction on user group This appliance may be used by children aged 8 or over and by people who have reduced physical sensory or mental abilities or inadequate experience an...

Page 5: ...tallation regulations When installing the appliance check that the power cable is not trapped or damaged If the insulation of the power cord is damaged this is dangerous Never let the power cord come...

Page 6: ...use any other mechanical devices or devices other than those recommended by the manufacturer Products which contain flammable propellants and explosive sub stances may explode e g spray cans Do not st...

Page 7: ...ome into contact with food and accessible drain systems Store raw meat and fish in suitable containers in the refrigerator so that they do not touch or drip on other food If the fridge freezer is empt...

Page 8: ...en Safety 8 Unplug the appliance from the mains or switch off the circuit breaker in the fuse box Call after sales service Page 26...

Page 9: ...on Keep the appliance out of direct sunlight Install the appliance as far away as possible from heating elements cookers and other heat sources Maintain a 30 mm clearance to electric or gas cookers Ma...

Page 10: ...ating plate Appliance Fig 1 4 Page 13 Climate class Permitted room tem perature SN 10 C to 32 C N 16 C to 32 C ST 16 C to 38 C T 16 C to 43 C The appliance is fully functional within the permitted roo...

Page 11: ...liance for the first time Page 20 4 5 Connecting the appliance to the electricity supply 1 Insert the non heating appliance plug of the power cable into the appliance 2 Insert the mains plug of the ap...

Page 12: ...miliarising yourself with your appliance Familiarising yourself with your appliance 5 1 Appliance You can find an overview of the parts of your appliance here 1 4 5 7 A B 2 3 6 1 A Refrigerator compar...

Page 13: ...the diagrams may differ with regard to their features and size 5 2 Control panel You can use the control panel to configure all functions of your appliance and to obtain information about the operatin...

Page 14: ...con tainer with humidity con trol Store fresh fruit and vegetables in the fruit and vegetable container You can adjust the humidity in the fruit and vegetable container using the humidity controller...

Page 15: ...ement only e g spoon handle 2 To loosen the ice cubes twist the ice cube tray slightly or hold it briefly under flowing water Basic operation 7 Basic operation Basic operation 7 1 Switching on the app...

Page 16: ...tion 4 to 6 hours before placing food weighing 2 kg or more In order to utilise the freezing capa city use the Super function Freezing capacity Page 18 Note When the Super function is switched on incr...

Page 17: ...as fish sausages and meat in the coldest zone Warmest zone The warmest zone is at the very top of the door Tip Store food that does not spoil easily in the warmest zone e g hard cheese and butter Che...

Page 18: ...er the whole area of the compartments or the frozen food containers Do not bring food which is to be frozen into contact with frozen food To ensure that the air can circulate freely in the appliance p...

Page 19: ...Defrosting in the refri gerator compartment When the appliance is operating condensation droplets or frost form on the rear panel of the refrigerator compartment due to functional reas ons The back p...

Page 20: ...sive de tergents Do not use cleaning products with a high alcohol content If liquid gets into the drainage hole the evaporation pan may overflow The rinsing water must not get into the drainage hole I...

Page 21: ...ck and remove it Removing the storage container 1 Pull the storage container out all the way 2 Lift the storage container at the front and remove it Removing the fruit and vegetable container 1 Pull o...

Page 22: ...en Cleaning and servicing 22 2 Lift the frozen food container at the front and remove it...

Page 23: ...test has ended the appli ance switches to normal operation The LED lighting does not work Different causes are possible Call customer service The customer service number can be found in the enclosed...

Page 24: ...ng The appliance makes noises Fittings wobble or stick Check the removable fittings and if required re place these Bottles or containers are touching Move the bottles or containers away from each othe...

Page 25: ...ture display indic ates the set temperature your ap pliance is OK The appliance switches to normal operation a If at the end of the appliance self test 5 audible signals sound and the temperature disp...

Page 26: ...n the European Eco nomic Area Note Under the terms of the manu facturer s warranty applicable to the location the use of Customer Service is free of charge The minimum dura tion of the warranty manufa...

Page 27: ...time of printing its web address had not yet been published Please then fol low the instructions on searching for models The model identifier is made up of the characters before the slash in the prod...

Page 28: ...Wery Stra e 34 81739 M nchen GERMANY Valid within Great Britain Imported to Great Britain by BSH Home Appliances Ltd Grand Union House Old Wolverton Road Wolverton Milton Keynes MK12 5PT United Kingd...

Reviews: