background image

Defrosting

 en

21

13 Defrosting

13.1 Defrosting in the refri-

gerator compartment

The refrigerator compartment in your
appliance defrosts automatically.

13.2 Defrosting in the cool-

fresh compartment

The cool-fresh compartment in your
appliance defrosts automatically.

14 Cleaning and servi-

cing

To keep your appliance working effi-
ciently for a long time, it is important
to clean and maintain it carefully.
Customer Service must clean inac-
cessible points. Cleaning by cus-
tomer service can give rise to costs.

14.1 Preparing the appliance

for cleaning

1.

Switch off the appliance.
→ 

Page 16

2.

Disconnect the appliance from the
power supply.
Unplug the appliance from the
mains or switch off the circuit
breaker in the fuse box.

3.

Take out all of the food and store it
in a cool place.
Place ice packs (if available) onto
the food.

4.

If there is a layer of hoarfrost, allow
this to defrost.

5.

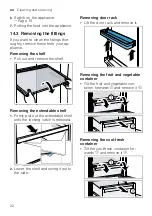
Remove all fittings and accessor-
ies from the appliance.
→ 

Page 22

6.

Remove the partition. → 

Page 23

7.

Remove the cover. → 

Page 23

8.

Remove the telescopic rails.
→ 

Page 23

14.2 Cleaning the appliance

WARNING

Risk of electric shock!

An ingress of moisture can cause an
electric shock.

Do not use steam- or high-pres-
sure cleaners to clean the appli-
ance.

Liquid in the lighting or in the con-
trols can be dangerous.

The rinsing water must not drip
into the lighting or controls.

ATTENTION!

Unsuitable cleaning products may
damage the surfaces of the appli-
ance.

Do not use hard scouring pads or
cleaning sponges.

Do not use harsh or abrasive de-
tergents.

Do not use cleaning products with
a high alcohol content.

If you clean fittings and accessories
in the dishwasher, this may cause
them to become deformed or discol-
our.

Never clean fittings and accessory
in the dishwasher.

1.

Prepare the appliance for cleaning.
→ 

Page 21

2.

Clean the appliance, the fittings,
the accessories, the components
and the door seals with a dish
cloth, lukewarm water and a little
pH-neutral washing-up liquid.

3.

Dry thoroughly with a soft, dry
cloth.

4.

Insert the fittings and install the ap-
pliance components.

5.

Electrically connect the appliance.
→ 

Page 11

Summary of Contents for KI8815OD0

Page 1: ...Refrigerator en Information for Use KI881...

Page 2: ...ese compart ment 15 6 7 Door rack 15 6 8 Accessories 15 7 Basic operation 15 7 1 Switching on the appliance 15 7 2 Operating tips 15 7 3 Switching off the appliance 16 7 4 Setting the temperature 16 8...

Page 3: ...ce self test 27 16 Storage and disposal 27 16 1 Taking the appliance out of operation 27 16 2 Disposing of old appliance 27 17 Customer Service 28 17 1 Product number E Nr and production number FD 28...

Page 4: ...3 Restriction on user group This appliance may be used by children aged 8 or over and by people who have reduced physical sensory or mental abilities or inadequate experience and or knowledge provide...

Page 5: ...elec trical installation according to the installation regulations When installing the appliance check that the power cable is not trapped or damaged If the insulation of the power cord is damaged th...

Page 6: ...g material away from children Do not let children play with packaging material Children may breathe in or swallow small parts causing them to suffocate Keep small parts away from children Do not let c...

Page 7: ...nded period of time this may lead to a considerable temperature increase in the compartments of the appliance Regularly clean the surfaces that may come into contact with food and accessible drain sys...

Page 8: ...genuine spare parts when repairing the appliance If the power cord of this appliance is damaged it must be re placed by the manufacturer the manufacturer s Customer Ser vice or a similarly qualified p...

Page 9: ...t Install the appliance as far away as possible from heating elements cookers and other heat sources Maintain a 30 mm clearance to electric or gas cookers Maintain a 300 mm clearance to oil or solid f...

Page 10: ...ig 1 7 Page 13 Climate class Permitted room tem perature SN 10 C to 32 C N 16 C to 32 C ST 16 C to 38 C T 16 C to 43 C The appliance is fully functional within the permitted room temperature If an app...

Page 11: ...e protective foil and transit bolts e g remove the ad hesive strips and carton 3 Clean the appliance for the first time Page 21 4 5 Connecting the appliance to the electricity supply 1 Insert the main...

Page 12: ...elf with your appliance 5 1 Appliance You can find an overview of the parts of your appliance here 1 2 3 4 5 6 7 8 9 10 A B 1 A Refrigerator compartment Page 19 B Cool fresh compartment Page 20 1 Cont...

Page 13: ...ween your appli ance and the diagrams may differ with regard to their features and size 5 2 Control panel You can use the control panel to configure all functions of your appliance and to obtain infor...

Page 14: ...uit and vegetable container via the humidity controller on the partition and a special seal The air humidity in the fruit and vegetable container can be set according to the type and amount of food to...

Page 15: ...or your appli ance The accessories for your appliance depend on the model Bottle holder The bottle holder prevents bottles from falling over when the appliance door is opened and closed operation 7 Ba...

Page 16: ...est setting Setting 3 corresponds to the warmest setting a The selected setting is saved after one minute 8 Additional functions 8 1 Super cooling With Super cooling the refrigerator compartment cools...

Page 17: ...e automatic door opening aid 1 Open the door wait until the auto matic door opening aid is retrac ted and close the door 2 Open the door and press and hold for 2 seconds 3 Press repeatedly until the t...

Page 18: ...the Home Connect app Notes Please note the safety precautions in this instruction manual and make sure that they are also ob served when operating the appli ance via the Home Connect app Safety Page...

Page 19: ...nect server initial registration Unique appliance identification consisting of appliance codes as well as the MAC address of the Wi Fi communication module in stalled Security certificate of the Wi Fi...

Page 20: ...s not spoil easily in the warmest zone e g hard cheese and butter Cheese can then continue to release its aroma and the butter will still be easy to spread 12 Cool fresh compart ment In the cool fresh...

Page 21: ...6 Remove the partition Page 23 7 Remove the cover Page 23 8 Remove the telescopic rails Page 23 14 2 Cleaning the appliance WARNING Risk of electric shock An ingress of moisture can cause an electric...

Page 22: ...Pull out and remove the shelf Removing the extendable shelf 1 Firmly pull out the extendable shelf until the locking catch is released 2 Lower the shelf and swing it out to the side Removing door rack...

Page 23: ...ion 2 Remove the fruit and vegetable container 3 Press the lever on the underside on both sides and pull the parti tion forwards 4 Lift the partition and swivel it out to the side Removing the cover L...

Page 24: ...Push in the telescopic rail 4 Push the telescopic rail backwards above the rear pin and disen gage Installing telescopic rails 1 Place the extended telescopic rail on the front pin and pull it for wa...

Page 25: ...st Page 27 a Once the appliance self test has ended the appli ance switches to normal operation The LED lighting does not work Different causes are possible Call customer service The customer service...

Page 26: ...s If the temperature is too cold check the temper ature again on the following day The appliance hums bubbles buzzes gargles or clicks Not a fault A motor is running e g refrigerating unit fan Refrige...

Page 27: ...supply Unplug the appliance from the mains or switch off the circuit breaker in the fuse box 3 Remove all of the food 4 Defrost the appliance Page 21 5 Clean the appliance Page 21 6 To guarantee the v...

Page 28: ...nd the production number FD of your appliance The contact details for Customer Ser vice can be found in the enclosed Customer Service directory or on our website 17 1 Product number E Nr and productio...

Page 29: ...age for your appliance Hereby BSH Hausger te GmbH de clares that the appliance with Home Connect functionality is in compliance with relevant statutory requirements 1 A detailed Declaration of Conform...

Page 30: ......

Page 31: ......

Page 32: ...Stra e 34 81739 M nchen GERMANY Valid within Great Britain Imported to Great Britain by BSH Home Appliances Ltd Grand Union House Old Wolverton Road Wolverton Milton Keynes MK12 5PT United Kingdom 90...

Reviews: