background image

KVM Switcher User Manual   
NR-MSR2701S/NR-MSR2704S/NR-MSR2708S    


www.negorack.cn 


10 


Windows XP and above are recommended for the operating system. 


Server


The server is a computer connected to the switch through KVM dedicated cables. The following device must 
be installed on these servers: 


W A set of VGAs, SVGA ports 


W USB KVM Cable Connection: A set of Type A USB ports to the USB Master Controller. 


PS/2 KVM Module Cable Connection: 6-pin mini-DIN Keyboard and Mouse Port. 

Operating System 


Operating systems supported by remote users' computers include Windows XP and above 


The operating systems supported by the server connected to the switcher are shown in the following table:


Operating System 

Version 

Windows 

Windows 2000/XP/2003/2008/Vista/7/10 

Linux 

RedHat 

9.0 or higher 

SuSE 

10/11. 1 or higher 

Debian 

3.1/4.0 

Ubuntu 

7.04/7.10 

UNIX  AIX 

4.3 or higher 

FreeBSD 

5.5 or high 

Sun Solaris  8 or high 

Mac 

OS 9.0 to 10.6 (Snow Leopard) 

Novell  Netware 

6.0 or high 


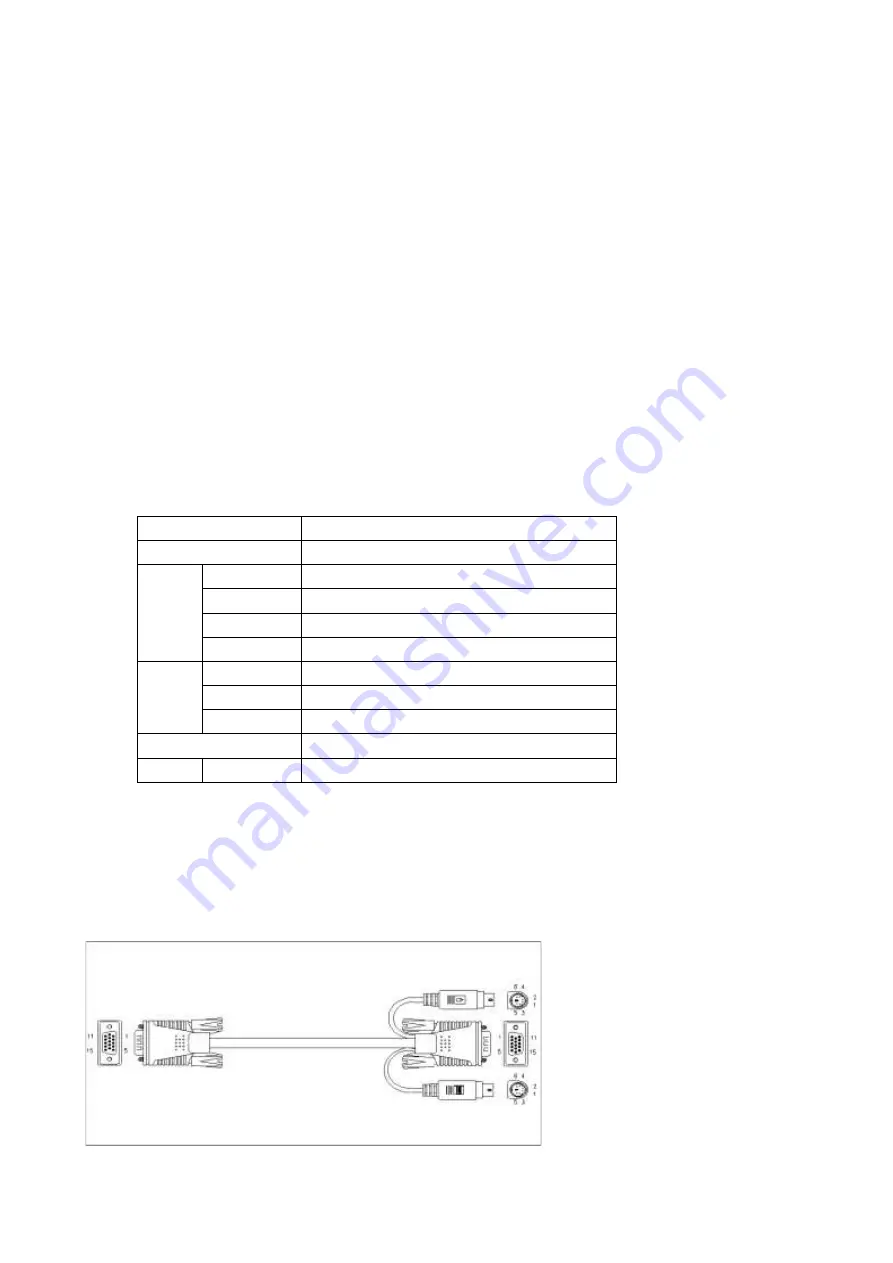
KVM Dedicated Connection Cable 

KVM device provides a variety of connection cables to choose from according to the user's usage: 


PS2 dedicated cable VGA+PS2 keyboard (purple) + PS2 mouse (green) 


Summary of Contents for NR-MSR2701S

Page 1: ...1 4 8 Port Short Depth PS 2 USB VGA Single Rail WideScreen LCD KVM Switch USER MANUAL NR MSR2701S NR MSR2704S NR MSR2708S...

Page 2: ...cribed in this manual If any defects in the software program are found after purchase the Purchaser and non manufacturers their distributors or their purchasers will be required to bear all necessary...

Page 3: ...uch pad mouse 101 standard keyboard front USB interface support cascade support HUB function NR MSR2708ULS 8 input VGA USB PS 2 HD 17 inch LCD VGA display touch pad mouse 101 standard keyboard front U...

Page 4: ...ing screw pack x 1 Check and make sure that all parts are present and not damaged in transit If you encounter problems please contact your dealer In order to prevent damage to the machine or the devic...

Page 5: ...ce Installation 15 LCDKVM All in One Product Schematic Diagram 17 Standard Rack Mounting 18 Chapter III Basic Operations 25 Hot Plug 25 Hot Plug PC Connection Port 25 Hot Plug Control End Connection P...

Page 6: ...tions features and advantages and describe and introduce its front and rear panel components Chapter 2 Hardware Installation This chapter explains how to install this product and its necessary steps i...

Page 7: ...emote From switch Remote User When a user logs into the switch from a location far away from the switch over the network we treat the user as a remote user Local Control Terminal The keyboard mouse an...

Page 8: ...to the appropriate connection port no software setting is required no complicated installation procedures are required and there will be no incompatibility problems Since the device can directly obta...

Page 9: ...Online technology to simulate the keyboard and mouse the device is safe and stable and the switching is fast without delay The controlled display screen can perform the function of window stepless zo...

Page 10: ...erating System Operating systems supported by remote users computers include Windows XP and above The operating systems supported by the server connected to the switcher are shown in the following tab...

Page 11: ...cable please contact the merchant you purchased to purchase the cable suitable for this switch Operating System Operating System Version Windows Windows 2000 XP 2003 2008 Vista 7 10 Linux RedHat 9 0 o...

Page 12: ...KVM Switcher User Manual NR MSR2701S NR MSR2704S NR MSR2708S www negorack cn 12 Components Front View KVM Panel Front View...

Page 13: ...KVM Switcher User Manual NR MSR2701S NR MSR2704S NR MSR2708S www negorack cn 13 Rear View KVM Rear View...

Page 14: ...se interface Connect the local USB keyboard and mouse interface USB TYPE A type 3 VGA Local Output Port Connect to a local VGA display with a resolution of up to 1920x1080 60HZ 4 4 8 channels of contr...

Page 15: ...KVM device to ensure that the detection circuit inside the device takes effect In order to prevent device damage during installation please confirm that all installed device has good grounding protect...

Page 16: ...VGA output interface of the controlled computer or server and the keyboard mouse interface of USB or PS2 Note The controlled computer is connected to the keyboard If the mouse is a USB interface the...

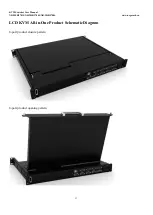
Page 17: ...KVM Switcher User Manual NR MSR2701S NR MSR2704S NR MSR2708S www negorack cn 17 LCD KVM All in One Product Schematic Diagram 8 port product closure pattern 8 port product opening pattern...

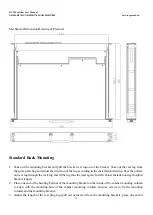
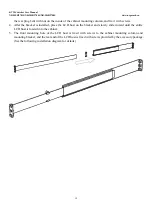
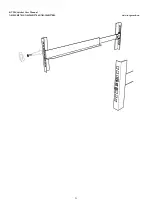
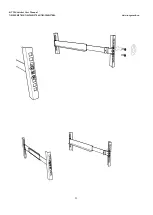
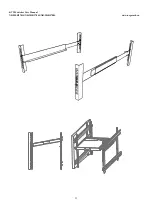
Page 18: ...to the installation drawing Pass the pulled out rear lug through the lock lug and fit the lug into the joist again Install cabinet Installation depth Adjust bracket length 2 Place one end of the bend...

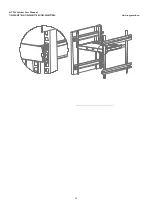
Page 19: ...bracket is installed place the LCD host on the bracket and slowly slide inward until the entire LCD host is loaded into the cabinet 5 The front mounting hole of the LCD host is fixed with screws to t...

Page 20: ...KVM Switcher User Manual NR MSR2701S NR MSR2704S NR MSR2708S www negorack cn 20...

Page 21: ...KVM Switcher User Manual NR MSR2701S NR MSR2704S NR MSR2708S www negorack cn 21...

Page 22: ...KVM Switcher User Manual NR MSR2701S NR MSR2704S NR MSR2708S www negorack cn 22...

Page 23: ...KVM Switcher User Manual NR MSR2701S NR MSR2704S NR MSR2708S www negorack cn 23...

Page 24: ...KVM Switcher User Manual NR MSR2701S NR MSR2704S NR MSR2708S www negorack cn 24...

Page 25: ...product also provides the function of hot plug of keyboard mouse and display at the control end This product provides keyboard and mouse interfaces of two interface types Users can select the correspo...

Page 26: ...the KVM 2 Turn off all computers connected to the KVM switch 3 Wait approximately 10 seconds before reconnecting the power to the KVM switch 4 Turn on the computer Note If the KVM connection cable of...

Page 27: ...orresponding functions through the operation of the monitoring screen and keyboard If you have set the user and password login you need to use the correct user name and login password to enter the OSD...

Page 28: ...select the switch port If you want to exit the OSD menu interface you can perform the exit operation through the Esc of the keyboard To move a row up and down in the list use the direction key If the...

Page 29: ...name method move the cursor to the NAME option through the keyboard key and then press the Enter key The NAME input bar box appears at the lower end of the window You can enter the name of the port t...

Page 30: ...settings for modification F3 LIST Press the F3 key to start the LIST function which can display the ports according to the mode that the user wants to display making it convenient for the user to qui...

Page 31: ...stays If the port has an icon it means that the port is set to express browsing mode and the set port information can be seen in QVIEW mode otherwise it is a normal port F5 EDIT Press F5 to set or edi...

Page 32: ...an double click the mouse or move the selection to the option and then press the Enter key An icon will appear before the selected option to indicate that the item has been selected Its setting instru...

Page 33: ...shortcut keys shown in the list to resolve the conflict SWITCH HOTKEY This function can set the shortcut hot key for port switching Users can directly select the port to be switched and skip the OSD...

Page 34: ...ve and take effect The initial default is 5 seconds SET PASSWORD This function can set the function permissions of ordinary users After the setting is successful the user can only use this password to...

Page 35: ...ion can clear the NAME settings of all ports When this function is executed it needs to verify the administrator s identity password to realize it If the password is correct a prompt will pop up CLEAR...

Page 36: ...oard Enter to confirm its entry into force To cancel this operation you can enter N and then enter Enter to confirm the cancellation operation or enter Esc on the keyboard to return directly LOCK CONS...

Page 37: ...KVM Switcher User Manual NR MSR2701S NR MSR2704S NR MSR2708S www negorack cn 37...

Page 38: ...pe on the label If you are not sure whether the power type is available please contact your distributor or local power company This equipment is designed and applied to IT power distribution system wi...

Page 39: ...ck or install the front fixing equipment on a combined plurality of rack Please install the rack from bottom to top and install the heaviest thing first Ensure that the rack is smooth and stable when...

Page 40: ...yboard and mouse 4 x VGA DB15 Blue Female Head 8 x VGA DB15 Blue Female Head 1x VGA DB15 Blue Female Head Power Supply 1 x DC jack Power Supply Specifications DC 12V4A Switchover switch Connection Por...

Page 41: ...sed by the use of this product or the CD and documents attached to this product The Company will not warrant express imply or legally declare the contents and purposes of this document and specificall...

Reviews: