5
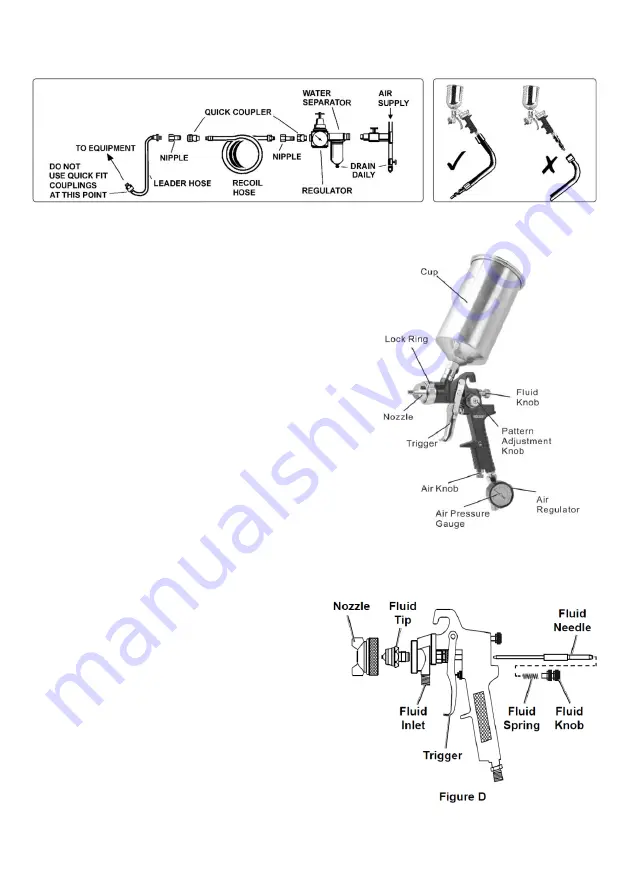
To overcome this, connect a leader hose to the spray gun. A quick change coupling may
then be used to connect the leader hose to the air line recoil hose (Fig.A and Fig.B).
4. OPERATION
Inspect tool before use, looking for damaged, loose, and missing parts. If any problems are
found, do not use tool until repaired.
Workpiece and Work Area Set Up
1. Designate a work area that is clean and well lit.
The work area must not allow access by children
or pets to prevent distraction and injury.
2. Route the air hose along a safe path to reach
the work area without creating a tripping hazard
or exposing the air hose to possible damage.
The air hose must be long enough to reach
the work area with enough extra length to
allow free movement while working.
3. Before spraying, mask nearby objects not being
sprayed and lay cloths (not included) on the floors.
NOTICE:
Clean the Spray Gun IMMEDIATELY after EVERY use. Delayed or inadequate cleaning will
permanently clog the Spray Gun. Latex paint hardens quickly and permanently inside Spray Gun.
Before First Use
Spray Gun thoroughly.
If not removed, the material used for testing and
corrosion prevention will contaminate paint.
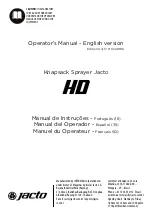
1. Remove Nozzle by hand.
2. Depress Trigger to retract Fluid Needle, then
remove Fluid Tip with spray gun wrench.
Release Trigger.
Note: Do not bend Fluid Needle.
3. Remove Fluid Knob by hand, then remove
Fluid Spring and Fluid Needle.
Note: Do not immerse Spray Gun Body in liquid.
Do not allow liquid to enter the air inlet.
4. Place parts, other than Spray Gun Body, into container with warm soapy water. Allow to
soak,then scrub parts, using brushes of this spary kit.
Fig.A
Fig.B


