background image

USE

 CAUTION 


Before starting the vacuum cleaner, remove any large objects that could block the tube or the nozzle. Turn off  

      the appliance immediately if the tube or the nozzle becomes blocked.
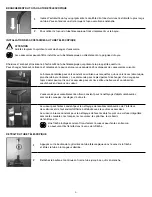
      Do not completely pull out the cord. It should not be pulled out further than the red mark. The yellow mark indicates  

      the optimal cord length. 
      Turn on the vacuum cleaner only when you have checked that all parts have been properly attached  

      and that the dust container and the filters have been correctly inserted and are completely dry.

   The handle has an air valve with which you can quickly reduce the suction force if necessary. Open the valve when clea-

ning curtains, rugs or other light mobile items. Otherwise you should keep this valve closed.

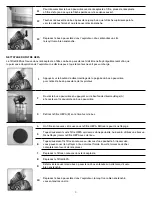
1

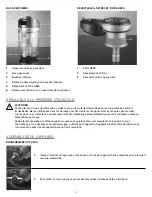
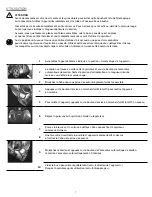
Assemble the appliance as described in the "Assembling the Appliance" section.

2

The cord is located on the back of the vacuum cleaner and below the automatic cord winder. 

Pull the cord out to the desired length but not further than the red mark. 

3

Insert the plug in a properly installed outlet that is easily accessible.

4

Press the On/Off button to turn the appliance on.

5

To turn it off, press the On/Off button again.

6

Adjust the suction strength with the suction control.

7

Guide the nozzle over the surface to be cleaned. The vacuum cleaner can be pulled along 

after you like a sled.

8

After you have finished vacuuming, turn off the appliance and remove the plug  

from the outlet.

9

Firmly hold the cord and press the automatic cord winder. The cord will roll back in. 

10

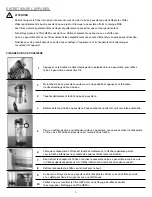
Empty the dust container regularly (see "Cleaning the Appliance"). Store the appliance  

in a secure place (see "Storage"). 

7

Summary of Contents for 1031011

Page 1: ...Cyclonic Vacuum Cleaner USER GUIDE 1031011...

Page 2: ...Aspirateur cyclonique GUIDE D UTILISATION 1031011...

Page 3: ...mettes des mat riaux chauds inflammables ou combustibles des objets pointus des cailloux des pi ces de monnaie ou des petits objets de m tal Aspirer ces mati res pourrait endommager l appareil ou occa...

Page 4: ...lit cigarette butts matches etc hot flammable or explosive materials pointed objects stones coins or small metal objects Vacuuming these substances could cause damage to the appliance or personal inj...

Page 5: ...ire direct sunlight or moisture Do not drop the appliance or allow it to be knocked violently Never place heavy objects on the appliance To prevent damage to the motor or filters do not vacuum any liq...

Page 6: ...ppareil et ne lui faites pas subir de chocs violents Ne d posez jamais d objets lourds sur l appareil Pour viter d endommager le moteur ou les filtres ne faites pas aspirer de liquides et ne remplisse...

Page 7: ...Poign e de transport 6 Tube t lescopique 7 Contr le d entr e d air 8 Bouton de l enrouleur automatique de cordon 9 R gulateur de la puissance d aspiration 10 Bouton de mise en marche et d arr t on of...

Page 8: ...hose connection 4 Combination floor nozzle 5 Carrying handle 6 Telescopic tube 7 Air valve 8 Automatic cord winder button 9 Suction strength control 10 On Off button 1 2 3 9 8 7 6 5 4 10 ACCESSORIES...

Page 9: ...strollers or playpens Discard the bag and any other packaging material immediately after removing its contents Do not re use bag Unpack all parts and verify that the contents are complete and in good...

Page 10: ...ux les lits d enfants les poussettes ou les parcs pour enfants ni pr s de ceux ci Jetez le sac ou tout autre mat riel d emballage imm diatement apr s avoir r cup r le contenu Ne r utilisez pas le sac...

Page 11: ...er de bois linol um La commande pour le pied permet de changer d un usage pour tapis celui pour sol lisse L accessoire pour sol lisse offre une brosse et un rebord en caoutchouc en dessous du suceur L...

Page 12: ...d hard floors ceramic wood floor linoleum The foot switch allows you to change between carpet and hard floor A brush and a rubber lip are extended on the underside of the nozzle for use on hard floors...

Page 13: ...d keep this valve closed 1 Assemble the appliance as described in the Assembling the Appliance section 2 The cord is located on the back of the vacuum cleaner and below the automatic cord winder Pull...

Page 14: ...ferm e 1 Assemblez l appareil comme indiqu la section Assemblage de l appareil 2 Le cordon se trouve en arri re de l aspirateur et sous le bouton de l enrouleur automatique de cordon Sortez le cordon...

Page 15: ...z le bac poussi re au dessus d une poubelle et appuyez sur le bouton de d verrouillage du fond du bac 3 Tapotez d licatement le c t du bac poussi re 4 Refermez le fond du bac poussi re Vous entendrez...

Page 16: ...dust container over a dustbin and press the release button to open the bottom cap of the dust container 3 Carefully tap the side of the dust container 4 Close the bottom cap of the dust container You...

Page 17: ...r and remove the dust container from the vacuum cleaner 2 Open the dust container by releasing the fastener clip A and lifting up the dust container lid 3 Remove the HEPA filter B by pulling it out 4...

Page 18: ...tirez le bac poussi re de l aspirateur 2 Ouvrez le bac poussi re en appuyant sur le bouton de d verrouillage A et en relevant le couvercle du bac poussi re 3 Retirez le filtre HEPA B en le tirant vers...

Page 19: ...de le replacer 5 Vous devez ouvrir le couvercle du filtre D avant de pouvoir retirer le filtre du moteur 6 Le grand filtre du moteur se trouve directement sous le couvercle du filtre Retirez le 7 Tap...

Page 20: ...y before inserting it again 5 To remove the large motor filter you must first open the filter cap D 6 The large motor filter is located directly beneath the filter cap Remove the large motor filter 7...

Page 21: ...ull Empty it Is the HEPA filter or one of the other filters clogged or dirty Clean them Is the nozzle the telescopic tube or the suction hose clogged Unplug the appliance and check for a blockage and...

Page 22: ...e d air qui se trouve sur la poign e est elle ouverte Fermez la R glez la puissance d aspiration gr ce au r gulateur Le bac poussi re est il plein Videz le Les filtres sont ils souill s Nettoyez les...

Page 23: ...taillant d cide de remplacer la ou les pi ces d fectueuses la ou les pi ces de remplacement seront neuves ou remises neuf quivalentes des pi ces neuves La pr sente garantie ne cr e aucune autre oblig...

Page 24: ...acement part or parts would be new or reconditioned equivalent to new parts The present limited warranty does not create any other obligation with the provider of the guarantee than those explicitly d...

Reviews: