Genesis Manual Rev1.6 Copyright 2018, Nellis Engineering, Inc.
10
2. Open the scooter, if not already open, and check the battery voltage between the Red and
Black connectors on each battery pack to verify at least 20.0VDC.
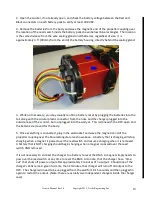
3. Remove the batteries from the body and wave the magnetic end of the propeller coupling over
the location of the reed switch inside the battery pack shown below (blue rectangle). The location
is the same distance from the wire sealing gland on all batteries, regardless of size. It is
approximately 3.5” (90mm) from the end of the battery housing, directly behind the sealing gland.
4. While not necessary, you may visually confirm a battery reset by plugging the batteries into the
tail along with the circular plastic connector from the nose and the charger plugged into the
outside nose of the scooter, but not plugged into the wall yet. This is done with the DPV open and
the batteries removed for the body.
5. Once everything is connected, plug in the wall socket and wave the magnetic end of the
propeller coupling over the blue rectangular area show above. A battery that is charging will stop
charging when a magnet is passed over the reed switch and resume charging when it is removed.
A battery that is NOT charging should begin charging when a magnet is passed over the reed
switch AND removed.
It is not necessary to connect the charger to a battery to reset the BMS. A magnet simply needs to
pass over the reed switch at any time to reset the BMS. Also note, that the charger has a “time-
out” that shuts off power output after approximately 2 minutes of no output. Should one of the
charger’s LEDs remain green for more than 2 minutes, that charger will turn off all output to the
DPV. The charger will need to be unplugged from the wall for 10-15 seconds and then plugged in
again to restart the output. (Note: there are actually two independent chargers inside the charger
case)


