background image

 Page 8  

P: 419.542.7751 ● F: 419.542.6690 ● 

800.782.6761

 ● nemcofoodequip.com


OPERATING INSTRUCTIONS 


1.


Once the Press has been located and installed properly it is now ready for use. 

2.


Toggle the Power Switch to the “ON” position to energize the Press. 

3.


The Display Area will now display “Pre-Heat”.  The press will pre-heat in approximately 15 
minutes. 

4.


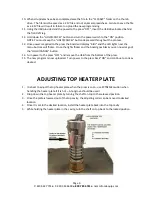
Once the Press has reached its preset pre-heat temperatures, 430°F on the Top Heater Plate 
and 410°F on the Lower Heater Plate, the Display Area will blink “Rdy” indicating the Press is 
now ready to operate. 

5.


Select the desired recipe by pushing the corresponding button on the Control Panel.  The 
red LED light next to the button will illuminate indicating which recipe has been selected.  If 
the incorrect recipe was selected, simply press and hold down the recipe button that was 
selected for 2 seconds, then release.  A new recipe may now be selected.  A new recipe will 
need to be selected each time the press completes a cycle. 

6.


Using the handle, pull the lid down to its latched position to begin the cycle.   

7.


When the cycle is complete the lid will automatically open and the sandwiches can be 
removed.  

NO metal utensils should be used to remove the food, as it will damage and 

shorten the life of the coating.  

A plastic spatula has been included with the Press for 

removing the sandwiches. 

8.


Repeat steps 5 through 7 to continue cooking, choosing your desired recipe for each cycle. 


MAKING & UPLOADING NEW PROGRAMS 

1.


Using the USB provided, open the .CSV file in the “1150APP” folder. 

2.


Set Upper and Lower heater plate Pre-Heat temperatures to desired temperature.  No 
temperature should be set higher than 450 degrees.  These temperatures are measured in 
Fahrenheit, as all temperatures on this spreadsheet are. 

3.


This grill has a “Standby” mode built in.  These settings can be changed as needed with this 
spreadsheet.  The “Standby’ mode simply reduces the heat to the set temperatures after the 
allotted time has passed.  Enter the time in the field specified – this time is measured in minutes 
– this time can be set in a range from 1 to 240.  The Upper and Lower heater plate temperatures 
can also be adjusted. 

4.


Each menu can be programmed independently. 

5.


Set the Upper and Lower heater plates to the desired temperature for the menu. 

6.


Each menu has 15 time stages.  Each stage can be set for a different period of time.  This time is 
measured in seconds. 

7.


For each stage the microwaves can be independently controlled.  Enter “On” or “Off” into each 
column.  Microwaves can be run concurrently, independently, or none at all. 

8.


If the menu is programmed complete and not all stages are used simply clear the contents of 
the unused stages to bypass those stages. 

9.


Repeat 8 – 11 for each of the 7 remaining menus. 

Summary of Contents for 6900A

Page 1: ...e conducted by authorized service agents using genuine Nemco replacement parts Nemco is not responsible for the damages caused by unauthorized service agents or parts The information contained in this manual is subject to updates and or change at the discretion of Nemco Food Equipment without notice Please read the Installation and Operating Instructions in its entirety before attempting to instal...

Page 2: ... not operate the oven if it is damaged It is particularly important that the oven door close properly and that there is no damage to the 1 door bent 2 hinges and latches broken or loosened 3 door seals and sealing surfaces d The oven should not be adjusted or repaired by anyone except properly qualified service personnel Important Safety Instructions 3 Electrical Instructions 4 Important Instructio...

Page 3: ...lug in water 13 Keep cord away from heated surfaces 14 Do not let cord hang over edge of table or counter 15 Either or i When cleaning surfaces of door and oven that comes together on closing the door use only mild nonabrasive soaps or detergents applied with a sponge or soft cloth or ii When separate cleaning instructions are provided see door surface cleaning instructions on page 10 16 To reduce...

Page 4: ...having a grounding wire with a grounding plug The plug must be plugged into an outlet that is properly installed and grounded WARNING Improper use of the grounding plug can result in the risk of electric shock Consult a qualified electrician or Serviceman if the grounding instructions are not completely understood or if doubt exists as to whether the appliance is properly grounded Do not use an ex...

Page 5: ...ierced into the food item to vent steam 9 DO NOT use completely sealed containers or combustible plastics in the sandwich press 10 If a menu cycle must be cancelled toggle the power switch to end the menu and release the lid 11 The sandwich press should not be used to warm plates or dry towels 12 DO NOT cook raw meat in the sandwich press 13 DO NOT keep flammable materials in the vicinity of any c...

Page 6: ...device Microwaves and heat plates will also reduce the percent moisture content in the food the longer the microwaves and heat plates are on To prevent damage to the PaniniPro when running a menu with microwaves provide AT A MINIMUM one fresh piece of white bread or the equivalent moisture content in the cooking cavity for NO LONGER THAN A 30 second period Longer cooking times require larger amoun...

Page 7: ...can t be drawn into the back cooling fans of the sandwich press if the sandwich press must be placed adjacent to a heat source then a heat shield should be placed between the appliances to protect the sandwich press The appliance should be placed on a flat level surface that is suitable for the weight of the sandwich press adjust the legs as needed A minimum of 2 inches 51mm of clearance at the si...

Page 8: ... spatula has been included with the Press for removing the sandwiches 8 Repeat steps 5 through 7 to continue cooking choosing your desired recipe for each cycle MAKING UPLOADING NEW PROGRAMS 1 Using the USB provided open the CSV file in the 1150APP folder 2 Set Upper and Lower heater plate Pre Heat temperatures to desired temperature No temperature should be set higher than 450 degrees These tempe...

Page 9: ...hts near the menu buttons will flicker Once the lights flicker and the board goes black you can now let go of the HOLD CANCEL button 14 Turn power to the press OFF and remove the USB from the bottom of the press 15 The new program is now uploaded Turn power to the press back ON and continue to cook as desired ADJUSTING TOP HEATER PLATE 1 It is best to adjust the top heater plate when the press is ...

Page 10: ...nu file isn t saved as a csv file or the formatting is wrong within the file Err3 Preheat temperature is out of range The preheat temperature is greater than 500 F Err4 Menu temperature is out of range The menu temperature is greater than 500 F Err5 The number of stages in a menu is greater than 15 Too many menu stages Err6 A single stage time is greater than 3599 seconds 59min 59s A stage time is...

Page 11: ...of the press Clean using warm water to rinse all debris from the filters If all debris cannot be removed then the filter should be replaced 6 Do not immerse in water or other liquids Do not clean with a water jet 7 If soap or chemical cleaners are used be sure they are completely rinsed away with clean water immediately after cleansing Chemical residue could damage the nonstick coating PRODUCT SPE...

Page 12: ...tive parts performed by Nemco s authorized service personnel Authorized service agencies are located in principal cities throughout the continental United States Alaska and Hawaii THE FOREGOING WARRANTY IS EXCLUSIVE AND IN LIEU OF ALL OTHER WARRANTIES EXPRESS OR IMPLIED NEMCO EXPRESSLY DISCLAIMS ANY IMPLIED WARRANTY THAT ANY OF ITS PRODUCTS IS MERCHANTABLE FIT FOR A PARTICULAR PURPOSE OR DOES NOT ...

Reviews: