background image

39

The Chiller has no dangerous corners, sharp and cutting surfaces or protruding parts. 
All  safety  guards  on  moving  parts  or  electrics  are  screwed  to  the  cabinet.  These 
guards avoid any form of accidental contact with parts that present a risk to the user. 
Always respect safety standards: 

-

Do not touch the Chiller with wet hands or feet; 

-

Not use the Chiller barefooted; 

-

Do  not  poke  screwdrivers,  cutlery  or  other  objects  between  the  safety 
guards mounted on moving parts; 

-

Before cleaning or servicing the Chiller lock-off the power supply. 

INSTALLATION  

Carefully  follow  and  adhere  to  the  instructions  given  in  this  chapter  to  guarantee 
working efficiency and safety when the Chiller is in use. 

CAUTION

: When transporting or moving the Chiller to the installation site do not 

push or drag it, lift it and position it on a trolley to avoid overturning. 

LOCATION  

Locate the Chiller in a ventilated area distant from heat sources such as radiators, air 
conditioning units, deep-fryers and ovens. 
Make sure the Chiller is located at a distance not less than 10 cm from the back wall 
to permit a good cooling effect for the various components.  
To  maintain  the  correct  internal  temperature,  the  ambient  temperature  must  not 
32°C  
Adjust height and levelling using the support feet and also check the door closes. If 
the  Chiller  is  not  perfectly  level  working  efficiency  and  condensation  flow  may  be 
affected. 
Remove the PVC protective film on both sides of the Chiller.   

CONNECTING TO THE POWER SUPPLY 

The Blast Chiller works off single-phase tension 230V- 50Hz. 
To connect to the power supply, simply plug the power cable in the power socket or 
connect the Chiller to the electrical panel, however before connecting check that: 

Summary of Contents for Freezy 5

Page 1: ...BLAST FREEZER BLAST CHILLER ISTRUZIONI D USO E MANUTENZIONE ISTRUCTIONS FOR THE USE AND MAINTENCE ISTRUCTIONS POUR L UTILISATION ET LA MAINTENANCE ...

Page 2: ...TRODUCTION 35 REGULAR MAINTENANCE 36 EXTRAORDINARY MAINTENANCE 37 INSTALLATION INSTRUCTIONS 38 INSTALLATION 39 RECOMMENDATIONS FOR CORRECT USE 40 INFORMATION FOR A CORRECT WASTE 44 ELECTRONIC CONTROLLER WORKING 45 ...

Page 3: ...ponsibility for uses other than those given in this manual TESTING The Chiller is dispatched only after it has been tested visual inspection electric test functional test Final testing is certified for the relevant documentation please refer to the enclosed appendixes GENERAL SAFETY STANDARDS The Chiller in question is manufactured conforming with the European Directives relevant to low tension 73...

Page 4: ...ergents and use a silicon wax to protect the steel PERIODICALLY CLEANING THE CONDENSER The condenser should be cleaned periodically Cleaning intervals will depend on how frequently it is used CAUTION To access the condenser please refer to page 16 in the spare parts catalogue it is necessary to remove the safety guards Always use qualified and specialised personnel To guarantee efficiency and perf...

Page 5: ...ns are due to simple and trivial causes and nearly always there is no need to call in a specialised technician therefore before informing the company check for the following The Chiller is not powered c Check that it is plugged in d Check that there is power The Chiller does not reach the correct internal temperature c Check the temperature settings d Check the probe The Chiller is excessively noi...

Page 6: ...ns in the condenser that can be recuperated and reused and the various components are considered special waste products and as such are treated as urban waste CAUTION All dismantling operations must be carried out by specialised personnel INSTALLATION INSTRUCTIONS INTRODUCTION This manual aims at providing the user with all the necessary information to correctly use and maintain the Chiller Before...

Page 7: ...on site do not push or drag it lift it and position it on a trolley to avoid overturning LOCATION Locate the Chiller in a ventilated area distant from heat sources such as radiators air conditioning units deep fryers and ovens Make sure the Chiller is located at a distance not less than 10 cm from the back wall to permit a good cooling effect for the various components To maintain the correct inte...

Page 8: ...s regarding electrical safety RECOMMENDATIONS FOR CORRECT USE Before using the Chiller remove all traces of glue using a detergent as there might be traces of condensate due to final testing in the factory Chiller efficiency when chilling and freezing depends on the following factors Type of containers to use We recommend you use pans or containers with sides no greater than 65 mm in height to per...

Page 9: ...is not altered in any way maintaining both its appearance and nutritional value When freezing the food core temperature reaches 18 C STORAGE The Chiller has a storage cycle in other words it maintains a set temperature which is automatically activated when the chilling or freezing cycles have been completed This storage is continuous and to stop the program simply press the ON OFF button Due to Ch...

Page 10: ...r declares that its products respect such norms The following symbol on the side of the equipment indicates that the product must not be disposed of as urban waste Disposing of a household appliance separately avoids possible negative consequences for the environment and health deriving from inappropriate disposal and enables the constituent materials to be recovered to obtain significant savings ...

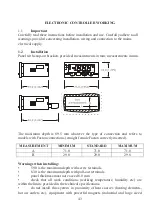
Page 11: ...ers to models with Faston connections straight female Faston correctly inserted MEASUREMENT MINIMUM STANDARD MAXIMUM A 71 0 71 0 71 0 B 29 0 29 0 29 8 Warnings when installing 59 0 is the maximum depth with screw terminals 83 0 is the maximum depth with pull out terminals panel thickness must not exceed 8 0 mm check that all work conditions working temperature humidity etc are within the limits pr...

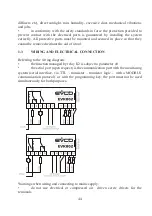
Page 12: ...ved without the aid of a tool 1 3 WIRING AND ELECTRICAL CONNECTION Referring to the wiring diagram the function managed by relay K2 is subject to parameter u0 the serial port upon request is the communication port with the monitoring system serial interface via TTL transistor transistor logic with a MODBUS communication protocol or with the programming key the port must not be used simultaneously ...

Page 13: ...er supply is unexpectedly interrupted during a temperature controlled chilling cycle when power is restored the cycle restarts from the beginning of cycle If the power supply is unexpectedly interrupted during storage when power is restored storage mode continues If the power supply is interrupted with the blast chiller in stand by mode when power is restored the chiller returns to stand by 2 2 Di...

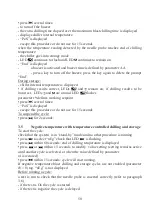
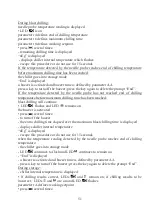
Page 14: ... displayed if C 1 is displayed the compressor is on if C 0 is displayed the compressor is off if C P is displayed compressor protection is running parameters C0 C1 C2 and i7 To display information concerning evaporator fan check that no other cycle is running press twice the first available tag is displayed if F 1 is displayed the evaporator fan is on if F 0 is displayed the evaporator fan is off ...

Page 15: ...nning 3 2 Positive temperature timer controlled chilling and storage To start the cycle check that the system is in stand by mode and no other procedure is running press to select PoS check that the LED is flashing press within 60 seconds blast chilling time will be displayed the unit of measurement is in minutes press or within 15 seconds to modify value setting setting remains active until anoth...

Page 16: ... when the value defined by parameter r2 is restored press within 15 seconds cycle will start running If negative temperature blast chilling and storage cycles are not enabled parameter rb 0 tag nEg is not displayed During blast chilling remaining chilling time is displayed LED is on parameter r2 defines chilling time parameter r8 defines working setpoint press several times nEg is displayed displa...

Page 17: ...negative the cycle is delayed During blast chilling needle probe temperature reading is displayed LED is on parameter r3 defines end of chilling temperature parameter r5 defines maximum chilling time parameter r7 defines working setpoint press several times remaining chilling time is displayed PoS is displayed displays chiller internal temperature which flashes escape this procedure or do not use ...

Page 18: ...er r9 defines working setpoint press several times PoS is displayed escape this procedure or do not use for 15 seconds To suspend the cycle press for 2 seconds 3 5 Negative temperature with temperature controlled chilling and storage To start the cycle check that the system is in stand by mode and no other procedure is running press to select nEg check that LED is flashing press within 60 seconds ...

Page 19: ... reached end of chilling temperature before maximum chilling time has been reached blast chilling will continue LED flashes and LED remains on the buzzer is activated press several times to turn off the buzzer the extra chilling time elapsed over the maximum blast chilling time is displayed displays chiller internal temperature nEg is displayed escape this procedure or do not use for 15 seconds wh...

Page 20: ...sults positive if the difference in the temperature detected by the needle probe chiller temperature is at least 6 times out of 8 1 C 1 F greater in respect to the previous comparison this comparison is run every rd 8 seconds If the test results positive OK the cycle will start running If the test results negative the cycle will be delayed LED flashes If the power supply is unexpectedly interrupte...

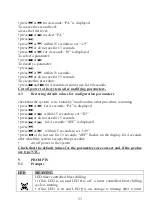
Page 21: ...rs check that the system is in stand by mode and no other procedure is running press or for 4 seconds PA is displayed press press or within 15 seconds to set 743 press or do not use for 15 seconds press or for 4 seconds dEF is displayed press press or within 15 seconds to set 149 press or do not use for 15 seconds dEF flashes on the display for 4 seconds after which the system escapes this procedu...

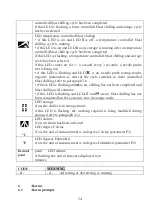
Page 22: ...ve parameters rc and rd the cycle switches to timer controlled blast chilling refer to paragraph 3 6 if this LED is flashing and is on chilling has not been completed and blast chilling will continue if this LED is flashing and LEDs and are on blast chilling has not been completed but the system is now in storage mode LED storage if on the chiller is in storage mode if this LED is flashing the wor...

Page 23: ...parameter i0 is set at 0 or 1 Remedies identify the causes which enabled this input refer to parameters i0 and i1 Results the resulting condition with parameter i0 iA Alarm compressor protection input only if parameter i0 is set at 2 Remedies identify the causes which enabled this input refer to parameters i0 and i1 Results the compressor stops Once the causes which have tripped an alarm are ident...

Page 24: ...uspended if parameter C11 is set at 1 the probe works both as needle probe and chiller compartment probe and blast chilling continues Results when the error occurs during storage if parameter C11 is set at 0 the compressor is managed by parameters C4 C5 and C6 if parameter C11 is set at 1 the needle probe works as the chiller compartment probe and storage continues Pr2 Error in needle probe Remedi...

Page 25: ...t NO for versions 12 VCA CC and 12 24 VCA CC 8 A res 250 VCA otherwise relay defrosting evaporator fan 8 A res 250 VCA change over contact Maximum allowable current across loads is 10 A Serial port port for communicating with the monitoring system through a serial interface via TTL transistor to transistor logic with MODBUS communication protocol or with programming key available upon request 9 WO...

Page 26: ... chilling chiller compartment temperature r9 99 0 99 0 C F 1 2 0 working setpoint during storage after positive temperature blast chilling chiller compartment temperature rA 99 0 99 0 C F 1 20 0 working setpoint during storage after negative temperature blast chilling chiller compartment temperature 9 2 Second level configuration parameters PARAM MIN MAX U M DEF TEMPERATURE READING INPUTS CA1 25 0...

Page 27: ... the needle probe r4 99 0 99 C F 1 18 0 end of chilling temperature for negative temperature chilling temperature detected by the needle probe r5 1 600 min 90 maximum time for positive temperature controlled blast chilling r6 1 600 min 240 maximum time for negative temperature controlled blast chilling r7 99 0 99 C F 1 0 0 working setpoint during positive temperature blast chilling chiller compart...

Page 28: ... step rd 1 99 S 60 during the second step of the test to check that the needle probe is inserted correctly refer to paragraph 3 6 PARAM MIN MAX U M DEF COMPRESSOR PROTECTIONS C0 0 240 min 0 delay in compressor activation after a cycle has been started delay in compressor activation after the power supply has been restored C1 0 240 Min 5 minimum time between two consecutive compressor start ups C2 ...

Page 29: ...r compartment probe 0 needle probe IF THE ERROR OCCURS WHEN IN STAND BY it is not possible to run a cycle IF THE ERROR OCCURS DURING EITHER TIMER OR TEMPERATURE CONTROLLED BLAST CHILLING the cycle is suspended IF THE ERROR OCCURS DURING STORAGE 1 both as needle probe and chiller compartment probe IF THE ERROR OCCURS WHEN IN STAND BY the needle probe functions as chiller compartment probe and only ...

Page 30: ...es PARAM MIN MAX U M DEF DEFROSTING d0 0 99 h 8 defrosting interval 3 0 interval defrosting is never activated d3 0 99 min 30 defrosting time 0 defrosting is never activated d7 0 15 min 2 dewatering time PARAM MIN MAX U M DEF TEMPERATURE ALARMS A1 0 99 0 C F 1 10 0 temperature below alarm limit the minimum temperature alarm is activated refer to A2 5 A2 0 0 1 1 type of minimum temperature alarm 0 ...

Page 31: ...rm from when the microport input is disabled only if i0 0 or 1 7 AA 0 240 s 5 buzzer duration time when chilling has been completed PARA M MIN MAX U M DEF EVAPORATOR FAN only if U0 1 F0 0 2 2 evaporator fan during blast chilling 0 off 1 on 2 in parallel with compressor F2 0 2 1 evaporator fan during storage 0 off 1 on F8 0 99 min 0 delay in evaporator fan during defrosting from when one of the fol...

Page 32: ...mpressor is shut down code iA flashes on the display and the buzzer is activated until the input is disabled i1 0 2 2 type of contact for the digital input 0 NO input enabled with contact closed 1 NO input enabled with contact opened 2 no input i2 1 120 min 30 delay in prompt for alarm input microport only if i0 0 or 1 1 no alarm prompt i3 1 120 min 15 maximum duration caused when the input microp...

Page 33: ... intervals every 30 minutes a modification to parameter d0 comes into effect after the defrosting interval has been completed or from when manual defrosting is activated 4 temperature alarms are only enabled when the chiller is in storage mode 5 the parameter differential is 2 0 C 4 F 6 during defrosting and dewatering temperature alarms are inactive if activated after defrosting has commenced 7 w...

Reviews: