background image

CHAPTER 4. OMNI DRIVE MODULE

4.2. SAFETY

4.2 Safety

4.2.1 Intended Usage

4.2.1.1 Fields of Application

The Omni-Drive-Module is intended to be used as part of the drive system of a mobile robot. It has been designed
for use in fields like robotics, autonomous vehicles and intralogistics. Vehicles based on the Neobotix Omni-Drive-
Module may be used in laboratories and similar controlled indoor environments without public access.

4.2.1.2 Environmental Conditions

The Omni-Drive-Module must only be used indoors. Outdoor use may significantly reduce the system’s life ex-
pectancy and may result in damages to the module.

Due to the unsealed drive amplifiers at the side of the Omni-Drive-Module it has to be protected against collisions,
dirt, metal objects (e.g. screws or washers) and moisture.

Under normal operating conditions the massive aluminium body of the drive module serves as a sufficient heat sink
for the amplifiers, the motors and the gears. In case the module is to be covered completely, appropriate ventilation or
other means of cooling might become necessary.

The drive module must be kept clean at all times. Exposure to excessive dirt or moisture may lead to damage of the
ball bearings or other moving parts. Neobotix cannot be held responsible for damages caused by dirt or moisture.

4.2.2 Improper Usage

Warning:

• Using a vehicle based on the Omni-Drive-Modules for any kind of passenger transportation is strictly pro-

hibited. Climbing onto any vehicle that is based on the Neobotix Omni-Drive-Modules is also prohibited.

• It is prohibited to operate a vehicle based on the Omni-Drive-Module in public areas without supervision by

a qualified trained person.

• The Neobotix Omni-Drive-Modules must be kept dry at all times. Exposing the modules to rain, mist or

splash-water may cause severe damage to the electronic components.

Tip:

The control software for aligning and moving two or more ODMs must be tested with special care. Using an

untested or faulty control software may damage the modules or even the complete vehicle.

4.2.3 Qualified Personnel

This product must only be modified, commissioned, operated and serviced by qualified personnel. More information
can be found at

Qualified Personnel

(page 39).

46
Summary of Contents for MMO-700

Page 1: ...MMO 700 Neobotix GmbH Apr 14 2022 ...

Page 2: ...eration 4 1 5 Mechanical Properties 4 1 5 1 Dimensions of the Robot 4 1 5 2 Dimensions of the Manipulator 4 1 6 Transport 5 1 6 1 Unpacking and Assembly 5 1 6 2 Installing the Auxiliary Batteries 6 1 7 Taking out of Service 8 1 8 Legal Notes 8 1 8 1 EU Declaration of Incorporation 8 1 8 2 RoHS Information 8 2 MPO 700 9 2 1 Product Information 10 2 1 1 Intended Use 10 2 1 2 Improper Use 10 2 1 3 Wo...

Page 3: ...of Service 20 2 7 Legal Notes 20 2 7 1 EU Declaration of Conformity 20 2 7 2 RoHS Information 20 3 General Hardware Information 21 3 1 Key Switch 21 3 1 1 Turning on 21 3 1 2 Emergency Reset 21 3 1 3 Shut down 21 3 1 4 Switch off 21 3 2 LC Display 22 3 2 1 Main View 22 3 2 2 The Info View 23 3 3 Batteries 24 3 3 1 Battery Types 24 3 3 2 Charging 25 3 3 3 Recycling 26 3 4 Charging Stations 26 3 4 1...

Page 4: ...Drive Kinematics 43 4 1 3 Special Features 45 4 2 Safety 46 4 2 1 Intended Usage 46 4 2 2 Improper Usage 46 4 2 3 Qualified Personnel 46 4 2 4 Safety Measures and Precautions 47 4 3 Mounting 47 4 3 1 Integrating the Module into a Platform 47 4 3 2 Mounting Components onto the Module 47 4 4 Electrical Installation 47 4 4 1 Power Supply 47 4 4 2 Communication Interfaces 52 4 4 3 Digital I Os 53 4 5 ...

Page 5: ...O 700 _Download as PDF1 The mobile manipulator MMO 700 combines the omnidirectional MPO 700 page 9 with a light weight robot arm for example from Universal Robots 1 https neobotix docs de hardware en MMO 700 pdf 1 ...

Page 6: ...r must the robot be used to move any other vehicle or hanger with passengers aboard The mobile robot must not be operated in any publicly accessible area without safety assessment If the robot is to be modified either permanently e g by mounting additional components or temporarily e g by loading cargo its safe operation must be assessed and approved Without the safety approval described above the...

Page 7: ...e handset is charged in the charging bay it is considered inaccessible to the operator who might be needing it Since this would be an unsafe situation the system will trigger an emergency stop To reset this remove the handset from the charging bay and follow the steps stated in the paragraph above The handset s battery runs out The radio connection between handset and receiver is constantly mainta...

Page 8: ...alone Operation The mobile platform can be operated without switching on the arm or completely without arm To do so please plug in the bridging connector X32 instead of the cable to the UR arm controller This connector can be found at the cables from platform to cabinet at the right side of the platform s top plate The robot arm can be operated independently of the mobile platform if the correspon...

Page 9: ... mobile platform using the counter sunk screws that were included in delivery The cover plates at the front and the sides of the control cabinet marked in red in the picture can be removed to provide easy access to the inside of the cabinet If the UR10e controller box was shipped separately place it inside the cabinet and fix its base to the cabinet s base plate with four M6 screws and washers The...

Page 10: ...ry sets of different charge levels Such currents may cause overheating and damage to the robot For charging the auxiliary batteries please use the adapter that was included in delivery to connect the battery charger directly to the green 2 pin power connector X42 inside the cabinet Remove the front plate of the controller cabinet and place the batteries inside the aluminium frame on the cabinet s ...

Page 11: ...CHAPTER 1 MMO 700 1 6 TRANSPORT Fig 3 Position of the auxiliary batteries and battery connectors 7 ...

Page 12: ...EU Declaration of Incorporation This product is a partly completed machinery and sold without CE marking This partly completed machinery must not be put into service until the final machinery into which it is to be incor porated has been declared in conformity with the provisions of Directive 2006 42 EC and all other applicable EU directives 1 8 2 RoHS Information As non road mobile machinery our ...

Page 13: ...e Omni Drive Modules of the MPO 700 feature important benefits compared to other omnidirectional drive kinematics like for example the MPO 500 s Mecanum wheels Fully omnidirectional manoeuvrability Very steady movements High stability and payload Compact easily integrated drive units This makes the MPO 700 a premium alternative for applications that require omnidirectional movements without the li...

Page 14: ...ding cargo its safe operation must be assessed and approved Without the safety approval described above the mobile robot must at no times be used without supervision of a qualified operator if there are guests passers by or other people unfamiliar with the robot within the working area The robot must never be operated in areas where there are staircases leading down elevated platforms or other pos...

Page 15: ...dules during operation Objects or limbs may get squeezed or crushed if they get pulled in by a drive wheel or when the robot drives over them Great care is required while working on or with the robot to avoid such injuries or damages Depending on the application it can be necessary to design and mount protective covers around the drive modules 2 2 Operating Elements The locations of the basic oper...

Page 16: ...MENTS Fig 1 Basic control elements of the MPO 700 1 Emergency stop button 2 LC Display 3 Key switch 4 Computer access 5 Battery connector 6 Charging connector 7 Charging contacts 8 Antenna of the radio controlled emergency stop system 12 ...

Page 17: ...he automatic charging station 2 2 5 LC Display This display shows the most important status information A detailed description of the LCD can be found in LC Display page 22 2 2 6 Access to the On Board Computer All peripheral connections of the on board computer are accessible at the front of the platform 2 3 Mechanical Properties 2 3 1 Dimensions Fig 2 Dimensions of the MPO 700 13 ...

Page 18: ...ing Exceeding these ratings might cause malfunctions or damage the robot Description Units Value Storage temperature C 20 50 Operating temperature environmental temperature C 0 35 Payload kg 400 Maximum speed m s 0 9 Maximum bumpiness to pass over 0 25m s mm 15 Maximum bumpiness to pass over full speed mm 5 2 3 3 Positions of Sensors All distances are in millimetres measured relative to the platfo...

Page 19: ...CHAPTER 2 MPO 700 2 3 MECHANICAL PROPERTIES Fig 3 Coordinate system of MPO 700 Fig 4 Positions of the laser scanners 15 ...

Page 20: ...m s on board computer are connected to the same CAN bus and set to a baud rate of 1 MBaud The amplifiers settings might need to be changed to match the communication requirements of the used control software The configuration software Composer from Elmo Motion Control can be used to configure test and retune all motor amplifiers Each amplifier can be connected to a COM port 57600 Baud no parity of...

Page 21: ...ver the battery should be supported and fixed in position by wooden bars or other appropriate means 2 4 2 Unpacking the Robot If the robot is shipped in the original transport box only the lid should be removed Then all small components and the cushioning material can be taken out Once the robot is free of all cushioning it can be lifted out of the transport box This should be done by at least two...

Page 22: ...l and electronic components 2 4 5 Shipping with AGM Battery If the key switch was removed there is no risk of the robot being turned on during the transport or the battery being discharged Tip To eliminate every risk when shipping the robot as airfreight it is recommended to disconnect the battery prior to shipping The AGM batteries are leak proof and approved for airfreight 2 4 6 Shipping with Li...

Page 23: ...tee a satisfying operation the platform should be checked and cleaned regularly Information on how to clean the robot and its sensors can be found in Maintenance page 38 2 5 2 Omni Drive Modules In order to optimise the performance of the omnidirectional platform and to maximise its life expectancy please mind the following Always treat the mobile platform very carefully Do not overload the platfo...

Page 24: ...can find information about taking out of service and about recycling here page 40 2 7 Legal Notes The general legal notes can be found at Legal Notes page 41 2 7 1 EU Declaration of Conformity This product fulfils all relevant directives of the European Union 2 7 2 RoHS Information As non road mobile machinery our mobile robots are explicitly exempted from the scope of the RoHS directive 2011 65 E...

Page 25: ...d for about one second and then release again The message in the LCD display should change if the robot can be moved again 3 1 3 Shut down Turn the key counter clockwise towards position I for five seconds to initiate the shutdown which will happen within 30 seconds In this time the platform software if running terminates and shuts down the operating system In case the on board computer is shut do...

Page 26: ...fety system by turning the key switch clockwise for about one second SCANNER STOP An obstacle has been detected within the laser scanner s safety field As soon as the obstacle has been removed the safety system will be reset automatically If a Flexi Soft safety controller is installed all stops are indicated with this message CHARGING The robot is currently charging its batteries SHUTDOWN IN XXs T...

Page 27: ... of the batteries Due to the batteries characteristics the actual battery voltage may be higher than the platform s rated main voltage Nominal voltage Shut down Working range Charging 24 V 22 V 23 V 25 V 25 V 29 V 48v 44 V 46 V 52 V 52 V 59 V 3 2 1 4 Temperature T 20C This is the temperature in C inside the platform measured at the RelayBoard 3 2 1 5 Uptime 00d 00h 02m 37s The bottom line shows th...

Page 28: ...ulting in high weight for a given capacity and a limited number of charge discharge cycles Their capacity will reduce over time until at some point approximately after two years of use the robot s available uptime is no longer sufficient and the batteries need to be replaced There are several measures to prolong the life of AGM batteries and to save costs and resources Recharge the robot whenever ...

Page 29: ...witch off the robot stop charging and contact Neobotix 3 3 2 Charging 3 3 2 1 With external Battery Charger The battery of the mobile robot consists of several batteries connected in series and or in parallel The resulting battery pack can be charged conveniently and safely by using the provided battery charger The battery charger needs a power supply of 230 VAC 50 Hz The charger must be placed in...

Page 30: ...g They still contain highly reactive chemicals and must never be opened or damaged to avoid serious damage or injuries Attention Under European law all kinds of batteries must only be returned to certified recycling companies Please get in touch with Neobotix if you are unsure about how to recycle or dispose of used batteries You can also return all old or wasted batteries from your Neobotix produ...

Page 31: ...ion After installing the charging station please check the height of the charging contacts and if the robot can reach the station without problems Attention Only plug in the power cable after successfully checking these two points The charging station requires the same power supply as the external battery charger To allow automatic charging the battery charger inside the station needs to remain sw...

Page 32: ...that the input voltage selection switch is set correctly and then connect the charging station to an ordinary power outlet Before installing any batteries always make sure that the integrated battery charger is switched off The main power switch is located directly beside the power cable connector Batteries can only be charged as a complete set of two identical batteries with the same charge level...

Page 33: ...CHAPTER 3 GENERAL HARDWARE INFORMATION 3 4 CHARGING STATIONS Fig 2 Position of the main power switch X 29 ...

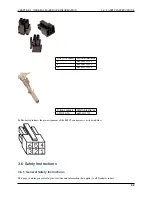
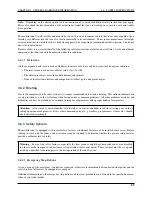
Page 34: ...839 4 429661 532 412 10 pins 2 rows 281839 5 429673 532 428 12 pins 2 rows 281839 6 429685 532 434 Crimp contacts TE Connectivity Farnell RS Components AWG 28 24 182734 2 429715 532 456 In Neobotix products the pin assignment of the HE14 connectors is as shown below 3 5 2 Würth Elektronik MPC4 Please check the Würth Elektronik online catalogue4 for details on the MPC45 4 https www we online de web...

Page 35: ...22 Crimp contacts Würth Elektronik AWG 24 18 64900613722 In Neobotix products the pin assignment of the MPC4 connectors is as shown below 3 5 3 Würth Elektronik MPC3 Please check the Würth Elektronik online catalogue6 for details on the MPC37 6 https www we online de web de wuerth_elektronik start php 7 https www we online de katalog de em connectors wire to board wr_mpc3 31 ...

Page 36: ...6113322 12 662012113322 Crimp contacts Würth Elektronik AWG 24 20 66200113722 In Neobotix products the pin assignment of the MPC3 connectors is as shown below 3 6 Safety Instructions 3 6 1 General Safety Instructions This page contains general safety instructions and information that applies to all Neobotix robots 32 ...

Page 37: ...s strongly recommended to attend a training This online documentation is only provided as a work of reference when facing minor or common problems All other problems mistakes and difficulties can best be avoided by an in depth training for programmers and a proper briefing for operators Attention Always make yourself familiar with the robot its control and behaviour before starting your work or se...

Page 38: ...rgency stop and or to reset the safety system Additional safety devices can also be integrated into the mobile robot Please contact Neobotix if you plan to implement any special functions 3 6 4 Cooperating with the Robot 3 6 4 1 Close Proximity As long as the robot is not in full emergency stop a minimum distance should always be kept Direct contact to the active robot system is to be avoided Warn...

Page 39: ...ended to consult Neobotix in order to provide the appropriate training and information for all technicians and programmers The functions and safety of all modified robots have to be checked and ensured before bringing them into service Attention All warranties are void in case of any unauthorised or improper modification of the mobile robot system All responsibilities for the further operation of ...

Page 40: ...even cause the robot to leave the predefined paths 3 6 7 5 Electrical Overload The robot s on board power supply must not be overloaded Extreme overload may lead to overheating damages to the electrical installation and to short circuiting Please contact Neobotix before modifying the electrical system of the mobile robot 3 6 7 6 Modifications The robot must always be turned off and disconnected fr...

Page 41: ...ng required from the Customer Mobile manipulators are very complex robot systems The applications in which they will be used could not be foreseen in detail during the development of the robot Therefore beside any modifications needed for certain research work or experiments some very basic tasks must be completed before the mobile manipulator can be used safely An assessment of risks must be perf...

Page 42: ...able also may reduce the robot s capability to safely discharge electrostatic charge 3 8 1 2 Sensors Cleaning the various sensors is indispensable to assure that the robot can move safely and swiftly through its environ ment Attention Be very careful not to scratch the cover of the laser scanner or the membranes of the ultrasonic sensors Damaging these components might cause severe malfunctions 3 ...

Page 43: ...y use replacement parts with features and properties identical to those of the original parts Always mount all covers and hull parts properly and securely after finishing your work Make sure to reconnect and fix all electrical connections especially shieldings and earthing straps 3 8 2 4 Batteries The batteries need to be checked regularly and have to be replaced after some time Additional informa...

Page 44: ... risk of injuries or damages to components that are to be reused and proper sorting of parts according to materials and way of recycling More information on qualified personnel can be found at Qualified Personnel page 39 3 10 2 Recycling 3 10 2 1 Reusable components Many components of the mobile robot e g the servo motors and the amplifiers have a very long life expectancy and will most probably s...

Page 45: ...composing However inaccuracies or omissions might occur Please inform Neobotix in case you notice any The Neobotix GmbH cannot be held responsible for any technical or typographical errors and reserves the right to make changes to the product and manual without prior notice Neobotix makes no warranty of any kind with regard to the material contained within this document including but not limited t...

Page 46: ...ctly flat These modules are intended for research and experiments and need to be modified and completed by the customer Several important issues must be considered when working with them The Omni Drive Module is a partly completed machine and not ready for immediate operation The drive amplifiers have been configured with general purpose settings Some of these settings might need to be adjusted ac...

Page 47: ...o amplifier each Whistle 10 60 from Elmo Motion Control mounted to a common printed circuit board One of the motors drives the mod ule s driving wheel while the other motor rotates the wheel around its vertical axis Both motors can rotate infinitely without mechanical boundaries thus allowing an omnidirectional robot to move continuously and without the need to re align the wheels due to any limit...

Page 48: ...mni Drive Modules This configuration ensures high stability for smaller robots avoids static indeterminacy and allows fully omnidirec tional movement All three wheels must be aligned correctly at all times to avoid jamming or slippage Please mind that the angle between the wheels must change according to the movement s centre of rotation 4 1 2 3 4 Omni Drive Modules This configuration is most comm...

Page 49: ...tly differ from module to module Therefore the control software must implement an adjustable offset for each orientation drive Tip Proper functioning of the overall drive system can only be achieved by aligning all wheels correctly at all times 4 1 3 3 Digital and Analogue I Os Each drive amplifier provides six digital inputs two digital outputs and one analogue input Three digital inputs and one ...

Page 50: ... ventilation or other means of cooling might become necessary The drive module must be kept clean at all times Exposure to excessive dirt or moisture may lead to damage of the ball bearings or other moving parts Neobotix cannot be held responsible for damages caused by dirt or moisture 4 2 2 Improper Usage Warning Using a vehicle based on the Omni Drive Modules for any kind of passenger transporta...

Page 51: ...designed to be mounted under a vehicle but into it The base plate of your vehicle must be in between the wheel carrier assembly and the gearbox housing A U shaped cut out of 60 mm to 70 mm width is recommended for the vertical axle of the wheel carrier assembly 4 3 2 Mounting Components onto the Module If all Omni Drive Modules are mounted to a common base plate additional components may be placed...

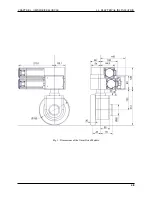
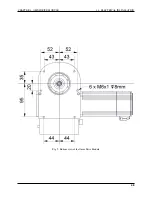
Page 52: ...CHAPTER 4 OMNI DRIVE MODULE 4 4 ELECTRICAL INSTALLATION Fig 1 Dimensions of the Omni Drive Module 48 ...

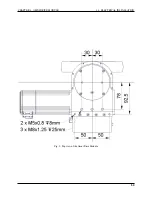
Page 53: ...CHAPTER 4 OMNI DRIVE MODULE 4 4 ELECTRICAL INSTALLATION Fig 2 Bottom view of the Omni Drive Module 49 ...

Page 54: ...CHAPTER 4 OMNI DRIVE MODULE 4 4 ELECTRICAL INSTALLATION Fig 3 Top view of the Omni Drive Module 50 ...

Page 55: ...on drive is powered directly from the amplifiers PCB If different voltages are used they must be connected to a common ground Attention The ground line of the digital input is by default connected to the common ground of the amplifier power supply In case independent supply voltages are required please contact Neobotix Use the following components for the power supply of the switch in case you are...

Page 56: ...or Please use the following components for the CAN bus connection Housing TE Connectivity HE14 receptacle double row 8 circuits 281839 4 Contacts TE Connectivity HE14 crimp terminal female 28 24 AWG 182734 2 The pin assignment is as follows Pin Function 1 5 GND 2 6 CANL 3 7 CANH 4 8 Shield If the CAN bus ends at one of the Omni Drive Modules a terminating resistor of 120 Ω has to be activated Plea...

Page 57: ...ase keep in mind that the limiting resistor has to be bridged if the default signal level of 5 V is used The digital input 1 of the orientation drive amplifier is connected to the output of the position switch and cannot be used for customised functions Tip The ground line of the digital inputs of the orientation drive amplifier is by default tied to the common ground of the amplifier power supply...

Page 58: ...d the limiting resistor 12 I3 Digital input 3 mind the limiting resistor 4 4 3 1 Motion Monitoring On request the connectors can be prepared to provide direct access to the encoder signals of the traction and or orientation motor from outside This option will change the pin assignment as follows Pin Function Description 1 O Emitter contact of the optocoupler of digital output 1 2 B Channel A of th...

Page 59: ...ce software Composer which is provided for free download from the homepage of the manufacturer Elmo Motion Control The latest version can be found at https www elmomc com product composer It is recommended to connect the computer that runs the Composer to the amplifier by a standard RS 232 serial connection COM port The appropriate configuration cable can be supplied on request The drive amplifier...

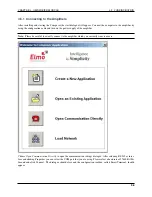
Page 60: ... the amplifier Note Please be careful to actually connect to the amplifier which you currently want to access Choose Open Communication Directly to open the communication settings dialogue After selecting RS 232 as inter face and clicking Properties you can select the COM port that you are using Please select a baud rate of 57600 Bit Per Second and click Connect The dialogue should close and the c...

Page 61: ...it sometimes happens that only the power supply is connected to the next module while the configuration cable is still plugged to the previous module Baud rate The baud rate of the serial connections has been changed to 57 6 kBaud to make working with the modules more convenient The default baud rate of the Composer is only 19 2 kBaud COM port Try other COM port numbers If a USB to serial converte...

Page 62: ... file and click Download in the open dialogue In case the current interface differs from the settings stored in the file you will need to open the properties dialogue by clicking Change in the Communication Info area of the file open dialogue After the connection has been established successfully the configuration is downloaded to the volatile memory of the amplifier To save the configuration perm...

Page 63: ...vanced Settings The motor must be deactivated for some settings to be applied Use the button Stop Motor Off to deactivate the motor 4 5 3 1 Acceleration and Deceleration The maximum permitted acceleration and deceleration can be set by editing the two according fields in the tab Profile of the Smart Terminal and clicking Apply These values are the limiting values and will be used by the internal c...

Page 64: ...to the given Position Simply click the Go button to start the motion and Stop to set the velocity back to zero The Composer also offers a function to record high definition measurements of the motor s movements and to plot these data graphically Please contact Neobotix or Elmo Motion Control if you need further information on this topic 4 6 Maintenance The Neobotix Omni Drive Module does not requi...

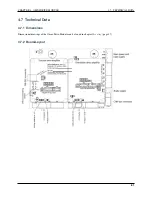
Page 65: ...CHAPTER 4 OMNI DRIVE MODULE 4 7 TECHNICAL DATA 4 7 Technical Data 4 7 1 Dimensions Dimensional drawings of the Omni Drive Module can be found in chapter Mounting page 47 4 7 2 Board Layout 61 ...

Page 66: ...rmation about taking out of service and about recycling here page 40 4 9 Legal Notes The general legal notes can be found at Legal Notes page 41 4 9 1 Declaration of Incorporation This product is a partly completed machinery and sold without CE marking This partly completed machinery must not be put into service until the final machinery into which it is to be incor porated has been declared in co...

Reviews: