background image


SK300-XL Steam Humidifier


25 

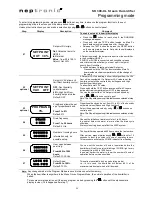
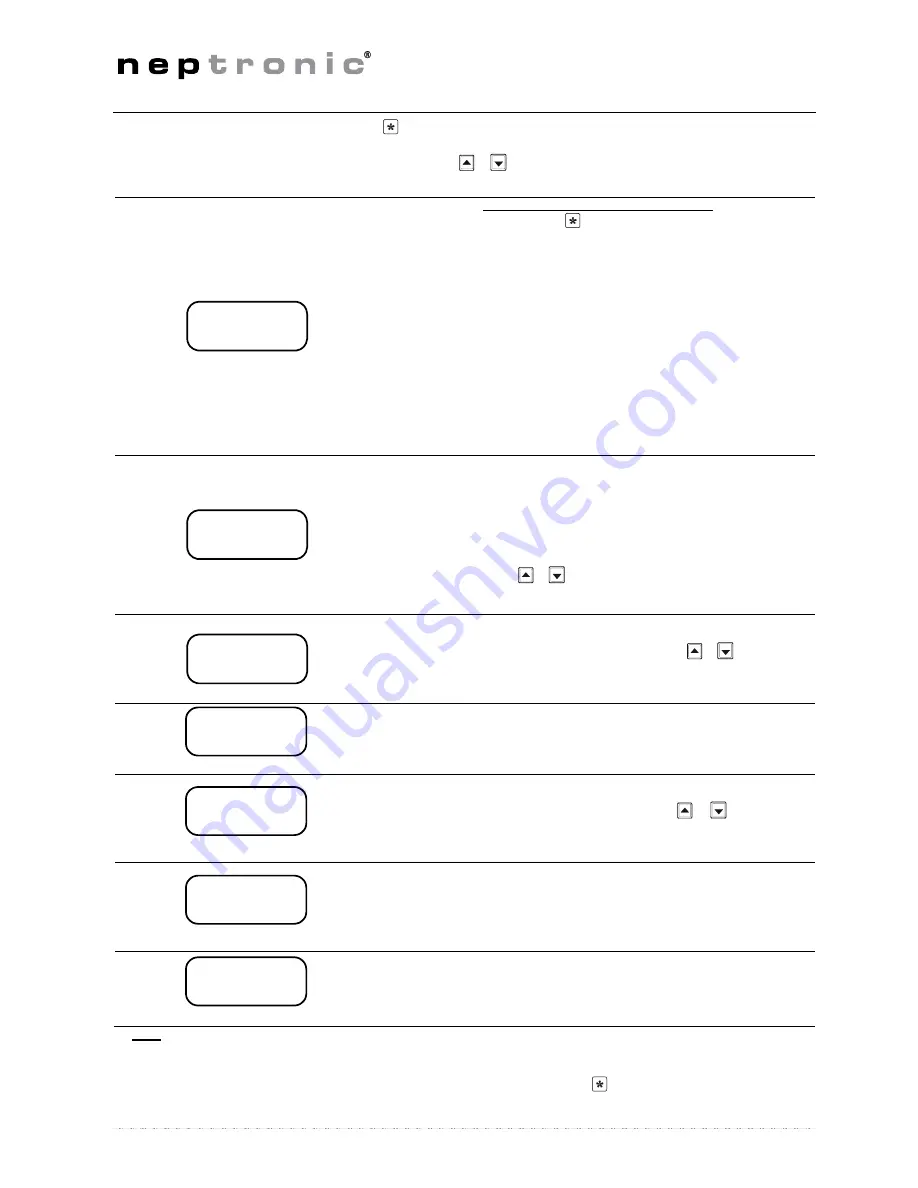
Programming mode 

To enter into programming mode, please push 

 button at any time, to advance the program function to the next 

programming step in the menu push the same button twice. 

Unless other instructions, you can make a selection by using 

 & 

 buttons on control panel. 


Step Display 

Description 

Comment 

01 


Set point RH origin 
 

Out

: Output set point to 

HRO20 

Int

: Internal. 

Value 

: from 00 to 100% 

Default: Out 30% 

To enable set point to humidifier display


  Press the 

 button to reach step 5, the RUNNING 

message will appear. 

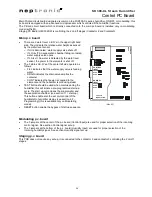
  Press and hold the TEST button located on Main Pc 

board inside electrical compartment for 10 seconds. 

  Release the TEST button then press the RESET button 

on the same main pc board. Set point is now displayed 
on the humidifier display. 


If Output is selected, the set point is sent from the humidifier 
to the humidistat HRO20. 
If SHR10 or SHC80 is connected with humidifier, please 
select Internal, this will allow you to set up RH set point 
directly from Humidifier. 
To switch between Output and Internal Set point: 

Press and hold the TEST button located on Main Pc 
board inside electrical compartment until the change of 
the value. 

02 

optional 


Set point VAV allows Hi 
limit Duct humidity control 
 

OFF

: Duct humidity 

control disable. 

65%:

 High limit Duct 

humidity set point value. 

Default: OFF 

If Set point VAV is disabling, no humidity signal from the VAV 
Duct will be considered. If a Set point VAV value is set, the 
humidity output will be controlled by both space and High 
limit duct humidity signal. 
To allow Set point VAV value: 
Press and hold the TEST button located on Main Pc board 
inside electrical compartment until OFF is disappeared. 
You can then select the VAV Set point value desired by 

using  

 & 

 buttons on control panel. 

Note: This Step will appear only if Internal has been selected at step 
01

03 

optional 


Prop Band allows the set 
up of proportional band. 
 

From 3 to 9% 

Default: 3% 

Proportional band can be set from 3% to 9% of the humidity 
set points values (Space and High limit duct). 

Select the appropriate value by using  

 & 

  buttons on 

control panel. 

Note: This Step will appear only if Internal has been selected at step 
01

04 

D R A I N

8   H R S


Drain frequency. 
 

From 1 to 24 hours 

Default: 4 Hrs 

Choose the initiation of a drain cycle for 1 to 24 hours. 
In general, harder the water is, more often the drain cycle 
should be. 
Drain cycle setting does not affect the AFEC system. 

05 

R U N N I N G

0 6 4 5 H R S


Number of running hours
 
Information only, no 
possible set up. 

The humidifier has operated 645 hours since the last service. 

After service, press simultaneously 

 & 

 buttons for 15 

seconds to reset the number of hours of operation to zero. 
This procedure will stop the CHECK indicator from flashing. 

06 

S E R V I C E

1 0 0 0 H R S


Hour span between 
servicing. 
 

From 400 to 1500 
hours. 
Default: 1000 Hrs 

You can set the number of hours of operation before the 
humidifier will call for service (blinking of CHECK light every 
4 seconds) from 400 to 1500 hours. 
In general, harder the water is, lower the number of hours of 
operation before service should be. 

07 

L O C K   O N
8 0 %   P W R


Output Span. 

From 00 to 100%. 
Default: 100%


This option is available only on modulating model. 
i.e.: In this case, the humidifier will deliver 80% of its 
maximum rated output when at full demand. 

Note:  

Any changes made in the Program Mode are saved into a non-volatile memory. 

When the humidifier is anywhere in the Menu Driven Program Mode, the normal operation of the humidifier is 
halted. 

To resume normal operation, exit the menu program mode by pressing the 

 button until the alphanumeric 

display is clear. (This happens after step 7) 

SETPOINT

OUT  30%

SETPOINT
VAV   OFF

PROPBAND

3%

Summary of Contents for SK300-XL Series

Page 1: ...Electric Steam Humidifier SK300 XL Series INSTALLATION INSTRUCTIONS Read and save these instructions SK300 XL IOM Rev 131125...

Page 2: ...the humidification system Have a competent person carry out a risk assessment of the water system supplying the humidifier to ensure the water supply is of an acceptable quality CORRECT USE Neptronic...

Page 3: ...a complete line of Electric Steam humidifiers for Residential application Gas fired Steam humidifiers for Commercial application Steam to Steam and Direct Injection Steam humidifiers for Commercial ap...

Page 4: ...d Mounting 8 Stage 2 Steam Distribution Installation 9 Stage 3 Water Supply Installation 12 Stage 4 Water Drain Connection 13 Stage 6 Electrical Control Connections 15 Humidity signal set up 19 Initia...

Page 5: ...3ph 480V 3ph 600V 3ph SK330M 90 41 30 83 4 see standard SK300 IOM 1 3 76 SK340M 120 56 40 111 0 see standard SK300 IOM 1 3 76 SK370M 210 95 70 n a 84 70 1 3 76 SK380M 240 108 80 n a 96 81 2 3 76 SK39...

Page 6: ...Inlet Diam F G SK330M SK340M SK370M 1 3 76 18 2 462 n a 3 4 20 NPT 15 1 383 7 5 190 SK380M SK390M 2 3 76 18 2 462 9 230 3 4 20 NPT 15 1 383 7 5 190 Note Drain outlet and water supply inlet are located...

Page 7: ...ng and Lifting The SK300 XL Steam Humidifier MUST always be handled and lifted with care and should remain in its original packaging for as long as possible prior to installation The SK300 XL Steam Hu...

Page 8: ...customer is responsible for ensuring their suitability For the installation of the SK300 XL Steam Humidifier and associated components there should be no special tooling requirements above that of a...

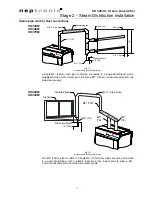
Page 9: ...the shortest possible length For flexible steam hose the total steam line length should not exceed 16 feet 5 meters For longer distances use insulated hard piping For insulated hard piping the total s...

Page 10: ...ould not exceed 50 feet 15 m 5 Whenever possible use rigid copper piping flexible steam hose can be used for short runs or for interconnecting between rigid pipe runs ensure that there is no kink in t...

Page 11: ...laced side by side 3 For installation of Multi Steam units please refer to Neptronic Multi Steam Installation Instructions Horizontal duct Fig 9 dimensions in bracket are in mm Vertical duct Fig 10 di...

Page 12: ...m condensate drain from the main steam supply SK380M SK390M Fig 12 dimensions in bracket are in mm Two 3 76mm steam outlets to a single 5 130mm feed pipe should be connected to a single Multi Steam wi...

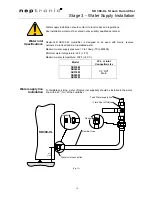
Page 13: ...de ionized and de mineralized water Maximum water supply pressure 10 to 70psig 70 to 480kPa Minimum water temperature 49 F 4 C Maximum water temperature 104 F 40 C Model Wa er inlet Connection size SK...

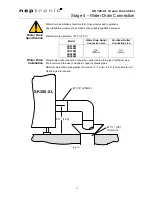
Page 14: ...ture 140 F 60 C Model Water Drain Outlet Connection size Pan Drain Outlet Connection size SK330M SK340M SK370M SK380M SK390M 3 4 20mm 1 2 15mm Water Drain Installation Water drain outlet connection sh...

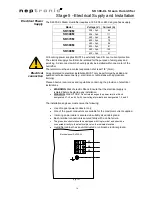
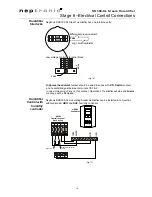
Page 15: ...cal personnel e g electrician or technicians with appropriate training Please observe local codes and regulations concerning the provision of electrical installations WARNING Risk of electric Shock En...

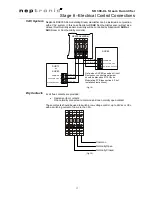
Page 16: ...s contact Operation of humidifier will stop and Alarm message will be displayed Humidifier Control with humidity controller Neptronic SK300 XL modulating Steam Humidifier can be installed in conjuncti...

Page 17: ...ier Control with humidity sensors Neptronic SK300 XL Steam Humidifier can be installed in conjunction with Neptronic SHR10 or SHC80 humidity sensors Fig 18 humidistat High limit 1 4 3 2 F 8 7 6 9 Cont...

Page 18: ...acts One normally connected to common and one normally open contact These contacts should be used to switch a low voltage control up to 24Vac or Vdc with a switching current of no more than 3 A Fig 20...

Page 19: ...hould be located on an inside wall or column It should not be be near any discharge air from supply ducts or sources of heat or cold The airflow switch must be positioned to accurately open on a loss...

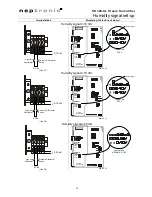
Page 20: ...on 0 10V Extra jumper TOP PCB MODULATING CONTROL INPUT HUMIDITY INPUT 4 20mA 0 10V 2 10V 4 20mA 2 10V 0 10V 1 8 7 5 4 3 2 F 6 9 2 10 Vcc Pressure Differential Switch High limit Humidistat 5 Vdc PCB97...

Page 21: ...n 0 10V Extra jumper TOP PCB MODULATING CONTROL INPUT HUMIDITY INPUT 4 20mA 0 10V 2 10V 4 20mA 2 10V 0 10V 1 8 7 5 4 3 2 F 6 9 2 10 Vcc Pressure Differential Switch High limit Humidistat 5 Vdc PCB9708...

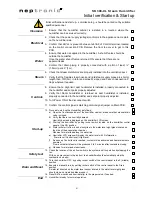
Page 22: ...itch 11 Confirm the control signal is matching control signal jumper on Main PCB Start up 12 Proceed to start up the Humidifier as follows a Open the front access door of the humidifier cabinet make s...

Page 23: ...e hours see section 12 Service O No abnormal conditions of operation 5 FILL indicator O Indication that the water supply fill valve is open O Indication that the water supply fill valve is closed 6 ST...

Page 24: ...s Only on modulating humidifiers suffix M If no High limit Duct sensor is installed second line is left blank Quantity of steam produced by the humidifier I e The actual output of the humidifier at th...

Page 25: ...verheated The temperature inside the container has exceeded the boiling temperature The humidifier has automatically shut off P R O B E D E F E C T E D Defected probe The water level sensor is not ope...

Page 26: ...buttons on control panel Note This Step will appear only if Internal has been selected at step 01 03 optional Prop Band allows the set up of proportional band From 3 to 9 Default 3 Proportional band...

Page 27: ...feeding water o DRAIN indicates the drain valve empties the container o CONT indicates that power is supplied to the elements and the humidifier is producing steam TEST button should be used when comm...

Page 28: ...al White Black Orange Purple Purple Purple Blue Black Black Contactor stage 1 Rocker switch Modulating PCB To high limit switch and differential pressure switch No 1 2 No F 24 Vac Input for modulating...

Page 29: ...a result of our failure to adhere to such promises 10 Return of good Goods received by the purchaser cannot be returned unless a completed R M A Form Return Material Authorization Form has been issued...

Page 30: ...treal Qc H4N 1R6 CANADA Tel 1 514 333 1433 Fax 1 514 333 3163 Customer service Fax 1 514 333 1091 Toll free 1 800 361 2308 Business hours from Monday to Friday 8 00am to 5 00pm Eastern Time Toll free...

Reviews: