SKR Humidifier – kit N
User Manual
www.neptronic.com
18
7.
Opening the evaporation chamber.
a)
Unfasten the 3 latches located around the evaporation chamber.
Caution: Risk of injury, latches are tight. It is recommended to use pliers or a screwdriver to
unfasten the latches.
b) Remove the cover from the evaporation chamber.
c) Do not misplace the gasket located between the cover and the cylinder.
8.
Cleaning the evaporation chamber.
a) Pour out any remaining water and scale from the bottom of the evaporation chamber
b) Clean out the remaining scale, use a non-metallic brush and water. Some vinegar or any weak acid
for cleaning stainless steel may be required.
IMPORTANT
: The use of wire brush or any non-recommended acid will void the warranty.
c) If the amount of scale to be removed is significant, the service required alarm setting and/or the
drain rate (section 10, DS1) may be set too high for the local water conditions.
Too much scale may impair the normal operation of the humidifier or damage it. In this case,
increase the frequency of maintenance as necessary.
9.
Cleaning the electric element and cover.
a)
The cover of the evaporation chamber and element will, in general, not require cleaning.
However, if cleaning is required, proceed as per the cleaning of the evaporation chamber.
IMPORTANT
: The use of wire brush or any non-recommended acid will void the warranty.
10. Checking the gasket
a) Check the gasket. The gasket should not be cracked.
The gasket must be replaced a minimum at every second maintenance of the evaporation chamber
or after one year of operation. Replace more frequently if required.
11. Reassembling the evaporation chamber.
a) Rinse out the cylinder and the cover with water.
b) Place the gasket inside the cover before installing the cover on the evaporation chamber.
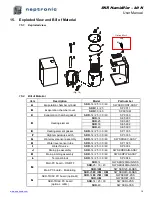
c) Align the dimple on the cover with the latch located nearest to the water drain/fill coupling (fig.2).
d) Tighten the three latches around the cover.
e) Replace the evaporation chamber in the humidifier.
f) Tighten the water drain/fill coupling.
g) Replace the steam hose on the outlet of the evaporation chamber and secure steam hose with the
clamp.
h) Reconnect the high temperature switch connector and the high voltage connector of the heating
element.
CAUTION: RISK OF OVERHEAT AND FIRE, MAKE SURE THE HIGH VOLTAGE CONNECTOR
IS PROPERLY LOCKED.
i)
Replace the cover on to the humidifier and lock it.
12. Start-up of the humidifier.
a) Close the main power breaker/fused disconnect switch to the humidifier
.
Reset of the operating hours to zero
: Press '
'POWER
'' push button to turn OFF the humidifier, if
necessary, then press and hold the '
'POWER
'' and ''
DRAIN
'' push buttons for ten seconds
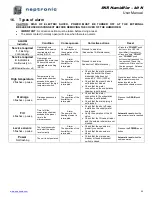
(section 16-Types of alarm, Reset).
b)
Press the “
POWER
” push button. The “
POWER
” indicator on the control panel will light.
c) The humidifier will go into a fill cycle; the ''
FILL
'' indicator will be on.
d) If there is a humidity demand, the humidifier will produce steam
.

