Evaporative Cooling Humidifier
Installation Instructions and User Manual
www.neptronic.com
Page | 22
Water Dilution
ATTENTION:
Risk of scale deposits. Correctly set the Water Dilution Interval (Step 4D in Installer menu) and
No. of Cycles (4D in Installer menu) according to the water quality or conductivity during commissioning of the
humidifier. Failure to do so will result in scale deposits on the evaporation module and the media panels.
The process of evaporative humidification results in built-up of dissolved solids in the water tank. To control this, a water
dilution cycle is run at specific intervals to clean the tank. This water dilution cycle does not interrupt normal system
operation. During the cycle, both the inlet and drain valves open to renew the water in the tank. The interval and number
of cycles of the water dilution cycle are directly related to the total dissolved solids or water conductivity of the water used.
This setting should be defined at the time of installation and commissioning of the humidifier based on the quality of water
as shown in the table below.
Table 8 - Water Dilution (determine interval and number of cycles)
Water Quality
Dilution Interval
(min)
Number of
Cycles
Water Quality
Total Dissolved
Solids (ppm)
Conductivity
(microS/cm)
352 550 30 5
320 500 100 5
256 400 200 5
192 300 250 5
160 250 400 4
128 200 600 3
96 150 800 2
64 100 1000
1
Firmware Update
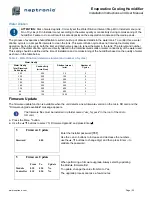
The firmware update function is available when the unit detects a new firmware version on the micro SD card and the
"Firmware upgrade available" message appears.
The firmware files must be installed in a folder named “skv_fw_pack” in the root of the micro
SD card.
A.
Press the Menu
*
button.
B.
Use the
▲
,
▼
buttons to
select “5) Firmware Upgrade” and press Enter
.
5 Firmware Update
Enter the Installer password [
757
].
Use the + and - buttons to increase and decrease the numbers,
use the
▲
,
▼
buttons to change digit, and then press Enter
to
validate the password.
Password 000
5 Firmware Update
When performing a firmware upgrade. Always start by updating
the Module firmware first.
To update, change the value from No to Yes.
The upgrade process can take a few minutes.
From
To
Update
Module 018 020 No
Controller
018 020 No
!

