Page 3
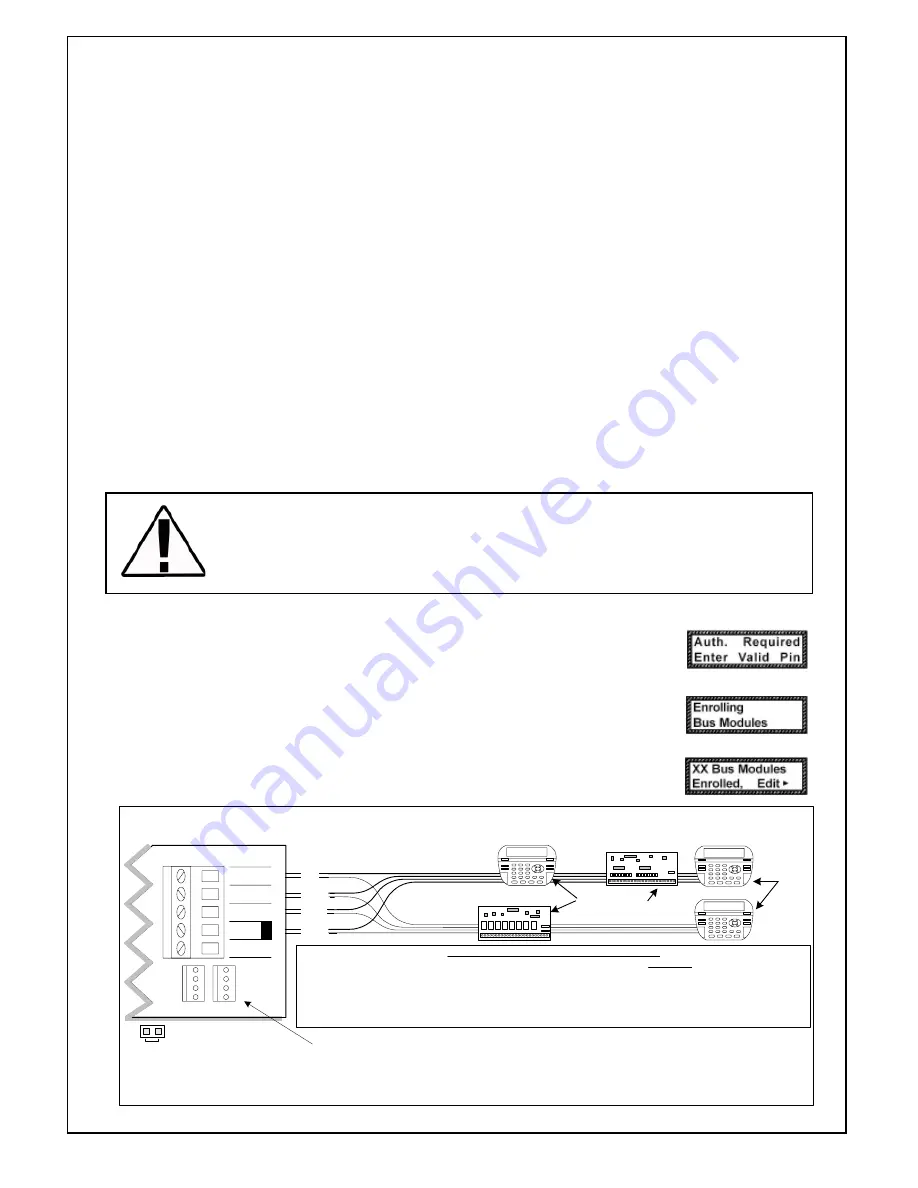
ENROLLING:
1.
Press the ELK key, then press 9 (or scroll up) to display 9 - Installation Programming.
Press the RIGHT arrow key to select this menu. The Installer Program Code (PIN) must be
entered to access this menu.
2.
Enter the Installer Program Code. (See M1 Manual for the default Code)
3.
The first Installer Programming menu displayed will be “Bus Module Enrolment”
4.
Press the RIGHT arrow key to select this menu. “Enrolling Bus Modules” will display
5.
The M1 transmit an enrolment message to all data bus devices, following by a display
showing the total Bus Modules that are enrolled. To view the enrolled devices and/or
remove a device press the RIGHT arrow key next to the word Edit.
6.
Press the * or Exit keys to exit Installer Programming.
(Optionally the modules can be enrolled into the system using the NessRP software)
NEG
-
DATA B
+12V
DATA BUS
+VKP
DATA B
DATA A
NEG
EGND
J1
J2
RE: Data Bus Termination Note
DATA BUS TERMINATION IS VERY IMPORTANT!!
Ideal setup is 2 home run cables (4 wire) with daisy chained devices along each. The last device on each cable MUST have
a Terminating resistor installed (activated) via the gold 2 pin header/jumpers marked JP2 on keypads, JP1 on expanders.
Place a black shorting cap (see hardware pack) onto the 2 gold pins to install a 120 Ohm resistor across data lines A & B.
NOTE: Place a shorting cap on JP3 of Main Board it there is only 1 data bus cable. See diagrams on multiple cables.
Temporary Connection "Plug-in" jacks for RS-485 Data Bus (J1 & J2)
Local connection for Data Bus Devices ie: Keypads, etc. for testing purposes only.
ELK-M1KP
BLACK
WHITE
GREEN
JP3 Teminating Jumper
(Located beneath cover)
RS-485 Data Bus
(Max. length is 4000 ft.
Max. bus devices vary by control.)
WARNING! The RS485 Data Bus must NEVER have more that two (2) terminating resistors
header/jumpers installed. Reliability and response will be negatively affected!
RS-485 DATA BUS
DATA A
RED
ELK-M1XIN
ELK-M1XOV
Jumper
Terminate
these two
devices.
DO NOT Jumper
Terminate these devices.
Keypad 1
ELK-M1KP
Keypad 2
ELK-M1KP
Keypad 3
Diagram for Daisy Chain Connection of Data Bus Devices Using Two (2) Home Run Cables
The ideal way to connect multiple home run cables is with an ELK-M1DBH Data Bus Hub. It accepts CAT5 or CAT6 cable with RJ45 plugs on the ends.
It does all the work of series connecting the DATA lines A & B and provides a clean, organized management of the data bus wires.
Data Bus E.O.L. Termination is Very Important
INSTALLATION AND ENROLLMENT OF NESS-M1RF RECEIVER
Select a suitable location for the receiver (not within a metal cabinet) with an ambient temperature range between 0
°
and 49
°
C (32° to +120
°
F).
The Ness M1RF Receiver connects onto the M1 data bus, which uses 4-wires. However, CAT5 or CAT6 eight (8)
conductor is recommended for all data bus cables. The extra wires are for data return paths. If cable is to be installed
in installations where electrical noise maybe present then a twisted pair shielded cable should be considered.
NOTE:
See pages 12 and 13 in the M1 Installation Manual for important information about Data Bus termination
when multiple homerun cables are installed.
DO NOT SPLICE OR CONNECT WIRE WITH CONTROL POWER
ON.
Minimum cabling should be four conductor 22 or 24 gauge. Maximum resistance per wire is 25 Ohms. Device
placement beyond 305 mts (1000 feet) is not recommended.
Setting the Data Bus Address and Enrolling Device(s) into the System
Keypads and expander devices communicate with the M1 over the RS-485 4-wire data bus. Each device must have
a unique address setting (from 1 to 16) within it's device type. Keypads are device TYPE 1, input (zone) expanders
& Wireless RF Receivers are TYPE 2, output expanders TYPE 3, etc. The purpose of device types is so that the
address numbers can be re-used in each different device type. It is acceptable to have a Keypad, and a Zone
Expander, and a Output Expander all set to address 2 and on the same data bus since each device is a different
device type.
It is NOT acceptable to have duplications of addresses within the same device type. I.E. Multiple keypads
on the same control cannot be set to 'like' addresses.
ADDRESS SETTING:
Locate the four "Address" switches. Each has a position of OFF or ON (binary 0 or 1)
with a decimal equivalent of (1, 2, 4, or 8). The total decimal value for the "ON" switches sets the bus address.
This determines which inputs (banks of 16) are assigned to the expander. E.G. Address 5 would be set with
switches 1 and 4 ON (1+4=5) and switches 2 and 3 OFF. RF Receivers are factory pre-set to address 2.
Note 1: A Wireless Receiver is a type 2 bus device, therefore it is treated and looks to
the system as an Input Expander.
Note 2: It is possible to use more than 1 Wireless Receiver per system. This increases
the range available to receive wireless devices. If more than one is used then ensure
they are all set at different address.


