background image


A note from Ness! 

Thank you for purchasing our Commercial Decorative Open Frame. I hope you get many years of 
satisfactory use from it for your business.  

Please read all of these instructions before you start building your frame as damage could occur if 
these instructions are not followed. 

It  is  critical  you  follow  these  instructions  and  warnings  to  assemble  your  Decorative  Open  Frame 
correctly to ensure it is safe when used as intended for decorative purposes. Failure to follow these 
instructions and warnings could lead to the equipment becoming unsafe or damaged or injury being 
caused.  The  Bare  Naked  Wood  Company  Ltd  will  not  take  any  responsibility  for  any  injury  or 
damage caused because these instructions have not been followed. 

Please follow the warnings on the next page and remember to communicate these warnings to your 
customer to avoid damage to the equipment or serious injury to a person. 

I have included some simple use and maintenance advice at the bottom of these instructions which 
I hope you will find helpful. 

Please  be  mindful,  wood  is  a  living  material,  even  in  its  driest  state.  It  can  still  respond  to  its 
environment and   be affected by temperature and humidity. Fine hairline cracks may appear over 
time.  Likewise  the  length  of  the  timber  means  on  occasions,  there  may  be  some  minor  bowing 
along the length of the grain. This is normal and does not make the open frame unsafe. Naturally if 
a bow develops which is severe, please contact us for a replacement part. All frames are checked 
thoroughly  before  they  leave.  Please  check  out  the  use  and  maintenance  details  below  for  more 
information. 

We  love  feedback.  If  you  feel  we  have  missed  something  from  these  instructions  or  we  could 
improve them, let us know. 

I hope you enjoy using your Princess Decorative Open Frame, and remember, she is a Princess, 
treat her well!      

Thank you 

Ness x 

www.barenakedwoodcompany.com 

Company Number: 12825667 

VAT Number 355649172   

Our Authorised European 

Representative in Europe is:- 

Clever Representatives AB, Box 1898, 

116 74 Stockholm, Sweden 

Bare Naked Wood Company Ltd 
Unit 4 Edison Court 
Edison Close 
Park Farm Ind Est 
Wellingborough 
NN8 6AH 

Email: barenakedwoodco@gmail.com 

Summary of Contents for X

Page 1: ... instructions which I hope you will find helpful Please be mindful wood is a living material even in its driest state It can still respond to its environment and be affected by temperature and humidity Fine hairline cracks may appear over time Likewise the length of the timber means on occasions there may be some minor bowing along the length of the grain This is normal and does not make the open ...

Page 2: ... electrical fittings such as mains operated fairy lights or other electrical equipment We also advise no mains operated electronic equipment is used inside the decorative open frame at any time due to the risk of an electrical fire If you do please conduct a risk assessment and record your actions We advise you do not drape your own fabrics or affix any decorations to the decorative open frame whi...

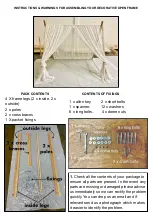
Page 3: ...vent any parts are missing or damaged please advise us immediately so we can rectify the problem quickly You can drop us an email and if relevant send us a photograph which makes it easier to identify the problem INSTRUCTIONS WARNINGS FOR ASSEMBLING YOUR DECORATIVE OPEN FRAME CONTENTS OF FIXINGS 1 x allen key 2 x short bolts 1 x spanner 12 x washers 6 x long bolts 4 x dome nuts ...

Page 4: ...rface to keep the frame clean 3 Take the 4 legs and place them in the same position as pictured Work with the top of the frame furthest away from you Note the position of the large pole holes on each corner This is critical for attaching the poles in the correct position shortly ...

Page 5: ...t hand hole and feed it through both frames you will see it come out the other side Feed it into the hole in the end of the pole Use the Allen key and turn the bolt in a clockwise direction to secure the bolt You will see the end of the pole disappear into the hole in the frame Do not over tighten the bolt at this point Repeat on the left side ...

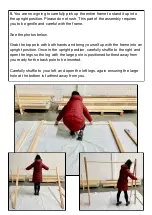
Page 6: ...s below Grab the top pole with both hands and bring yourself up with the frame into an upright position Once in the upright position carefully shuffle to the right and open the legs so the leg with the large pole is positioned furthest away from you ready for the back pole to be inserted Carefully shuffle to your left and open the left legs again ensuring the large hole at the bottom is furthest a...

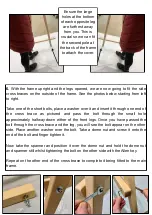
Page 7: ...through one end of the cross brace as pictured and pass the bolt through the small hole approximately halfway down either of the front legs Once you have passed the bolt through the cross brace and the leg you will see the bolt appear on the other side Place another washer over the bolt Take a dome nut and screw it onto the end of the bolt and finger tighten it Now take the spanner and position it...

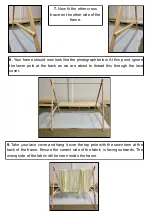
Page 8: ...ow At this point ignore the lower pole at the back as we are about to thread this through the lace cover 9 Take your lace cover and hang it over the top pole with the sewn hem at the back of the frame Ensure the correct side of the fabric is facing outwards The wrong side of the fabric will be seen inside the frame ...

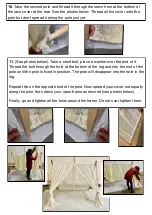
Page 9: ...the leg Repeat this on the opposite end of the pole Now spread your cover out equally along the pole then dress your open frame as desired see photos below Finally go and tighten all the bolts around the frame Do not over tighten them 10 Take the second pole and thread it through the sewn hem at the bottom of the lace cover at the rear See the photos below Thread all the cover onto the pole but do...

Page 10: ...his will cause the wood to warp Likewise keeping the frames in a damp environment such as a garage or outhouse will cause the wood to warp or produce mould on the surface The best place to store your open frame is somewhere dry with no excess of cold or heat Wood by its very nature can develop a splinter if damaged If this occurs you can gently sand the affected area with a piece of 120 grit sand ...

Reviews: