background image

21

20

3

2

1

3

2

1

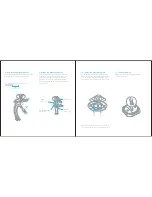
2. Twist Nest Protect counterclockwise until

it disconnects from the backplate.

3. Detach the power connector

from the back of Nest Protect

and open the battery door.

4. Replace the batteries. 

Align the + positive and 

- negative ends with the

markings in the battery 

compartment.

5. Close the battery compartment.

Do not force the door closed.

6. Reattach the power connector.

7. Push Nest Protect onto the backplate and

turn it clockwise until you feel it grip.

8. Turn power to Nest Protect back on at the

breaker box.

9. Press the Nest button twice.

SERVICING

1. Before sending Nest Protect for service,

visit 

nest.com/support

2. If your Nest Protect needs servicing,

first contact our support team to get 

a returnnumber

3. Send your Nest Protect to:

Nest Labs

(YOUR RETURN NUMBER)

4 East Stow Road

Marlton, NJ 08053 USA

GENERAL MAINTENANCE

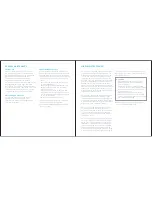
CLEANING YOUR NEST PROTECT

Nest Protect has been designed to be as 

maintenance free as possible, but you should 

keep it clean. As with any smoke alarm, 

dust buildup on the outside or inside of Nest 

Protect can stop it from working properly.
To clean Nest Protect:

1. Turn off power to Nest Protect at the

breaker box (see p.9)

2. Remove it from the wall or the ceiling (turn

counterclockwise until it comes off the 

backplate and detach the power connector).

3. Wipe the outside with a clean, slightly

damp cloth. Don’t use any soaps or solvents.

4. Place Nest Protect on a soft, dry cloth with

the Nest button facing down. Open the 

battery compartment door and remove the 

batteries. Remove the screws and lift off 

the back. Be careful to not lose the screws.

5. Gently vacuum the inside. Make sure

to clean all the way around the mesh  

sides of the smoke chamber (the large 

metal circle). 

Note: Never use detergents or solvents (like 

glass cleaner) on your Nest Protect and do 

not spray air fresheners, hair spray or other 

aerosols near it. Do not get water inside the 

alarm or paint over it.

REPLACING THE BACKUP BATTERIES

In case of a power outage, Nest Protect will 

use three AA Energizer® Ultimate Lithium 

batteries (L91) for backup. These batteries 

can be purchased at your local retailer.

1. Turn off power to Nest Protect at the

breaker box (see p.9) 

 WARNING

• Use only batteries specified by Nest.

Use of a different battery model will 

have a detrimental effect on the smoke 

alarm operation. 

• Never disconnect a wired alarm to stop 

an unwanted alarm (caused by cooking 

smoke, etc.) Removing power disables the 

alarm so it cannot sense smoke or carbon 

monoxide (CO). Instead open a window or 

fan the smoke away from the unit.

• The batteries cannot work until you install

the batteries in the correct position 

(Match + to + and - to -).

• Once Nest Protect has expired you’ll no

longer be protected from smoke or CO if 

you don’t replace it.

GEN

ER

A

L M

A

IN

TEN

A

N

C

E

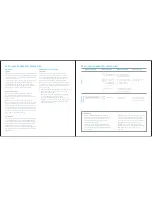
YELLOW pulses.

Low battery.

Change the batteries 

of Nest Protect now.

“THE BATTERY IS LOW IN  

THE [ROOM NAME].  

REPLACE THE BATTERY 

NOW.” Single chirp  

every 60 seconds.

Nest Protect has tested 

its sensors and there is 

a problem.

Clean according to 

instructions on page 20.  

If the problem persists, 

replace Nest Protect.

“THE SENSORS HAVE 

FAILED IN THE [ROOM 

NAME]. REPLACE NEST 

PROTECT NOW.” Single 

chirp every 60 seconds.

Nest Protect has expired 

and reached the end of 

its life.

Replace Nest Protect now.

“NEST PROTECT HAS 

EXPIRED. REPLACE IT 

NOW.” Two chirps every  

60 seconds.

There’s a problem with 

the horn of Nest Protect.

Replace Nest Protect now.

“NEST PROTECT CAN’T 

SOUND THE ALARM IN 

THE [ROOM NAME].”Two 

chirps every 60 seconds.

YELLOW pulses.

Change the batteries 

of Nest Protect soon.

Low battery.

“THE BATTERY IS LOW IN  

THE [ROOM NAME].

REPLACE THE BATTERY 

SOON.”

YELLOW pulses.

YELLOW pulses.

WHAT YOU HEAR

WHAT IT MEANS

WHAT TO DO

WHAT YOU SEE

GENERAL MAINTENANCE

YELLOW pulses.

Summary of Contents for 06C

Page 1: ...Nest Protect Wired 120V 60Hz Detects smoke and carbon monoxide CO User s Guide ATTENTION Please read carefully and keep this user s guide in a safe place ...

Page 2: ...y 24 Limited Warranty 34 First a word about privacy We re committed to being open and honest about how we use data We will always ask for permission before sharing personally identifiable information like your email address and we keep your data safe with the samesecuritytoolsbanksuse Gotonest com privacy to learn more about our Privacy Policy Want to see how it s done Go to nest com installprotec...

Page 3: ...orn enables Nest Protect to alert you with a loud emergency sound The speaker allows Nest Protect to speak with a human voice The light ring changes color to alert you Push the Nest button to hush alarms or run a test Micro USB connector not for normal use AC connector pins for the 120V connector Backup battery compartment Three AA Energizer Ultimate Lithium batteries L91 Nest Protect is designed ...

Page 4: ...alled 2 Set up Nest Protect The Nest app will guide you through each step scanning the Nest Protect QR code connecting it to the Internet and connecting it to other Nest Protects in your home Go to nest com installprotect to watch the video The installation of a smoke and CO alarm should be made by a qualified technician and all wiring used to install this alarm should be made in accordance with a...

Page 5: ...sociation NFPA recommendsinstallingasmokealarm inthefollowingareas On every floor including finished attics and basements Inside and outside every sleeping area At the top of the first to second floor stairway and on the basement ceiling near the entry of the stairs In homes with more than 1 000 square feet 93 m2 on one level additional alarms may be required Nest Protect should be installed at le...

Page 6: ...late later 6 Remove your old smoke alarm To prevent electrical shock make sure the green power light is off on the alarm You may have to twist the alarm to release it Carefully remove it to keep from damaging your ceiling or wall Placement on the ceiling or wall Installing on the ceiling is recommended Mark where the screws will go using the base as a guide Make sure it s at least 4 inches 10 cm a...

Page 7: ...ntil it s secure Do the same with the black wires There s no need for the red orange yellow wire Simply cap it with a wire nut and twist until secure 8 Remove the old connector Unscrew the wire nuts to detach the 120V connector from your old smoke alarm 10 Install the Nest backplate Screw the Nest backplate to the existing electrical box reusing the existing screws You can also screw the backplate...

Page 8: ... ceiling Install the rest of your Nest Protects if you have more 13 Switch power back on or replace the fuse 14 Press to test Press the Nest button on one Nest Protect It will tell you what to do next Every Nest Protect in the house should speak up confirming that they re connected to each other Tip If you ever need to remove it for cleaning or battery replacement turn off power to your Nest Prote...

Page 9: ...alerts Heads Up and Emergency Alarms When smoke or carbon monoxide levels are heightened but haven t yet reached Emergency Alarmlevels NestProtectcansoundaHeads Up as an early warning Nest Protect will pulse yellow and tell you where there s smoke or carbon monoxide You ll get an Emergency Alarm when smoke or carbon monoxide reach critical levels Nest Protect will pulse red sound a loud alarm and ...

Page 10: ... will switch to backup batteries You ll also see a yellow instead of green Nightly Promise light when you turn off the lights for the night NIGHTLYPROMISE Nest Protect continuously tests itself so you don t have to wonder if it s working Nightly Promise reports on every Nest Protect in your home When you turn out the lights for the night Nest Protect will glow green for a moment that means everyth...

Page 11: ...ass cleaner on your Nest Protect and do not spray air fresheners hair spray or other aerosols near it Do not get water inside the alarm or paint over it REPLACING THE BACKUP BATTERIES In case of a power outage Nest Protect will use three AA Energizer Ultimate Lithium batteries L91 for backup These batteries can be purchased at your local retailer 1 Turn off power to Nest Protect at the breaker box...

Page 12: ...ct has a limited life You will need to replace Nest Protect after 10 years with a brand new Nest Protect You can check the date of replacement written on the back of Nest Protect to see when it will expire Abouttwoweeksbeforeitexpires NestProtect will light up with a yellow light Press the Nest button and it will say Nest Protect has expired Replace it now Buy a new alarm and recycle the expired o...

Page 13: ...y people like apartment buildings condominiums hotels motels dormitories hospitals long term health care facilities nursing homes day care facilities or group homes of any kind even if they were once single family homes It is not a suitable substitute for complete fire detection systems in warehouses industrial facilities commercial buildings and special purpose non residential buildings which req...

Page 14: ...e of each separate dwelling unit sleeping area within 21 ft 6 4 m of any door to a sleeping room the distance measured along a path of travel 3 On every level of a dwelling unit including basements 4 On every level of a residential board and care WHERENOTTOINSTALLYOURSMOKEALARMS For best performance AVOID installing a smoke alarm in these areas Where combustion particles are produced Burningmateri...

Page 15: ...nstallation Failure to turn off the power before installation may result in serious electrical shock injury or death Do not restore power until all alarms are completely installed Restoring power before installation is complete may result in serious electrical shock injury or death Turn off the power to the area where the alarm is installed before removing it from the mounting bracket Failure to t...

Page 16: ...ified during this inspection have the equipment serviced immediately Note any combustion equipment not inspected by the technician and consult the manufacturers instructions or contact the manufacturers directly for FIRE SAFETY PRECAUTIONS CREATE AN ESCAPE PLAN TO PRACTICE Be prepared when your smoke CO alarm sounds its alarm Develop a family escape plan discuss it with all household members and p...

Page 17: ... provide reasonable protection against harmful interference in a residential installation This equipment generates uses and can radiate radio frequency energy and if not installed and used in accordance with the instructions may cause harmful interference to radio communications However there is no guarantee that interference will not occur in a particular installation If this equipment does cause...

Reviews: