background image


UX2000 SBC XO SIP Trunk Lync Server 2010 Configuration Guide 


10 


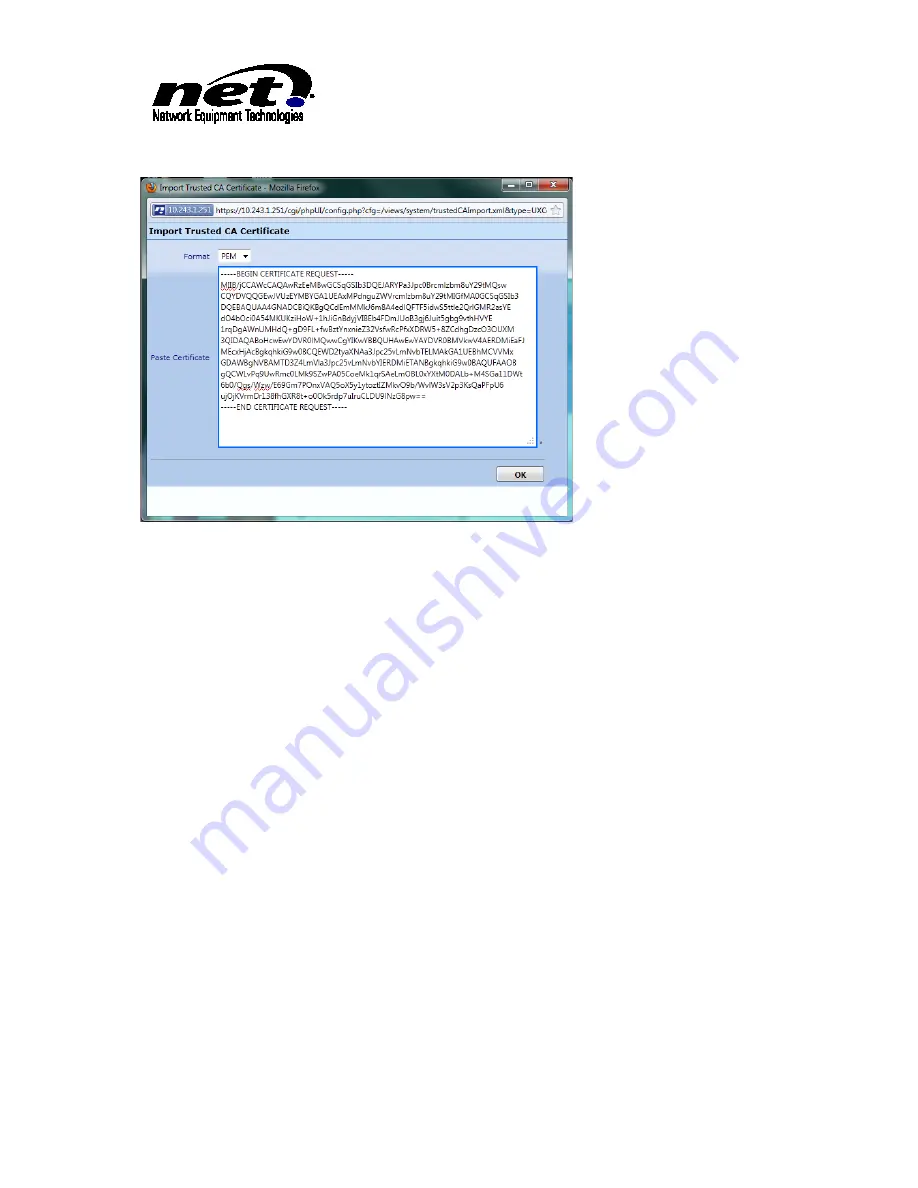
Figure 3 Importing Root Certificate PEM Format 


3.4


UX Certificate 


Click on the ‘Generate CSR’ tab. Complete the dialog below with the minimum of the FQDN of the 
UX2000 in the ‘Common Name’ field . Once the dialog is populated click ‘OK’. This will create the 
unsigned certificate that will have to be submitted to the Certificate Authority to be signed. This 
submission process varies per installation and is out of the scope of this document. 

Summary of Contents for UX2000 SBC

Page 1: ...lied warranty NET s sole warranty is contained in its Product Warranty The End User Documentation shipped with NET s products constitutes the sole Specifications referred to in the Product Warranty NET assumes no responsibility for any use of the information contained in this document or for any infringement of patents or other rights of third parties that may result Networking products cannot be ...

Page 2: ...LETING SIP TRUNK TASK ON UX2000 8 3 1 Prerequisites 8 3 2 Initial Task configuration 8 3 3 Root Certificate 9 3 4 UX Certificate 10 3 5 SIP Signaling Endpoints 12 4 CONFIGURING PUBLIC ETHERNET PORT AND IP ADDRESSING 13 4 1 Configuring the Public Ethernet Port 13 4 2 Selecting Unused Ethernet Port 14 4 3 Configuring the IP Default Route 16 4 4 Configure Internal Private IP Static Route 17 ...

Page 3: ...FIGURATION 30 8 ENABLING MEDIA TRANSCODING 32 9 ANALOG SUPPORT 33 9 1 Differences Between PSTN and Analog Call Routing 34 9 2 Analog Configuration 39 9 2 1 SIP Server Table 39 9 2 2 Analog Translation Table 41 9 2 3 Signaling Group 43 9 2 4 Modify Lync Server 2010 Routing Table to Add ATA Route 45 9 2 5 Add Translation Table for ATA 47 9 2 6 Add Route Table for ATA 48 10 TROUBLESHOOTING 50 10 1 Vi...

Page 4: ...n Tables 28 Figure 24 Tranlation Table that Removes and 1 29 Figure 25 Translation Table that Adds and 1 30 Figure 26 Media Profiles Showing Enabled Codecs 30 Figure 27 Typical G711Alaw Codec Settings 31 Figure 28 Media List Containing G711Alaw and G711Ulaw 31 Figure 29 Media List cont Showing Digit Relay Settings 32 Figure 30 Signaling Group Showing Media List Selection 32 Figure 31 Media Trancod...

Page 5: ...nc Server 2010 Configuration Guide 5 Figure 48 Routing Entry for Calls From ATA to Lync Server 2010 49 Figure 49 XO SIP Trunk Down 50 Figure 50 Alarm Status 51 Figure 51 Debug Logs 51 Figure 52 Syslog Collector Configuration 52 ...

Page 6: ...Net Product Documentation Hub https support net com display ALLDOC NET Product Documentation jsessionid BA930EB97FD04F91A 5C84BA74B9DAE35 UX2000 Specific https support net com display UXDOC Home Tenor Quickstart Guide https support net com download attachments 3407913 TenorAFQuickStart pdf version 3 modificati onDate 1303316655000 Tested Versions UX2000 1 2 0v39 Lync Server 2010 4 0 7577 0 ...

Page 7: ...O s SIP Trunk offerings and Microsoft s Lync Server 2010 over the public internet The UX2000 provides a secure method of isolating the internal corporate data network from the publicly reachable SIP Trunk offerings The UX2000 is located between the Public Internet and the internal WAN LAN network as shown below Figure 1 Typical Lync Server 2010 to XO SIP Trunk Deployment ...

Page 8: ...be required to complete the configuration of the UX2000 SIP Trunk Task a Access to the Certificate Authority to download the root certificate and sign and download the user certificate for the proper TLS operation between the UX2000 and the Lync 2010 Server s b FQDN of the Lync 2010 Mediation Server or Server pool c IP Address s of the XO Communications SIP Signalling destination server d FQDN of ...

Page 9: ...ge that loads will have 4 sub tabs located in the right configuration pane Click on the Trusted CAs tab and then the left box with the red up arrow icon This will prompt for the import of the Root Certificate There are 2 options for the import type DER and PEM DER is used to import a binary type format certificate and will open a file explorer to import the certificate The PEM type is used to impo...

Page 10: ...rate CSR tab Complete the dialog below with the minimum of the FQDN of the UX2000 in the Common Name field Once the dialog is populated click OK This will create the unsigned certificate that will have to be submitted to the Certificate Authority to be signed This submission process varies per installation and is out of the scope of this document ...

Page 11: ...signed from the Certificate Authority click on the UX Certificate tab Click on the green sign This will load a dialog similar to the Root Certificate import process Select either the DER or PEM format in the dropdown to match the file format of the UX Certificate to complete the process Shown below is the PEM format import process ...

Page 12: ...unking SIP Properties No of Channels Provide the total number of simultaneous calls expected to the SIP Trunking Provider Lync Server Pool Server Pool Host The FQDN of the Server or Server pool that the UX will communicate with Port Number The IP Port that the Server or Server pool listens on for SIP messages from the UX Border Element Servers Border Element Server IP or FQDN Address of the XO ser...

Page 13: ... the XO SIP signalling and media servers The internal IP addressing is setup during the initial installation of the UX2000 SBC and is outside the scope of this Configuration Guide 4 1 Configuring the Public Ethernet Port There are 5 Ethernet ports on the front of the UX2000 SBC The far left Admin is reserved for administrative use during the initial configuration The 4 other ports can be used for ...

Page 14: ...te for UX2000 SBC e Private IP Static Route if Needed 4 2 Selecting Unused Ethernet Port From the Settings Tab Node Interfaces Ports display select an Ethernet that is not currently used These are shown below Figure 7 Node Interfaces In Figure 7 Ethernet port 4 will be used for the Public IP connection Click the Right Arrow next to Lan4 to open the Configuration Dialog Supply the following informa...

Page 15: ...speed Configured Duplexity Leave this at Auto unless the Ethernet port will be connected to a device that can not automatically negotiate the port duplex settings Networking Mode Select Routed from the drop down Primary Address Supply the IP Address assigned to the UX2000 SBC Primary Netmask Supply the Netmask associated with the IP Address of the UX2000 SBC Configure Secondary Address Ensure this...

Page 16: ... the public IP network From the Settings Protocols IP Static Routes click on the green sign to add the route This will open the dialog for the IP Route Complete the dialog with the following information Figure 9 IP Default Route Destination IP Enter 0 0 0 0 Mask Enter 0 0 0 0 Gateway Enter the IP Address of the IP Default Router Metric Enter 1 Once configured click OK to apply the configuration ...

Page 17: ...the UX2000 SBC needs to communicate with multiple internal private IP addresses These static routes have to be deterministic because there can be only one default route and this is used on the public side If there are multiple internal networks then multiple static routes will be required The examples below show static routes for a private 10 0 0 0 network and a private 192 168 0 0 network ...

Page 18: ...UX2000 SBC XO SIP Trunk Lync Server 2010 Configuration Guide 18 Figure 11 Internal Static IP Route 1 Figure 12 Internal Static Route 2 ...

Page 19: ...e been installed along with Lync users The user should be familiar with Lync Server Topology Builder Lync Server Control Panel and Lync Server management Shell This section does not cover the basic installation of Lync Server 2010 5 1 Adding UX2000 SBC to Lync Server Topology The Lync Server topology needs to be modified by adding the UX2000 SBC as a Gateway device The Gateway device will be the i...

Page 20: ...e the radio button for TLS is selected Once the dialog is complete click OK Click on the sign next to the Mediation Pools to expand and the click on the configured Mediation Server Click on the Edit Properties link in the right hand pane to open the edit dialog as shown below Figure 14 Edit Mediation Server Dialog Click on the gateway FQDN ux krisno com in the none associated gateway table Once se...

Page 21: ...r 2010 to send calls to the XO SIP Trunk the UX2000 SBC will have to be added to the Routing Open Lync Server Control Panel and click on the Voice Routing link on the left hand pane Click on the Route tab on top of the right hand pane to show the dialog below Figure 15 Lync Server Control Panel Route Selection Click on the Add button next to Associated gateways table This will bring up a list of a...

Page 22: ... SBC is highlighted in the dialog and click OK Scroll down to the Associated PSTN Usages Click on the Select button to bring up the list of available PSTN Usages Select the proper PSTN Usages from the list and click OK With the PSTN Gateway selected and the PSTN Usages selected the dialog should be similar to below ...

Page 23: ...signed DIDs to Lync Users In order for Lync users to be called directly from the PSTN the Lync users will have to have the XO SIP Trunk DID numbers assigned This is done in the User section of Lync Server Control Panel Open the specific Lync user in Lync Server Control panel that will have a DID assigned to it Configure the DID in the Line URI configuration as shown below ...

Page 24: ...evices to be called directly from the PSTN the analog devices will have to have the proper XO SIP Trunk DID assigned to it This section does not go into details on configuring analog devices Please see the Lync Server 2010 documentation for further details Open Lync Server Management Shell Below is an example of how to create an analog contact as a fax machine and a XO SIP Trunk DID number of 1425...

Page 25: ...lated and additional lookups can be done to ensure the call is routed properly Incoming Signaling Group Receives Call and Sends Call to Assigned Route Table Translation Table Manipulates Information Elements Outbound Signaling Group Sends Call to Next Hop Incoming Call Outgoing Call Route Table Sends Call Information Elements to the Translation Table for Modification as Needed Route Table Sends Ca...

Page 26: ...e Routing Table as shown below Figure 21 Signaling Group 6 2 Call Routing Table The Call Routing Table will send the Called and Calling Party information elements to a Translation Table so that they can be modified if required to match the destination systems format Once the translations have been completed the Route Table will then route the call to the applicable SG for the destination system ...

Page 27: ...ly on the use of Regular Expressions as the numbers names are changed from what is received to what is sent to the destination Translation tables must have a matching entry format in order for the call to be routed to that route If there are no matching Translation table entries the call will be returned back to the Routing table so the next Route entry can be tried for a match This will happen as...

Page 28: ... from Lync 2010 Server in E 164 format to a US 10 digit number for routing into the XO SIP Trunk Input Field Type Called Address Number Used to capture the numeric portion of the Dialed Number Value 1 d 10 Regular Expression that looks for the 1 at the start of the Dialed Number and then captures the 10 digits that follows between the open and close parenthesis Output Field Type Called Address Num...

Page 29: ... Used to capture the numeric portion of the Dialed Number Value d 10 Regular Expression that looks for the 1 at the start of the Dialed Number and then captures the 10 digits that follows between the open and close parenthesis Output Field Type Called Address Number Identifies the Information Element that the Input Field Type should be translated to Value 1 1 Prepends 1 and Identifies the open and...

Page 30: ...ation The UX2000 initial configuration task from Section 1 of this guide will setup the required media settings for both the Lync 2010 Server and the XO SIP Trunk Media lists will be created and applied to the appropriate SGs Below are examples of a typical Media configuration Figure 26 Media Profiles Showing Enabled Codecs ...

Page 31: ...UX2000 SBC XO SIP Trunk Lync Server 2010 Configuration Guide 31 Figure 27 Typical G711Alaw Codec Settings Figure 28 Media List Containing G711Alaw and G711Ulaw ...

Page 32: ... Digit Relay Settings Figure 30 Signaling Group Showing Media List Selection 8 Enabling Media Transcoding Media Transcoding can be used for changing both codec and DTMF digit transfer methods Since Lync 2010 Server does not support both G 729 and inband DTMF digit transfer methods the UX2000 can be ...

Page 33: ...nating on the Lync 2010 Server using G711 and the matching Route table entry for XO has Transcoding enabled and calls out the Media list that is used for the XO SIP Trunk Figure 31 Media Trancoding Configuration 9 Analog Support Lync Server 2010 supports analog devices such as phones and fax machines in its topology The devices can be configured with DID numbers so that they can be dialed directly...

Page 34: ...ATA from Lync Server 2010 and route these differently than calls to the SIP Trunk Calls from the SIP Trunk will all go to the Lync 2010 Server The Route table in the UX2000 will have to have knowledge of all analog numbers so these calls can be routed to an ATA instead of to the SIP Trunk All other numbers that are not recognized as analog devices will then be routed to the PSTN through the XO SIP...

Page 35: ...UX2000 SBC XO SIP Trunk Lync Server 2010 Configuration Guide 35 Figure 33 PSTN to Analog Call Flow ...

Page 36: ...UX2000 SBC XO SIP Trunk Lync Server 2010 Configuration Guide 36 Figure 34 Lync Client to PSTN Call Flow Figure 35 Lync Client to Analog Call Flow ...

Page 37: ...UX2000 SBC XO SIP Trunk Lync Server 2010 Configuration Guide 37 Figure 36 Analog to Analog Call Flow ...

Page 38: ...UX2000 SBC XO SIP Trunk Lync Server 2010 Configuration Guide 38 Figure 37 Analog to PSTN Call Flow ...

Page 39: ... routing will be to send all calls from the Analog devices to the Lync Server 2010 Also since the UX2000 does not currently support Analog connections a separate ATA will be required 9 2 1 SIP Server Table The SIP Server table for the ATA is configured so that the UX2000 will know where to send analog calls to The SIP Server table is configured under Settings SIP SIP Server Tables Click on the gre...

Page 40: ...e Name Once the SIP Server Table Name has been created for the ATA click on the name in the list on the left pane From here click the right facing arrow right arrow will turn down as dialog opens next to the SIP Server name in the right hand pane to open the configuration dialog as shown below ...

Page 41: ...P Address of ATA Port SIP Signaling Listen Port of the ATA Protocol IP Protocol that will be used to reach the ATA The rest of the settings can stay default for a basic install 9 2 2 Analog Translation Table Add a Translation table that will be used to route to an ATA with Settings Translation Table The example below is adding a Translation table entry for a DID number assigned to the Tenor 206 AT...

Page 42: ...alog for this DID entry Enter the following information in the dialog Description Enter a description so this will be recognized as the ATA route Input Field Type Select Called Address Name from the dropdown Value Enter the number to route to this ATA as 14255551234 Output Field Type Select Called Address Name from the dropdown Value Enter 1 to route the contents of the Input Field When the dialog...

Page 43: ...outing 9 2 3 Signaling Group The Signaling Group for the ATA is configured at Settings Signaling Groups Click on the Add SIP SG link in the top of the right hand pane to add the name of the SIP SG The example bellows shows a SG with the name of Tenor 206 with the basic configuration changes made from the default dialog ...

Page 44: ...port SIP Server Table Select from the dropdown the name of the SIP Server table configured in the previous step Listen Ports The port s that the SG will listen to for SIP Signaling from the ATA Federated IP FQDN The IP Address of the ATA or Network Address of the ATA IP Network This is used to ensure the SG listens only to the originating ATA for SIP signalling Click OK to complete the dialog ...

Page 45: ... by clicking on Settings Call Routing Table Click on the Call Routing table for calls coming from Lync Server 2010 in this configuration it is the Lync Server 2010 Routing entry Once the table is opened click on the green sign to add the route to the table Configure the following to complete the dialog Description Add a description to associate with this route Number Name Translation Table Select ...

Page 46: ...e dialog and then click Resequence at the top of the Route Table entries In the dialog that opens click on the route for the ATA and then click Up to move this route to the top of the table This will ensure that the Route table will analyse the routes for the ATA first before the call is routed to the XO SIP Trunk ...

Page 47: ...Translation Table for ATA All Calls from the ATA will have to be routed to Lync Server 2010 A Translation table may be required to match the default number format on the Lync Server 2010 E 164 The Translation table below is used to add a to the called number from the ATA Figure 46 Translation Table to Add to Called Number ...

Page 48: ... Table and then on the green sign in the right hand pane Enter a name for the route table dialog as shown below Figure 47 Creating a Route Table for the ATA Click OK to complete the dialog Once Route Table is added complete the configuration dialog with the following information Description Enter description to associate with the route Number Name Translation Table Select the Translation Table fro...

Page 49: ...UX2000 SBC XO SIP Trunk Lync Server 2010 Configuration Guide 49 Figure 48 Routing Entry for Calls From ATA to Lync Server 2010 Click OK to complete the dialog ...

Page 50: ...us of the configured SGs and also a real time view of call status Also the current alarms will be shown in the Alarm Window at the bottom of the screen and the highest unacknowledged alarm color will show in the Monitor tab 10 1 1 Current SG Status and Call Activity The top portion of the Monitor display will show the current status of the SGs and their associated channels If a SG is down the SG w...

Page 51: ... rotated down from the top and a new log will start to write To view one of these logs click the blue box to the left of the file name This will open a web based text box that can be scrolled through to find certain debug information To download the log to either save or open in a text editor click on the Download link to the right of the file information This will open a dialog to either save to ...

Page 52: ...on Guide 52 Click OK to complete the dialog This will start sending the debug log information to the Syslog collector Different levels of collection may be required to shown applicable trouble shooting information Figure 52 Syslog Collector Configuration ...

Reviews: