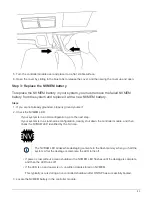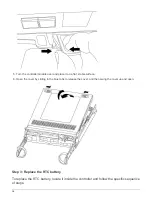
4. Locate the battery plug and squeeze the clip on the face of the battery plug to release the plug from the
socket, and then unplug the battery cable from the socket.
5. Remove the battery from the controller module and set it aside.
6. Remove the replacement battery from its package.
7. Loop the battery cable around the cable channel on the side of the battery holder.
8. Position the battery pack by aligning the battery holder key ribs to the “V” notches on the sheet metal side
wall.
9. Slide the battery pack down along the sheet metal side wall until the support tabs on the side wall hook into
the slots on the battery pack, and the battery pack latch engages and clicks into the opening on the side
wall.
10. Plug the battery plug back into the controller module.
Step 4: Reinstall the controller module
After you replace components in the controller module, reinstall it into the chassis.
Steps
1. If you are not already grounded, properly ground yourself.
2. If you have not already done so, replace the cover on the controller module.
3. Align the end of the controller module with the opening in the chassis, and then gently push the controller
module halfway into the system.
Do not completely insert the controller module in the chassis until instructed to do so.
4. Recable the system, as needed.
If you removed the media converters (QSFPs or SFPs), remember to reinstall them if you are using fiber
86


