


SAS shelves with IOM12 modules
Install and cable
Install and cable shelves for a new system installation - shelves with IOM12
modules
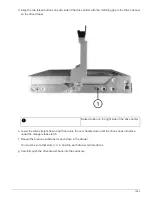
If your new system—HA pair or single-controller configuration—did not come installed in
a cabinet, you can install and cable the disk shelves in a rack.
Requirements for installing and cabling disk shelves with IOM12 modules for a new system installation
You must meet certain requirements before installing and cabling the disk shelves.
• You must have the installation and setup instructions for your platform model.
The installation and setup instructions address the complete procedure for your system installation, setup,
and configuration. You only use this procedure (
Install and cable shelves for a new system installation
) in
conjunction with the platform installation and setup instructions if you need detailed information about
installing or cabling the disk shelves to your storage system.
Installation and setup instructions can be found by navigating to your platform model documentation.
AFF and FAS System Documentation
• Disk shelves and controllers must not be powered on at this time.
• If you are using mini-SAS HD SAS optical cables, you must have met the rules in
.
Considerations for installing and cabling disk shelves with IOM12 modules for a new system
installation
You should familiarize yourself with aspects and best practices about this procedure
before installing and cabling the disk shelves.
General considerations
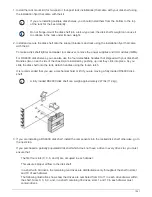
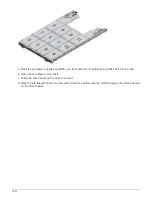
• Disk shelves with IOM12 modules are shipped with shelf IDs preset to 00.
If you have an HA pair with at least two stacks, the disk shelf containing the root aggregates
for the second stack has the shelf ID preset to 10.
You must set shelf IDs so they are unique within the HA pair or single-controller configuration. You can
manually set shelf IDs or have shelf IDs automatically assigned for all disk shelves in the HA pair or single-
controller configuration using a command in maintenance mode. Instructions for both methods are
provided.
• Disk shelves containing the root aggregates can be identified by the labels on the disk shelf box and disk
shelf chassis.
The labels show the stack number; for example, "`Loop or Stack #: 1 `" and "`Loop or Stack #: 2 `". Disk
1539
Summary of Contents for AFF A700
Page 4: ...AFF and FAS System Documentation 1...
Page 208: ...3 Close the controller module cover and tighten the thumbscrew 205...
Page 248: ...2 Close the controller module cover and tighten the thumbscrew 245...
Page 308: ...Power supply Cam handle release latch Power and Fault LEDs Cam handle 305...
Page 381: ...Power supply Cam handle release latch Power and Fault LEDs Cam handle 378...
Page 437: ...1 Locate the DIMMs on your controller module 434...
Page 605: ...602...
Page 1117: ...3 Close the controller module cover and tighten the thumbscrew 1114...
Page 1157: ...2 Close the controller module cover and tighten the thumbscrew 1154...
Page 1228: ...Power supply Cam handle release latch Power and Fault LEDs Cam handle 1225...
Page 1300: ...Power supply Cam handle release latch Power and Fault LEDs Cam handle 1297...
Page 1462: ...Installing SuperRail to round hole four post rack 1459...
Page 1602: ...1599...
Page 1630: ...1627...
Page 1634: ...Orange ring on horizontal bracket Cable chain 1631...
Page 1645: ...Guide rail 1642...
Page 1669: ...Attention LED light on 1666...