

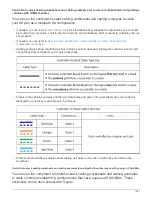

If your mixed stack connectivity is…
Then…
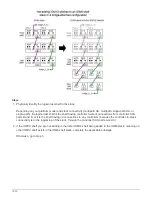
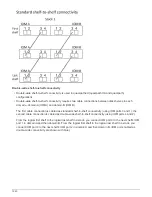
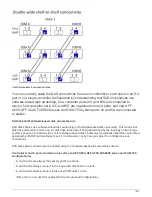
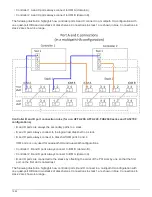
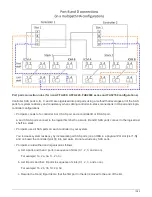
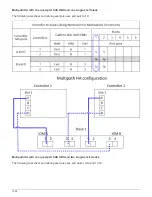
Bridge-attached connectivity in a MetroCluster
configuration
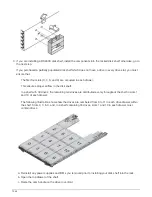
a. Move the bottom bridge-to-stack cable from the
old last IOM12 shelf to the same port on the
new last IOM12 shelf.
b. Cable the shelf-to-shelf connection between the
old last IOM12 shelf IOM A port 3 and the next
IOM12 shelf IOM A port 1, and then repeat this
for any additional IOM12 shelves.
Use a SAS copper Mini-SAS HD-to-Mini-SAS
HD cable.
c. Cable the shelf-to-shelf connection between the
old last IOM12 shelf IOM B port 3 and the next
IOM12 shelf IOM B port 1, and then repeat this
for any additional IOM12 shelves.
d. Go to step 4.
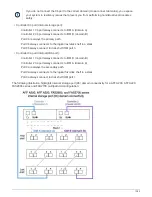
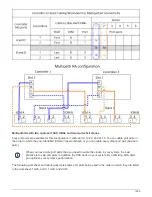
Single-path HA or single-path with no controller
connectivity to the logical last shelf
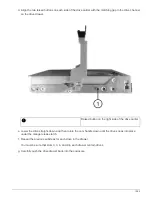
a. Cable the shelf-to-shelf connection between the
last IOM12 shelf IOM A port 3 and the new last
IOM12 shelf IOM A port 1.
Use a SAS copper Mini-SAS HD-to-Mini-SAS
HD cable.
b. Repeat the above substep for IOM B.
c. If you are hot-adding another IOM12 shelf,
repeat substeps a and b.
Otherwise, go to step 4.
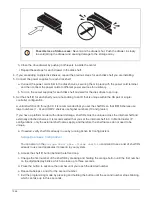
4. Verify that the SAS connections are cabled correctly.
If any cabling errors are generated, follow the corrective actions provided.
NetApp Downloads: Config Advisor
5. If you disabled automatic drive assignment as part of the preparation for this procedure, you need to
manually assign drive ownership and then re-enable automatic drive assignment, if needed.
Otherwise, you are done with this procedure.
All MetroCluster configurations require manual drive assignment.
Complete the hot-add
If you disabled automatic drive assignment as part of the preparation for hot-adding the
1574
Summary of Contents for AFF A700
Page 4: ...AFF and FAS System Documentation 1...
Page 208: ...3 Close the controller module cover and tighten the thumbscrew 205...
Page 248: ...2 Close the controller module cover and tighten the thumbscrew 245...
Page 308: ...Power supply Cam handle release latch Power and Fault LEDs Cam handle 305...
Page 381: ...Power supply Cam handle release latch Power and Fault LEDs Cam handle 378...
Page 437: ...1 Locate the DIMMs on your controller module 434...
Page 605: ...602...
Page 1117: ...3 Close the controller module cover and tighten the thumbscrew 1114...
Page 1157: ...2 Close the controller module cover and tighten the thumbscrew 1154...
Page 1228: ...Power supply Cam handle release latch Power and Fault LEDs Cam handle 1225...
Page 1300: ...Power supply Cam handle release latch Power and Fault LEDs Cam handle 1297...
Page 1462: ...Installing SuperRail to round hole four post rack 1459...
Page 1602: ...1599...
Page 1630: ...1627...
Page 1634: ...Orange ring on horizontal bracket Cable chain 1631...
Page 1645: ...Guide rail 1642...
Page 1669: ...Attention LED light on 1666...


