


• You must power cycle a shelf in order for the shelf ID to take effect.
The amount of time you wait before turning the power back on depends on the state of ONTAP, as
described later in this procedure.
Steps
1. Turn on the power to the disk shelf if it is not already on.
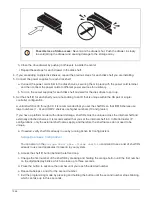
2. Remove the left end cap to locate the button near the shelf LEDs.
3. Change the first number of the shelf ID by pressing and holding the orange button until the first number on
the digital display blinks, which can take up to three seconds.
If the ID takes longer than three seconds to blink, press the button again, making sure to
press it in all the way.
This activates the disk shelf ID programming mode.
4. Press the button to advance the number until you reach the desired number from 0 to 9.
The first number continues to blink.
5. Change the second number of the shelf ID by pressing and holding the button until the second number on
the digital display blinks, which can take up to three seconds.
The first number on the digital display stops blinking.
6. Press the button to advance the number until you reach the desired number from 1 to 9.
The second number continues to blink.
7. Lock in the desired number and exit the programming mode by pressing and holding the button until the
second number stops blinking, which can take up to three seconds.
Both numbers on the digital display start blinking and the amber LED on the operator display panel
illuminates after about five seconds, alerting you that the pending disk shelf ID has not yet taken effect.
8. Power cycle the disk shelf to make the shelf ID take effect.
You must turn off both power switches, wait the appropriate amount of time, and then turn them back on to
complete the power cycle.
◦
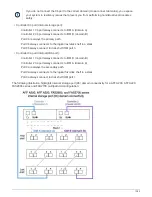
If ONTAP is not yet running or you are hot-adding a shelf (that has not yet been cabled to the system),
wait at least 10 seconds.
◦
If ONTAP is running (controllers are available to serve data), and all disk drives in the shelf are
unowned, spares, or part of offlined aggregate(s), wait at least 70 seconds.
This time allows ONTAP to properly delete the old shelf address and update the copy of the new shelf
address.
9. Replace the left end cap.
10. Repeat steps 1 through 9 for each additional disk shelf.
11. Verify that your system does not have duplicate shelf IDs.
1576
Summary of Contents for AFF A700
Page 4: ...AFF and FAS System Documentation 1...
Page 208: ...3 Close the controller module cover and tighten the thumbscrew 205...
Page 248: ...2 Close the controller module cover and tighten the thumbscrew 245...
Page 308: ...Power supply Cam handle release latch Power and Fault LEDs Cam handle 305...
Page 381: ...Power supply Cam handle release latch Power and Fault LEDs Cam handle 378...
Page 437: ...1 Locate the DIMMs on your controller module 434...
Page 605: ...602...
Page 1117: ...3 Close the controller module cover and tighten the thumbscrew 1114...
Page 1157: ...2 Close the controller module cover and tighten the thumbscrew 1154...
Page 1228: ...Power supply Cam handle release latch Power and Fault LEDs Cam handle 1225...
Page 1300: ...Power supply Cam handle release latch Power and Fault LEDs Cam handle 1297...
Page 1462: ...Installing SuperRail to round hole four post rack 1459...
Page 1602: ...1599...
Page 1630: ...1627...
Page 1634: ...Orange ring on horizontal bracket Cable chain 1631...
Page 1645: ...Guide rail 1642...
Page 1669: ...Attention LED light on 1666...


